JDK8
lambda :简化代码
lambda λ 组成 :
- 逗号隔开的参数列表 (x,x,x) ()
- 箭头符号 ->
- 方法体 (λ代码块)
示例
package lambda;
public class Demo01 {
public static void test01(){
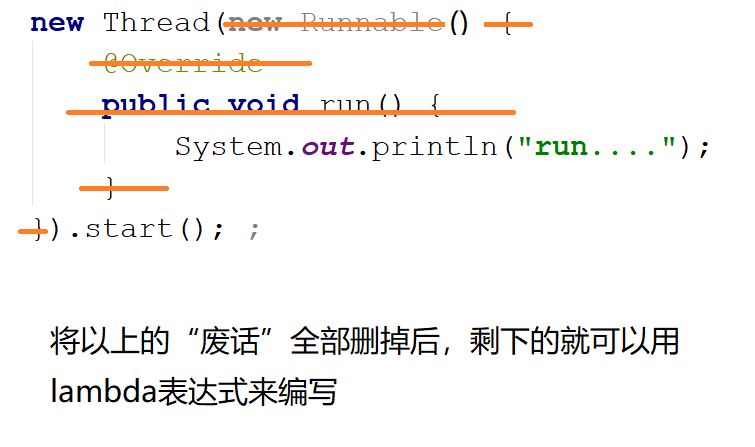
new Thread(new Runnable() {
@Override
public void run() {
System.out.println("run....");
}
}).start();
}
public static void test02(){
new Thread(
// () -> { System.out.println("run...."); }
() -> System.out.println("run....")
).start(); ;
}
public static void main(String[] args) {
// test01() ;
test02() ;
}
}
        new Thread(
                ()  ->  System.out.println("run....")
        ).start(); ;
以上述为例, new Thread( )中是一个接口、抽象类。但是为了避免 不能区分 lambda到底是重写的哪个方法,语法上lambda要求 重写的 接口、抽象类中 有且只能有一个 抽象方法。
仔细观察,lambda重写的接口、抽象类中 会标识一个@FunctionalInterface,称为函数式接口。
函数式接口:标注@FunctionalInterface,有且只有一个 抽象方法。
lambda表达式重写的 必须是 函数式接口(或者 只有一个抽象方法的抽象类)
函数式接口要注意以下几点:
- 即使没有标注@FunctionalInterface,但是只有一个抽象方法,也称之为函数式接口(接口中的方法的默认修饰符为public abstract
特殊情况:如果某个接口中有多个抽象方法,但只有1个抽象方法是本接口新定义的,其他抽象方法和Object中已有的方法重复,那么该接口仍然是函数式接口。
package lambda;

@FunctionalInterface
public interface MyInterface  {//everything is an Object
public abstract void a() ;//本接口新定义的抽象

public abstract String toString() ;//和Object中重名(实际会调用Object中的toString())
public abstract boolean equals(Object obj) ;//和Object中重名

//重点:toString()和equals()看似是抽象方法,实则是 有方法体的具体方法
}

class MyInterfaceImpl implements  MyInterface{
@Override
public void a() {
    System.out.println("a...");
}
}
class TestMyInterface{
public static void main(String[] args) {

    MyInterfaceImpl impl = new MyInterfaceImpl();
    impl.a();
    impl.equals("")  ;
    impl.toString();
}
}
MyInterface中的a()方法是 自己定义的,而其他equals()、toString()方法可以理解为 从Object中继承而来,因此 MyInterface虽然显示了3个抽象,但其实只有1个抽象。
() { return }
函数式接口从哪来?
- JDK自带 (很多存在于java.util.function包中)
四大核心函数式接口
有参,无返回值 (消费型:传给你一个参数,你把他给弄没了)
 @FunctionalInterface
 public interface Consumer<T> {
     void accept(T t);
     ...
 }
无参,有返回值(供给型:什么都没给你,你却给我了一个东西)
@FunctionalInterface
public interface Supplier<T> {
T get();
  }
有参,有返回值 (函数型:)
@FunctionalInterface
public interface Function<T, R> {
R apply(T t);
...
}
断言式接口
@FunctionalInterface
public interface Predicate<T> {
boolean test(T t);
...
}
自定义
lambda表达式的使用方式
方式一
函数式接口 引用名 = lambda表达式 ;(先实现在使用)
Predicate
    public static void test01(){
        //   boolean test(T t);
        Predicate<Integer> p = (num) ->  {return num < 10;} ;
        //Predicate<Integer> p = num ->  num < 10  ;
        System.out.println( p.test( 3  )   );
    }
    public static void test02(){
        //相当于将 MyMath中的add()方法进行了具体的实现
//        MyMath math =  (int n1,int n2) -> {  return  n1+n2 ;} ;
        MyMath math =  (n1,n2) -> {  return  n1+n2 ;} ;
        System.out.println(   math.add(1,100  )       );
    }
示例
package lambda;

import java.util.function.Consumer;
import java.util.function.Function;
import java.util.function.Predicate;
import java.util.function.Supplier;

public class Demo02 {
    public static void test01(){
        //   boolean test(T t);
//        Predicate<Integer> p = (num) ->  {return num < 10;} ;
        Predicate<Integer> p = num ->  num < 10  ;
        System.out.println( p.test( 3  )   );
    }

    public static void test02(){
        //相当于将 MyMath中的add()方法进行了具体的实现
//        MyMath math =  (int n1,int n2) -> {  return  n1+n2 ;} ;
         //lambda自带类型推断机制,因此参数的类型 可以省略
        MyMath math =  ( n1,n2) ->     n1+n2  ;
        System.out.println(   math.add(1,100  )       );
    }


    public static void test03(){
        // void accept(T t);
        Consumer<String> c = (x) ->  System.out.println("吃:"+x) ;

        c.accept("苹果");
    }

    public static void test04(){

        Supplier<Integer> supplier = ()->  (int)(Math.random()*9000+1000) ;
        System.out.println(   supplier.get() );
    }


    public static void test05(){

        Function<String,String> f = (s) -> s.toUpperCase() ;
        System.out.println(  f.apply("hello world"));
    }

        public static void main(String[] args) {

        test05();
    }
}
方式二
new Thread(
    ()  ->  System.out.println("run....")
).start(); ;
将lambda表达式所代表的函数式接口,作为一个方法的参数存在。
理解:方法B( 方法A ):函数式编程。scala javascript本身就支持函数式编程。
形式:方法( 函数式接口 )
package lambda;
import java.util.function.Consumer;
import java.util.function.Function;
import java.util.function.Predicate;
import java.util.function.Supplier;
public class Demo02 {
public static void test01(){
// boolean test(T t);
// Predicate<Integer> p = (num) -> {return num < 10;} ;
Predicate<Integer> p = num -> num < 10 ;
System.out.println( p.test( 3 ) );
}
public static void test02(){
//相当于将 MyMath中的add()方法进行了具体的实现
// MyMath math = (int n1,int n2) -> { return n1+n2 ;} ;
MyMath math = (n1,n2) -> n1+n2 ;
System.out.println( math.add(1,100 ) );
}
public static void test03(){
// void accept(T t);
Consumer<String> c = (x) -> System.out.println("吃:"+x) ;
c.accept("苹果");
}
public static void test04(){
Supplier<Integer> supplier = ()-> (int)(Math.random()*9000+1000) ;
System.out.println( supplier.get() );
}
public static void test05(){
Function<String,String> f = (s) -> s.toUpperCase() ;
System.out.println( f.apply("hello world"));
}
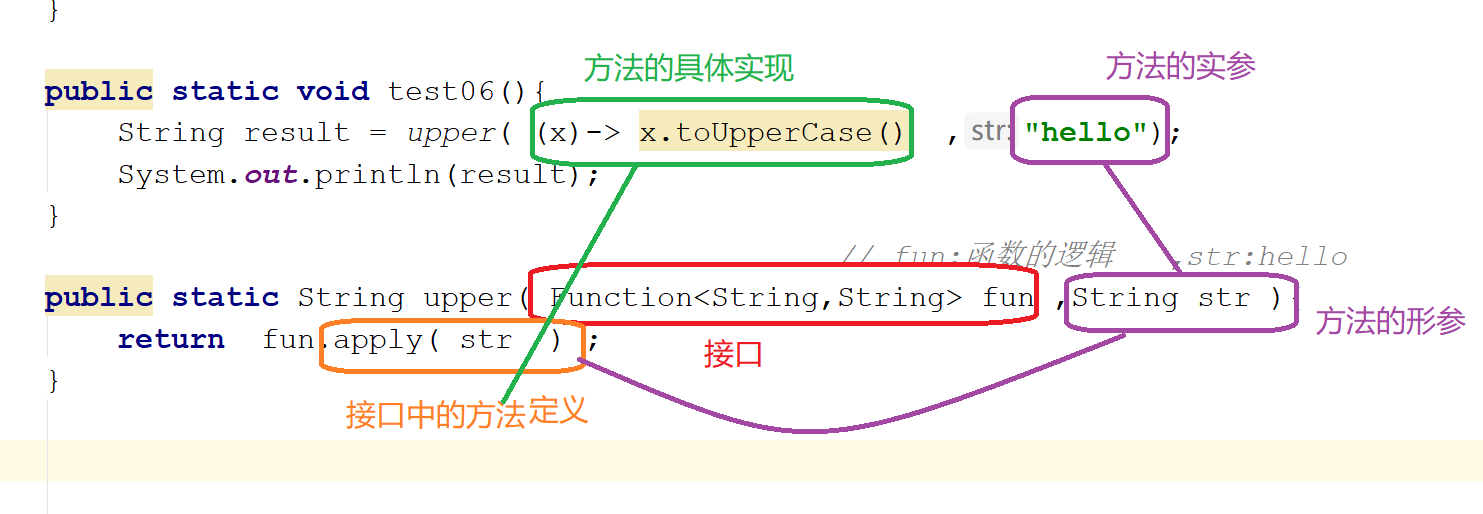
public static void test06(){
String result = upper( (x)-> x.toUpperCase() ,"hello");
System.out.println(result);
}
// fun:函数的逻辑 ,str:hello
public static String upper( Function<String,String> fun ,String str ){
return fun.apply( str ) ;
}
public static void test07(){
myPredicate( (x) -> x>18 , 10);
}
public static void myPredicate(Predicate<Integer> pre, Integer num ){
System.out.println( pre.test( num ) );
}
public static void main(String[] args) {
test07();
}
}
JDK8其他新特性简介
接口 的默认方法与静态方法
在Java 8中,可以使用default关键字在接口中定义默认方法,并提供默认的实现。之后,该接口的所有实现类都会默认地使用该实现方法。当然,实现类也可以对该默认方法进行重写。例如:
public interface MyInterface {
    default String myFunction() {
        return "hello world";
    }
}
此外,还可以在接口中定义静态方法,并提供默认实现。例如:
public interface MyInterface {
     static String myFunction() {
        return "hello world";
     }
}
方法引用
Java 8还允许使用::来引用一个已经存在的方法,其语法如下:
类名::方法名
注意:只写方法名即可,不需要写括号。
具体地讲,共有以下四种类型的引用。
| 类 型 | 示 例 |
|---|---|
| 引用静态方法 | ContainingClass::staticMethodName |
| 引用某个对象的实例方法 | ContainingObject::instanceMethodName |
| 引用某个类型的任意对象的实例方法 | ContainingType::methodName |
| 引用构造方法 | ClassName::new |
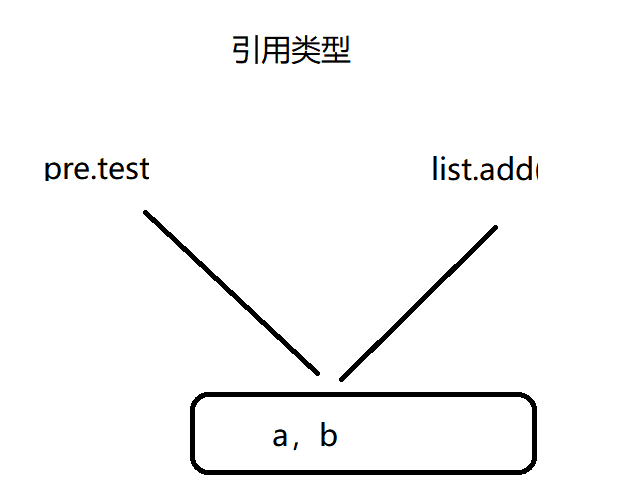
        ArrayList<String> list = new ArrayList<>() ;
      //  list.add(...);   参数:String,返回值:boolean

        Predicate<String> pre = list::add ;   // pre.test(  ):参数:String,返回值:boolean
        pre.test("a") ;
        pre.test("b") ;

        System.out.println(list);
重复注解
自从Java 5引入了注解以后,注解就被广泛应用于各个框架之中。但Java 5引入的注解存在一个问题:在同一个地方不能多次使用同一个注解。而Java 8就打破了这个限制,引入了重复注解的概念,允许在同一个地方多次使用同一个注解。
在Java 8中使用@Repeatable注解定义重复注解,代码示例如下:
@Repeatable(Authorities.class)
public @interface Authority {
     String role();
}

public @interface Authorities {
    Authority[] value();
}

public class RepeatAnnotationUseNewVersion {

    @Authority(role="Admin")
    @Authority(role="Manager")
    public void doSomeThing(){ }

}
在创建重复注解Authority时,加上@Repeatable并指向用于存储的注解Authorities。之后,在使用的时候,就可以重复使用Authority注解。
其他
Java 8 还提供了Nashorn引擎便于在JVM上运行JavaScript代码,提供了新的Date API,提供了对高并发的新支持,类依赖分析器jdeps……
集合
Collection:存储的数据是 不唯一、无序的对象
List:存储的数据是 不唯一、有序的对象
Set:存储的数据是 唯一、无序的对象
唯一:不能重复
有序:不是排序;是输入顺序 是否与 输出顺序一致的。
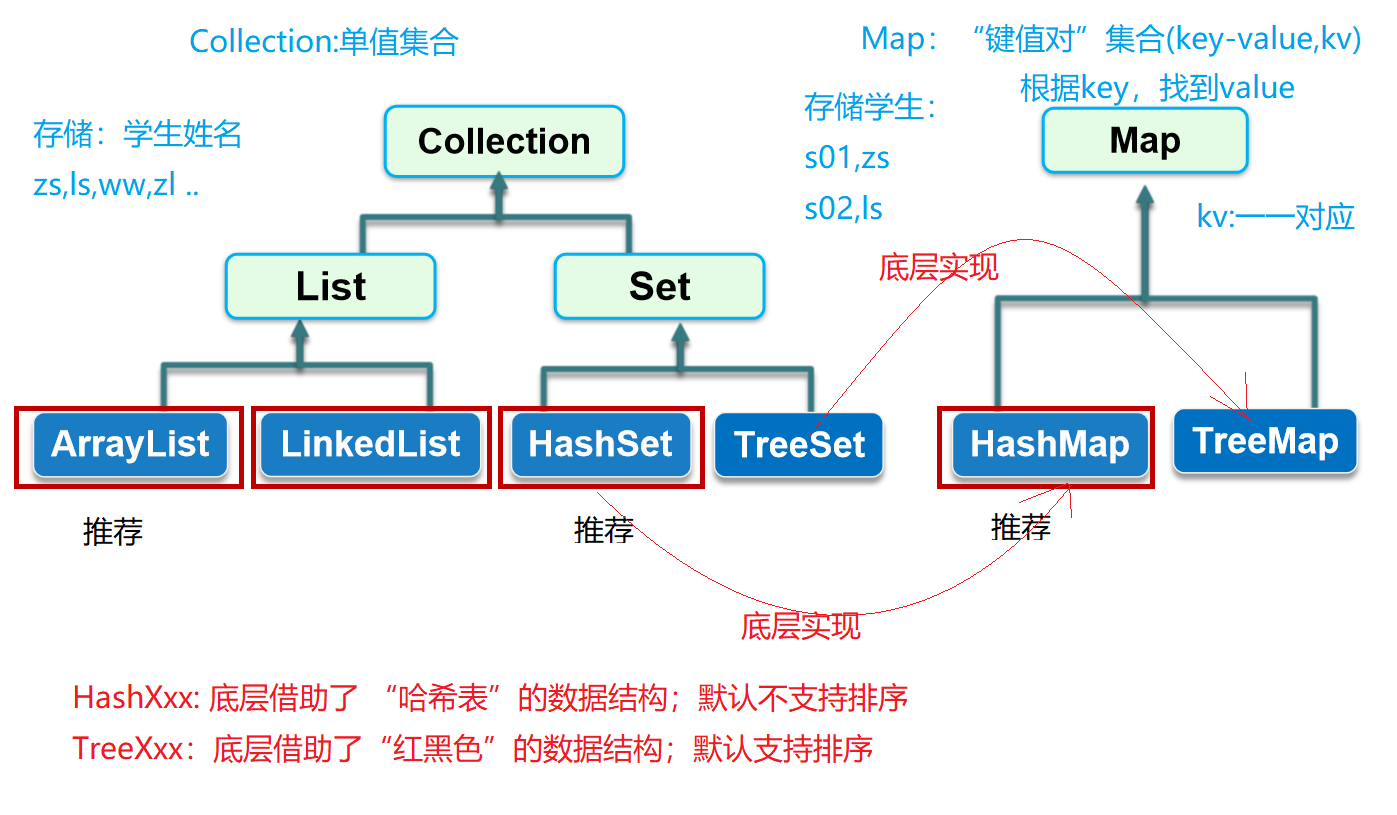
HashXxx:底层借助了“哈希表” 的数据结构;默认不支持排序 TreeXxx:底层借助了“红黑色”的数据结构;默认支持排序
set中的remove()为什么只能根据 内容删?不能根据下标删?
package col;

import java.util.ArrayList;
import java.util.Collection;
import java.util.HashSet;
import java.util.LinkedList;
public class Demo01 {
    public static void main(String[] args) {
        Collection list = new ArrayList();
        list.add("中国") ;
        list.add("美国") ;
        list.add("俄罗斯") ;
        System.out.println(list);


        LinkedList list2 = new LinkedList();
        list2.add("hello") ;
        list2.add("world") ;
        //LinkedList独有的方法
        list2.addLast("wh");
        list2.addFirst("hw");

//        list2.remove(1) ;
        list2.remove("world");

        System.out.println(list2);

        HashSet set = new HashSet() ;
        set.add("aa") ;
        set.add("bb") ;
        set.add("cc") ;
        set.remove("bb") ;//因为 set是无序的,因此无法根据“下标”删。只能根据内容删
        System.out.println(set);
    }
}
map中的key是唯一的;value是不唯一的
删除:
Collection中的类(List、Set),删除的返回值是 boolean;
Map中的类,是根据Key删除,返回值是value.
package col;

import java.util.Collection;
import java.util.HashMap;
import java.util.Set;

public class Demo02 {
    public static void main(String[] args) {
        HashMap map = new HashMap() ;
        map.put( "s01","张三")  ;//key:学号 ,value:姓名
        map.put( "s02","李四")  ;
        map.put( "s03","王五")  ;
        map.put( "s04","王五")  ;

        System.out.println(map);

        Object v = map.get("s01");//根据key,找到value

        System.out.println( v);

        System.out.println(map.size());
        //判断是否 包含了指定的Key
        System.out.println(    map.containsKey("s01")              );
        //判断是否 包含了指定的value
        System.out.println(    map.containsValue("王五")              );

        //将Map转为单值集合
        //转为只包含了key的单值集合

        Set set = map.keySet();//为什么是set,不是list?因为map中,key是唯一的
        System.out.println(set);

        //转为只包含了value的单值集合
        Collection values = map.values();
        System.out.println(values);

        Object a = map.remove("s01");//删除的返回值,就是删除的 value对象
        System.out.println(map);
        System.out.println(a);

    }
}
如何遍历集合?list set map
(1)循环for(普通for[只适用于‘有序’的集合],增强for[建议])
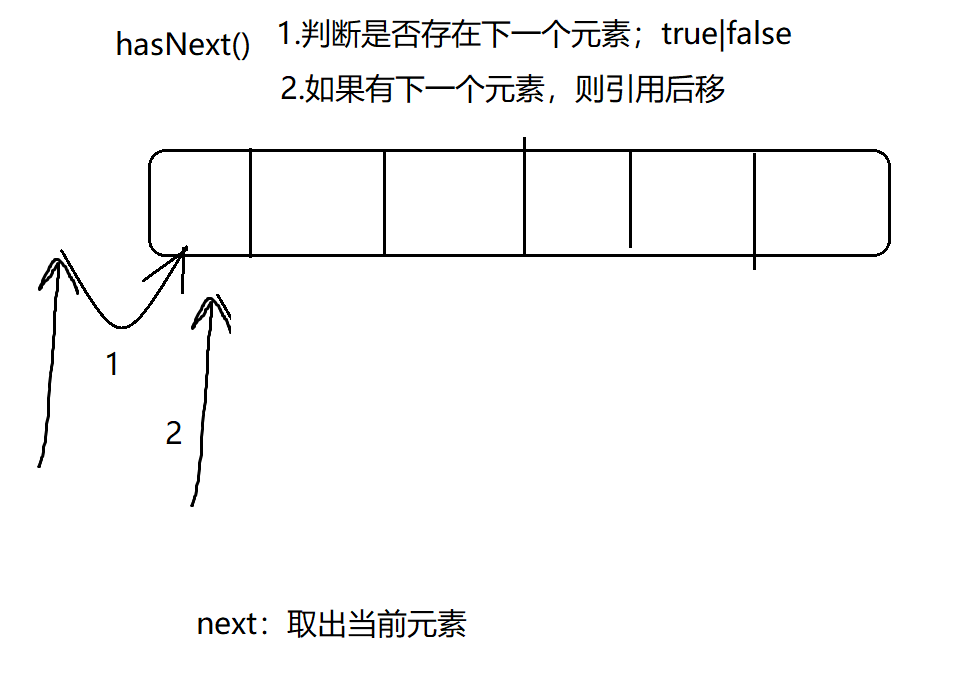
(2)迭代器
public interface Iterator<E> {...}
package col;

import java.util.*;

public class Demo03 {
    public static void main(String[] args) {

        List list = new ArrayList() ;
        list.add("aa") ;
        list.add("bb") ;
        list.add("cc") ;
        //普通for
        for(int i=0;i<list.size();i++){
            System.out.println(   list.get(i));
        }
        System.out.println("增强for");
        //增强for
        for(Object o :list){
            System.out.println(o);

        }

        Set set = new HashSet() ;
        set.add("A");
        set.add("b");
        set.add(1);
        set.add("D");
        //普通for,不适用于 “无序”的集合
//        for(int i=0;i<set.size();i++){
//            System.out.println(      set.get );
//        }

        for(Object e :   set){
            System.out.println(e);
        }
        System.out.println("迭代器");

        Iterator iterator = set.iterator();
        while(iterator.hasNext()){
            Object o = iterator.next();
            System.out.println(o);
        }

    }
}
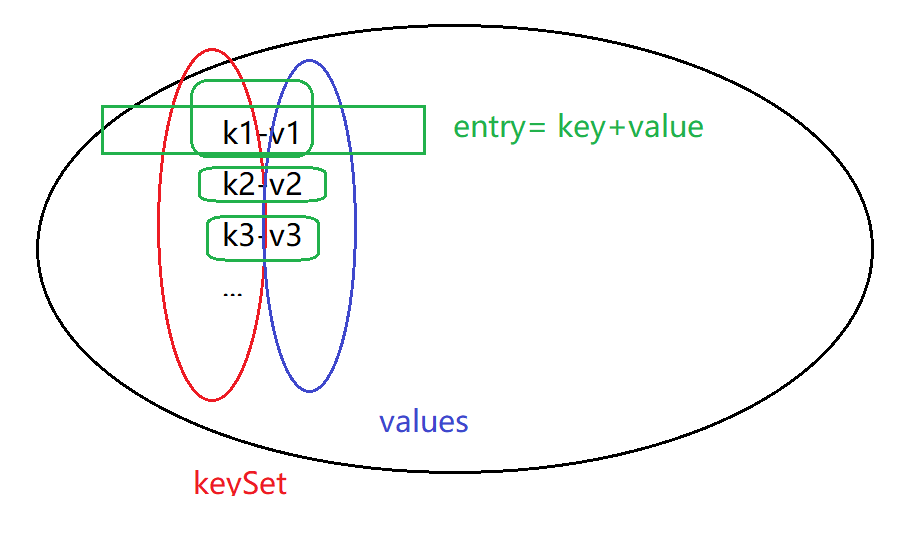
遍历map:将双值集合 ,转为单值集合。
map -> keySet
map->values
        System.out.println("遍历map。。。");
        Map map = new HashMap() ;
        map.put("s01","Zs") ;
        map.put("s02","ls") ;
        map.put("s03","ww") ;
        Set set1 = map.keySet();//将双值集合 降成单值集合
        for(Object o :set1){
            System.out.println("key:" +o);
            Object v = map.get(o);//map可以根据key,获取value; map.get(key) ->value
            System.out.println("value:"+v);

        }

//        Collection values1 = map.values();
//        Iterator iterator1 = values1.iterator();
//        while(iterator1.hasNext()){
//            System.out.println("value: "+iterator1.next() );
//        }

        System.out.println("通过entry遍历..");
        Set entries = map.entrySet();

        for(Object e :entries){
            Map.Entry et =  (Map.Entry)e ;
           Object k =  et.getKey();
            Object v = et.getValue();
            System.out.println("k-"+k);
            System.out.println("v-"+v);
        }
泛型
Collection、Map接口中都可以使用
自jdk1.5开始提供。
作用:
(1)数据安全
(2)防止类型转换时出错
list.add(默认是Object)
如果加了Double泛型,则自动变成 list.add(double…),返回值类似,会直接返回double类型的数据
简言之,以Double泛型为例。如果不加泛型,则默认操作的是Object类型,如果加了Double泛型,则默认操作的是Double类型。
package col;

import java.util.*;
public class Demo04 {
    public static void main(String[] args) {
//        List<String> list = new ArrayList<String>() ;
        List<String> list = new ArrayList<>() ;//jdk1.7之后提供类型推断
        list.add("a") ;
//        list.add(1) ;
        String s = list.get(0);
        System.out.println(s);

        Set<String> set =new HashSet<>() ;
        set.add("aa") ;

        //Key(学号s01),Value(名次)
        Map<String,Integer> map = new HashMap<>() ;
        map.put("s01",3);
        map.put("s02",1);
        map.put("s03",2);

        Set<Map.Entry<String,Integer>>  entries = map.entrySet();
        for(Map.Entry<String,Integer> entry :entries){
            System.out.println(  entry.getKey());
            System.out.println(  entry.getValue());
        }


        System.out.println("迭代器中...");
        //取key
        Set<String> keys = map.keySet();
        //遍历Key
        Iterator<String> iterator = keys.iterator();
        while(iterator.hasNext()){
            String key = iterator.next();
            Integer value = map.get(key) ;
            System.out.println(key+"--"+value);
        }


    }
}
示例:根据人的名字,查询这个人的全部信息。
package col;

import javax.sound.midi.Soundbank;
import java.util.HashMap;
import java.util.Map;
import java.util.Scanner;
import java.util.Set;
public class Demo05 {
    public static void main(String[] args) {
        Map<String,Person> map = new HashMap<>() ;
        Person p1 = new Person("zs",23,"xa");
        Person p2 = new Person("ls",24,"bj");
        Person p3 = new Person("ww",25,"sh");
        Person p4 = new Person("zl",26,"sz");
        Person p5 = new Person("sq",27,"tj");

        //key:名字    value:人
        map.put("zs",p1);
        map.put("ls",p2);
        map.put("ww",p3);
        map.put("zl",p4);
        map.put("sq",p5);

        System.out.println("请输入人的名字:");
        Scanner in = new Scanner(System.in) ;
        String name = in.next();

        Person person = map.get(name);
        System.out.println(person);//如果不是null,在打印时会调用toString;如果是null,则不调用。
//        System.out.println(person.toString());


//        Set<String> names = map.keySet();
//        //在names中查找name
//        for(String n :names){
//            if(n.equals( name )){
//                Person person = map.get(n);
//                System.out.println(person);
//            }
//        }
    }
}
集合工具类
集合工具类Collections:排序、复制、翻转等操作
数组工具类Arrays 排序、复制、翻转等操作 ,Arrays.sort(数组)
package col;

import java.util.ArrayList;
import java.util.Collections;
import java.util.List;
public class Demo06 {
    public static void main(String[] args) {
        List<String> list = new ArrayList<>();
        list.add("w") ;
        list.add("a") ;
        list.add("b") ;
        list.add("x") ;
        list.add("a") ;
        list.add("i") ;

        Collections.sort(list);
        System.out.println(list);

        System.out.println(   Collections.max(list) );
        System.out.println(   Collections.min(list) );

        //二分查法(使用前,必须保证集合元素是 自然有序的)
        System.out.println(  Collections.binarySearch( list,"i")     );
        //混洗,洗牌:打乱已有顺序
        Collections.shuffle(list);
        System.out.println(list);
        Collections.shuffle(list);
        System.out.println(list);

        Collections.reverse(  list);
        System.out.println(list);

        Collections.swap(list,  2,3);
        System.out.println(list);

        Collections.replaceAll(list, "a","A") ;
        System.out.println(list);

        Collections.fill(list,"H");
        System.out.println(list);
    }
}
package col;

import java.util.Arrays;

public class Demo07 {
    public static void main(String[] args) {
        int[] arr = new int[]{3,2,14,6,1};
        Arrays.sort(arr);

        for(int i=0;i<arr.length;i++){
            System.out.println(arr[i]);
        }
//
//        Arrays.fill(arr,5);
//        for(int i=0;i<arr.length;i++){
//            System.out.println(arr[i]);
//        }

        Arrays.sort(arr);
        //通过二分法,在arr中查找2的下标(前提是 数组已经排好序)
        int position = Arrays.binarySearch(arr, 2);
        System.out.println(position);


    }
}
比较器
list.add(3) ; //2 4 3 1 9
list.add(“b”) ; //b c a d w
Collections.sort(list) //能够识别一些自然顺序
但是,如果集合中的元素是 用户自定义对象,如何排序?
Person p1 = new Person(3,“zs”,23,6) ;
Person p2 = new Person(2,“ls”,24,2) ;
Person p3 = new Person(1,“ww”,25,8) ;
list.add(p1);
list.add(p2);
list.add(p3);
Collections.sort(list) //程序 无法知道 ,是根据什么排序? ->自定义比较器, 自定义“比较时,根据学号排”
自定义比较器:Comparable 、Comparator
Comparable: 内部比较器(侵入性,需要修改原有代码)
package col;
public class Person implements Comparable{
    private int id ;
    private String name ;
    private int age ;
    private String city;
    public Person() {
    }
    public Person(int id, String name, int age, String city) {
        this.id = id;
        this.name = name;
        this.age = age;
        this.city = city;
    }
    public Person( String name, int age, String city) {
        this.name = name;
        this.age = age;
        this.city = city;
    }

    public int getId() {
        return id;
    }

    public void setId(int id) {
        this.id = id;
    }

    public String getName() {
        return name;
    }

    public void setName(String name) {
        this.name = name;
    }

    public int getAge() {
        return age;
    }

    public void setAge(int age) {
        this.age = age;
    }

    public String getCity() {
        return city;
    }

    public void setCity(String city) {
        this.city = city;
    }

    @Override
    public String toString() {
        return "Person{" +
                "id=" + id +
                ", name='" + name + '\'' +
                ", age=" + age +
                ", city='" + city + '\'' +
                '}';
    }

    //重写比较器接口中的方法

    /*
        {1,3,5,7  }升序
        {7,5,3,1  }降序
        //输入源   3     1  7  5
           {3}

        返回值:
            1正数:当前对象大,    降序
            -1负数:传入的对象大 ,升序
            0:一样大
         传入一个Person对象和当前对象进行比较
     */
    @Override
    public int compareTo(Object o) {
        Person inputPerson = (Person)o ;
        //根据学号,降序
       int result =  this.id > inputPerson.id ?-1  : (   this.id   ==    inputPerson.id ?0:1 ) ;
       //如果学号相同,再根据姓名升序.  za  zs
        if(result  == 0 ){
            result = this.name .compareTo(      inputPerson.name) ;//调用String已经重写过的compareTo()
        }
        return result;
//        return 1;//当前对象,比传入对象大
    }
}
思路:将比较的对象(Person)实现Comparable接口,重写连的compareTo()方法。在compareTo()中编写比较的逻辑。重点是返回值,-1 ,0,1 ;
Comparator:外部比较器 (无侵入性,不影响原有代码)
1.先定义一个外部比较器
package col;

import java.util.Comparator;

public class MyComparatorWithId implements Comparator {
    @Override
    public int compare(Object o1, Object o2) {
        Student s1 =  (Student)o1 ;
        Student s2 =  (Student)o2 ;
        return   s2.getId() -  s1.getId()  ;
    }
}
2.使用外部比较器
package col;

import java.util.ArrayList;
import java.util.Collections;
import java.util.List;

//内部比较器
public class Demo08 {
    public static void main(String[] args) {
        List<Person> persons = new ArrayList<>() ;
        Person p1= new Person(10,"zs",23,"xa") ;
        Person p2= new Person(2,"ls",24,"xa") ;
        Person p3= new Person(2,"zs",25,"xa") ;
        persons.add(p1) ;
        persons.add(p2) ;
        persons.add(p3) ;

        Collections.sort( persons );

        System.out.println(persons);
        System.out.println("-------");
        Student s1 = new Student(10,"zs",23,"xa") ;
        Student s2 = new Student(2,"zs",26,"xa") ;
        Student s3 = new Student(3,"zs",24,"xa") ;
        List<Student> students = new ArrayList<>() ;
        students.add(s1);
        students.add(s2);
        students.add(s3);

        Collections.sort(  students,new MyComparatorWithId() );//给students使用了MyComparatorWithId比较器
        System.out.println(students);

    }
}
List
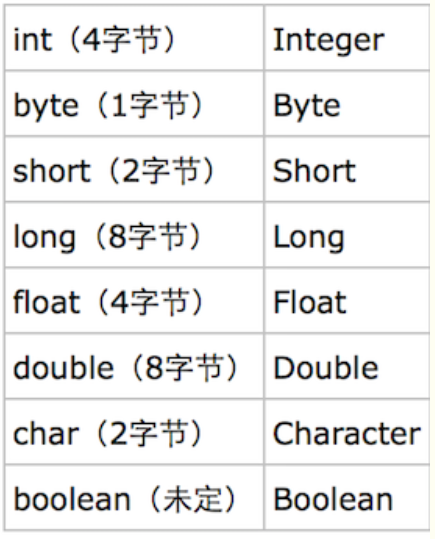
包装类(自动装箱、自动拆箱)
evething is an Object,万物皆对象。 属性、方法
自动装箱:基本类型 ->包装类型 ,int ->Integer
自动拆箱:包装类型->基本类型,Integer ->int
java中 将8个基本类型,包装成了8个对象类型(引用类型)。这8个对象类型 就成为包装类
package col;
public class BZL {
    public static void main(String[] args) {
        int i = 10 ;
        Integer j = new Integer(20) ;
        i = j ;//Integer->int  自动拆箱 底层用的是intValue()
        j = i ;//int ->Integer 自动装箱 底层用的是valueOf() ,该方法中有个缓冲区 [-128,127],如果要装箱的数字 在缓冲区范围以内,则直接从缓冲区中取;否则,new Integer()一个新对象
        Integer i1 = 100 ;
        Integer i2 = 100 ;
        Integer i3 = 1000 ;
        Integer i4 = 1000 ;
        System.out.println(i1 == i2);
        System.out.println(i3 == i4);

    }
}
异常
简介
try
{
    //一切正常,执行这里
}catch(Exception e)
{
    //如果不正常,执行这里(异常)
}
int[] nums = new int[3] ;
try
{
    //nums[n]一切正常,执行这里
}catch(Exception e)
{
    // nums[n]如果不正常,执行这里(异常)
}
如果代码出现问题时,使用“异常机制”比 选择结构 更加方便。
异常的继承结构图
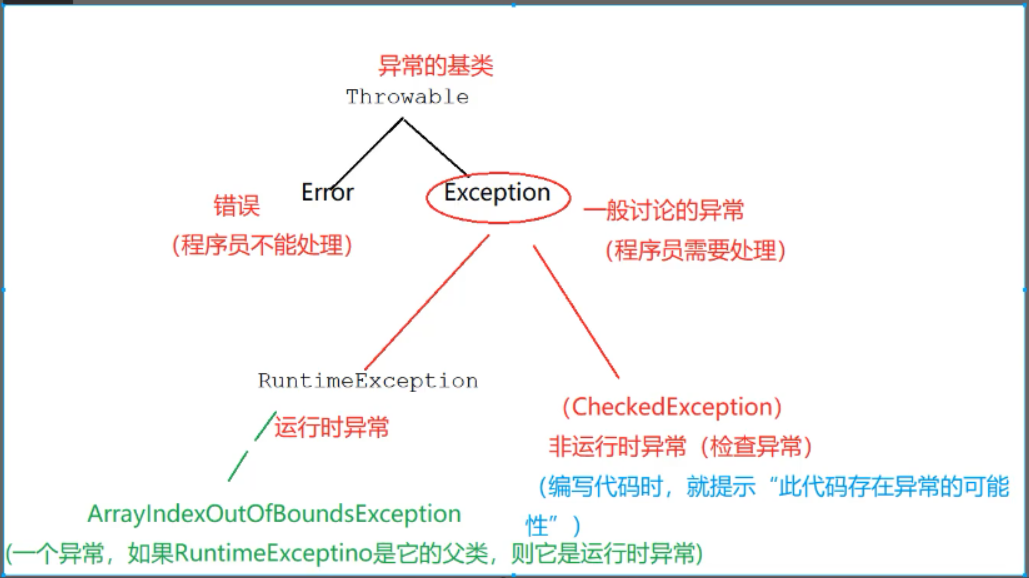
运行时异常:代码在编辑(编译阶段)时 不报错,运行时才报错。语法上, 可以选择性处理。
检查异常:代码在编辑(编译阶段)时报错。在编辑时,必须处理。(没有使用try catch包围)
异常重点
try catch finally throws throw
处理异常:try catch 或者 throws
try: 将可能发生异常的代码 用{}包裹起来
catch : 捕获特定类型的异常;捕获时,先写范围小的类型,后写范围大的类型
如果try中的代码的确发生了异常,则程序 不再执行try中异常之后的代码,而是直接跳到cath中执行
public class Demo01 {
    public static void main(String[] args) {
        int[] nums = new int[3] ;
        System.out.println(nums[3]);//运行时异常,选择性处理
//

//       Class.forName("ex.Demo01");//检查异常,强制处理
    }
}
try catch
自己(当前方法)能够处理,使用try catch .
throws
自己(当前方法)不能处理,上交给 上级(方法调用处)处理 ,使用throws .
    public static void test04() throws NullPointerException,ClassNotFoundException{//抛出异常,抛出给上级(方法调用处)
            Object obj = null   ;
            obj.equals("") ;//空指针
            Class.forName("xxx") ;
    }

    public static void main(String[] args) throws Exception{//继续往上抛出异常(JVM)
            test04();//异常
    }
finally
无论正常,还是异常,始终都会执行的代码
不论执行完try,还是执行完catch,最终都会执行finally的代码
1.即使遇到return ,也仍然会执行finally
2.除非虚拟机关闭,才不会执行finally
package ex;

public class Demo02 {

    public static void test01(){

        Object obj = null   ;
        try {
//            System.out.println("111");
            obj.equals("");//可能产生异常的代码
//            System.out.println("222");
//            System.out.println("正常时,关闭资源。。。");
        }catch (NullPointerException e){//捕获特定类型的异常
//            System.out.println("异常。。。");
//            System.out.println("发生了空指针异常。。");
//            System.out.println("异常时,关闭资源。。。");
        }finally{
            System.out.println("无论正常,还是异常,始终都会执行的代码。。。");
        }
    }

    public static int test02(){
        try{
            Object obj = null   ;

            System.exit(1);//关闭jvm
            obj.equals("") ;
            return 1 ;
        }catch (NullPointerException e){
                return 0 ;
        }finally{
            System.out.println("finally...");
        }
    }

    public static void main(String[] args) {
        test02() ;


    }
}
多个catch块
   public static void test03(){
        try{
            Class.forName("xxx") ;
            Object obj = null   ;
            obj.equals("") ;//空指针

            int[] nums = new int[3] ;
           nums[3] = 3 ;//数组越界异常

        }catch (NullPointerException e){//捕获空指针
            System.out.println("空指针异常..");
        }catch (ArrayIndexOutOfBoundsException e){
            System.out.println("数组越界异常...");
        }catch (Exception e) {//还有一些 根本临时想不到的异常
            System.out.println("其他异常。。。");
        }
    }
throw 一般和 自定义异常 一起使用
throw: 声明异常
jdk中自带了很多类型的异常,但如果 这些内置的异常 仍然不能满足项目的需求,那么就需要创建 自定义异常。
如何编写自定义异常:
1类,继承Exception,调用super(“异常信息”)
package ex;

//public class MyException  extends  Throwable{
//public class MyException  extends  NullPointerException{
public class MyException  extends  Exception{//推荐
    public MyException(String message){//异常信息
        super(message);
    }
}
2.使用throw 声明一个自定义异常、并且进行try catch或throws
package ex;
public class Demo03 {

    public static void main(String[] args)   {
        int age = 188 ;
        //约定,年龄不能大于120
        if(age<= 0 || age>120){
            try {
                //手工声明一个异常
                throw new MyException("年龄不能大于120");
            }catch ( MyException e ){
                e.printStackTrace();
                System.out.println(e.getMessage());
            }
        }
    }
}
在开发的过程中,要逐步积累异常,有助于提高我们的 排查bug的能力。
Java注解
类:要给一个类增强一些功能? 继承、实现一个接口 ,还可以使用注解
class A extends B
class A implements C
可以通过使用注解 增强类、方法、属性的功能。
内置注解
@Override :可以确保 重写的方法  的确存在于父类/接口中,可以有效的避免 单词拼错等情况。
@Deprecated:给用于提示,该方法由于安全、性能问题等 已经不推荐使用了。此外,在版本升级时,如果要计划删除一些方法,也通常会在前一个版本中 将该方法加上@Deprecated,然后再在后续版本中删除。

@SuppressWarnings(value="unchecked")//压制警告 (虽然可以使用SuppressWarnings压制警告,但不建议使用。)//忽略对泛型等的检查操作。value值:unchecked ,deprecation(忽略一些过期的API) ,unused (是否未被使用)  ,fallthrough(swtich 是否一致往下执行,而没有break);path(忽略 对类路径不存在的检查)  ,serialVersionUID(忽略 一个类可以序列化、但却没有序列化的 警告),all
package annotaion;

import java.io.Serializable;
import java.util.ArrayList;
import java.util.List;

class Father {
    public void eat() {
        System.out.println("father eat...");
    }
}

class Son extends Father{
    @Override
    public void eat() {
        System.out.println("son eat...");
    }

    @Deprecated
    public void test(){

    }
}


//压制警告 (虽然可以使用SuppressWarnings压制警告,但不建议使用。)
@SuppressWarnings(value="all")//忽略对泛型等的检查操作
public class Demo01 {
    public static void main(String[] args) {
        int a = 1 ;

        Father f = new Son();
        f.eat();

        new Thread().stop();
        new Son().test();
        List list = new ArrayList();
    }
}
自定义注解
public @interface MyAnnotation {
}
元注解
元数据:修饰数据的数据
元注解:修饰注解的注解, @Target、@Retention、@Document、@Inherited
@Target:限制注解 可以使用的位置
限制注解 能够使用哪些元素上(属性、方法、类);如果一个注解没有@Target描述,则该注解 可以修饰任何类型的元素; 如果有@Target修饰,该注解就只能用于 被@Target修饰的地方
哪些位置? ElementType.枚举
/*
 * Copyright (c) 2003, 2013, Oracle and/or its affiliates. All rights reserved.
 * ORACLE PROPRIETARY/CONFIDENTIAL. Use is subject to license terms.
 */

package java.lang.annotation;

/**
 * The constants of this enumerated type provide a simple classification of the
 * syntactic locations where annotations may appear in a Java program. These
 * constants are used in {@link Target java.lang.annotation.Target}
 * meta-annotations to specify where it is legal to write annotations of a
 * given type.
 *
 * <p>The syntactic locations where annotations may appear are split into
 * <em>declaration contexts</em> , where annotations apply to declarations, and
 * <em>type contexts</em> , where annotations apply to types used in
 * declarations and expressions.
 *
 * <p>The constants {@link #ANNOTATION_TYPE} , {@link #CONSTRUCTOR} , {@link
 * #FIELD} , {@link #LOCAL_VARIABLE} , {@link #METHOD} , {@link #PACKAGE} ,
 * {@link #PARAMETER} , {@link #TYPE} , and {@link #TYPE_PARAMETER} correspond
 * to the declaration contexts in JLS 9.6.4.1.
 *
 * <p>For example, an annotation whose type is meta-annotated with
 * {@code @Target(ElementType.FIELD)} may only be written as a modifier for a
 * field declaration.
 *
 * <p>The constant {@link #TYPE_USE} corresponds to the 15 type contexts in JLS
 * 4.11, as well as to two declaration contexts: type declarations (including
 * annotation type declarations) and type parameter declarations.
 *
 * <p>For example, an annotation whose type is meta-annotated with
 * {@code @Target(ElementType.TYPE_USE)} may be written on the type of a field
 * (or within the type of the field, if it is a nested, parameterized, or array
 * type), and may also appear as a modifier for, say, a class declaration.
 *
 * <p>The {@code TYPE_USE} constant includes type declarations and type
 * parameter declarations as a convenience for designers of type checkers which
 * give semantics to annotation types. For example, if the annotation type
 * {@code NonNull} is meta-annotated with
 * {@code @Target(ElementType.TYPE_USE)}, then {@code @NonNull}
 * {@code class C {...}} could be treated by a type checker as indicating that
 * all variables of class {@code C} are non-null, while still allowing
 * variables of other classes to be non-null or not non-null based on whether
 * {@code @NonNull} appears at the variable's declaration.
 *
 * @author  Joshua Bloch
 * @since 1.5
 * @jls 9.6.4.1 @Target
 * @jls 4.1 The Kinds of Types and Values
 */
public enum ElementType {
    /** Class, interface (including annotation type), or enum declaration */
    TYPE,

    /** Field declaration (includes enum constants) */
    FIELD,

    /** Method declaration */
    METHOD,

    /** Formal parameter declaration */
    PARAMETER,

    /** Constructor declaration */
    CONSTRUCTOR,

    /** Local variable declaration */
    LOCAL_VARIABLE,

    /** Annotation type declaration */
    ANNOTATION_TYPE,

    /** Package declaration */
    PACKAGE,

    /**
     * Type parameter declaration
     *
     * @since 1.8
     */
    TYPE_PARAMETER,

    /**
     * Use of a type
     *
     * @since 1.8
     */
    TYPE_USE
}
自定义一个注解
//修饰该注解 只能在 属性、方法上使用
@Target(value= {ElementType.FIELD   ,ElementType.METHOD} )
public @interface MyAnnotation {
    /*
        用定义方法的形式,定义一个属性 value
        方法的名字,就是属性的名字;方法的返回值,就是属性的类型
     */
    String value()  default "张三";//String value = "张三" ;
    int age() default  22 ;
}
使用
public class TestMyAnnotation {
    @MyAnnotation(value="李四",age=33)
    public void test(){

    }
}
@Retention:限制注解的生命周期
public enum RetentionPolicy {
    /**
     * Annotations are to be discarded by the compiler.
       jvm直接将该注解丢弃 ,写了跟没写一样
     */
    SOURCE,

    /**
     * Annotations are to be recorded in the class file by the compiler
     * but need not be retained by the VM at run time.  This is the default
     * behavior.
       .java -> .class
       程序在编译时 会使用注解,在运行时不会使用
     */
    CLASS,

    /**
     * Annotations are to be recorded in the class file by the compiler and
     * retained by the VM at run time, so they may be read reflectively.
     *
     * @see java.lang.reflect.AnnotatedElement
       程序在编译以及运行时,都会使用注解
     */
    RUNTIME
}
自定义注解如何使用? 结合反射使用。
注解+反射 什么时候会真正使用? 开发框架 ,instanceof判断类型
使用注解案例
package annotaion;

import java.lang.annotation.Annotation;

public class TestMyAnnotation {


    @MyAnnotation(value="李四",age=33)
    @Deprecated
    public static void test() throws  Exception{

        Annotation[] annotations = Class.forName("annotaion.TestMyAnnotation").getMethod("test").getAnnotations();
        for(Annotation a :annotations){
            if(a  instanceof  MyAnnotation ){//@MyAnnotation
                System.out.println(    ((MyAnnotation)a)  .value()     );
                System.out.println(    ((MyAnnotation)a)  .age()     );
            }else{//@Deprecated
                System.out.println(        "@Deprecated"     );
            }
        }
    }

    @SuppressWarnings("all")
    public static void main(String[] args) throws  Exception {
        test() ;
    }
}
运行结果
李四
33
@Deprecated
@Document:
javadoc:java帮助文档。 ABC.java -> 帮助文档
默认情况下,javadoc不包含 注解的解释;如果现在javadoc文档中 也包含对注解的说明,则需要使用 @Document标注
例如,一下MyAnnotation注解,会在生成javadoc时,被显示在文档中
@Documented
public @interface MyAnnotation {

}
@Inherited:继承
@Inherited
public @interface MyAnnotation {
}

@MyAnnotation
public  class A{}

public  class B extends A{}//默认情况下,B不会继承A中的注解;如果要想继承,则需要加@Inherited
IO
输入流InputStream 输出流OutputStream
java.io.*
文件:硬盘上的文件 txt docx 电影 图片
本章的核心:通过 IO 来操作文件。
File
import java.io.File;
import java.io.IOException;

public class Demo01 {
    public static void main(String[] args) {
        //file:文件\目录\不存在的文件或目录
//        File file = new File("d:/abc.txt");
        File file = new File("hello.txt");
        System.out.println("相对路径:"+file.getPath() );
        System.out.println("绝对路径:"+file.getAbsolutePath());
        System.out.println("文件名称:"+file.getName() );
        System.out.println("文件大小:"+file.length() );//单位字节

        System.out.println(      file.isFile()==true? "文件":"非文件" );
        System.out.println(      file.isDirectory()==true? "目录":"非目录" );
        boolean flag = file.exists();
        try {
            if(flag) {
//                file.delete();
                //彻底删除(不过回收站)
                System.out.println("删除成功");
            }
            else {
                file.createNewFile();
                System.out.println("创建成功");
            }
        } catch (IOException e) {
            e.printStackTrace();
        }
    }
}
相对路径/绝对路径:
- 如果FIle("绝对路径"):getPath() 和getAbsolutePath()的结果一致,打印的都是绝对路径
- 如果FIle("相对路径"):getPath() 打印相对路径;getAbsolutePath()打印绝对路径
流
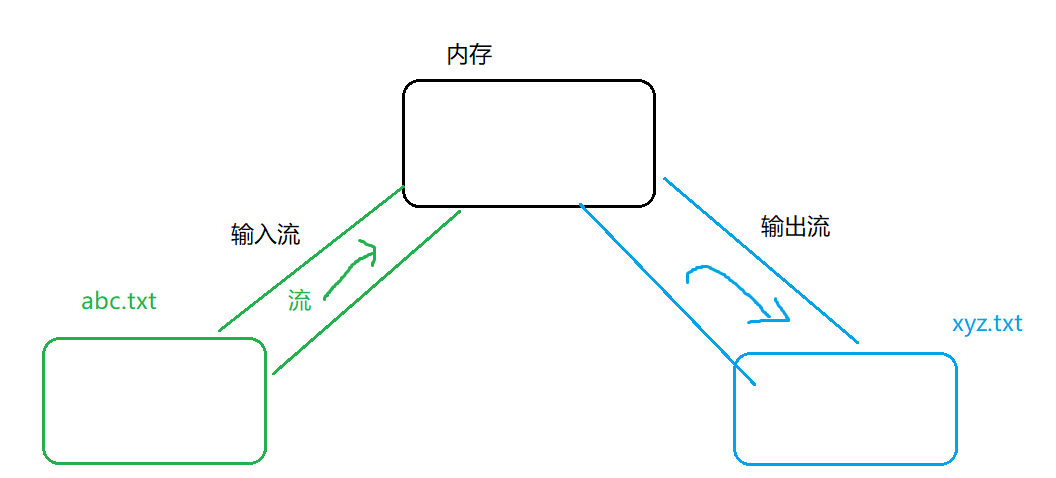
流:是一种FIFO(先进先出)的数据结构
分类:
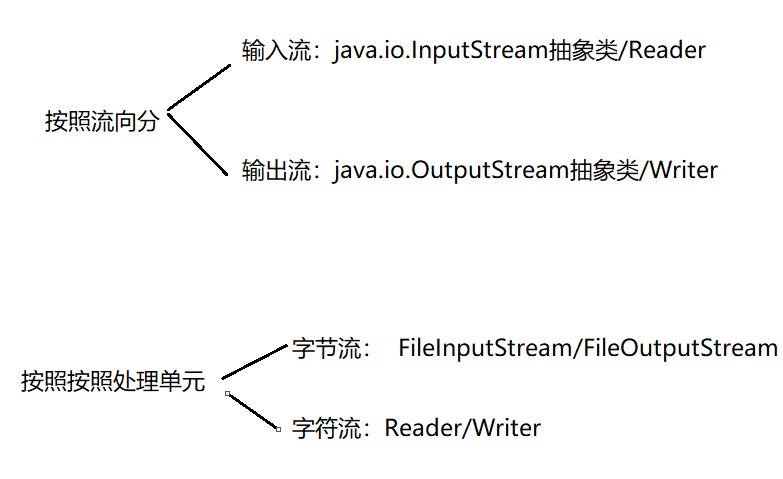
说明:1.字节流就是 将内容转为了字节形式进行传输, 1 字节 ->8二进制 ,二进制可以传输任何类型的数据,因此字节流也可以传输任何类型的数据。
2.字节流是8位通用字节流( 1 字节 ->8二进制 ) (字节流可以处理任何类型,处理文本文件以外的其他文件) ;字符流是16位的unicode字符流 (只用于处理字符,处理文本文件)
3.在while循环中 分批次传输时,字节流使用的缓冲区是 byte[],字符流使用的缓冲区是 char[]
- 其他流
文件复制

输入
import java.io.File;
import java.io.FileInputStream;
import java.io.IOException;
import java.io.InputStream;

public class InputStreamDemo {
    public static void main(String[] args) {
        InputStream in = null ;
        try {
            in =   new FileInputStream(new File("d:/abc.txt"));
//            InputStream in = new FileInputStream("d://abc.txt");
            System.out.println(in.available());//file.length()
            byte[] buf = new byte[in.available()] ;
            in.read(buf);//将文件abc.txt内容读取到buf中
            //buf :byte[] ->String
            System.out.println(new String(buf));
        }catch (Exception e){
            e.printStackTrace();
        }finally {
            try {
                in.close();
            } catch (IOException e) {
                e.printStackTrace();
            }
        }
    }
}
输出
import java.io.FileNotFoundException;
import java.io.FileOutputStream;
import java.io.IOException;
import java.io.OutputStream;
public class OutputStreamDemo {
    public static void main(String[] args) {
        OutputStream out = null ;
        try {
             out = new FileOutputStream("d:/xyz.txt") ;
             out.write("helloworld123".getBytes()); //内存->xyz.txt
        } catch (FileNotFoundException e) {
            e.printStackTrace();
        } catch (IOException e) {
            e.printStackTrace();
        }finally {
            try {
                out.close();
            } catch (IOException e) {
                e.printStackTrace();
            }
        }
    }
}
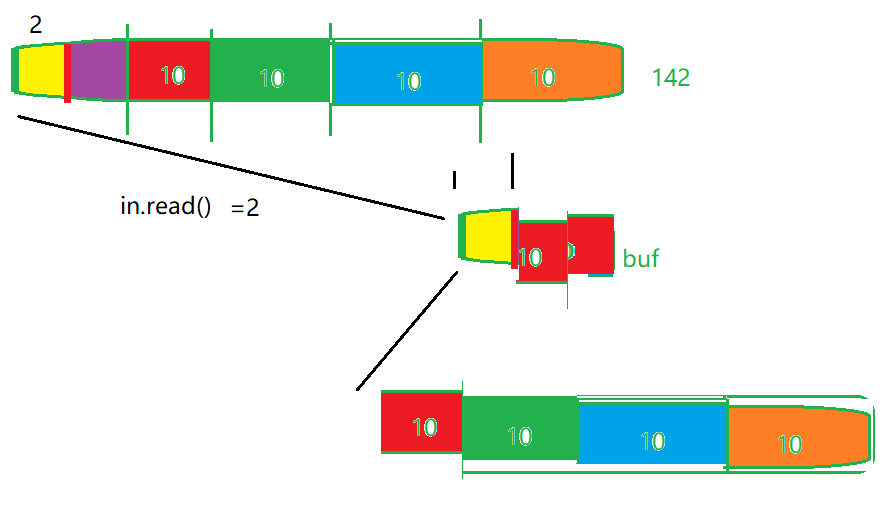
文件复制
import java.io.*;

public class FileCopy {
    //abc.txt->内存->xyz.txt
    public static void main(String[] args) {
        InputStream in = null ;
        OutputStream out = null ;
        try {
            //abc.txt->内存
             in = new FileInputStream("d:/abc.txt") ;
             out = new FileOutputStream("d:/xyz.txt") ;
            //开辟10字节的内存
            byte []buf = new byte[10] ;
            int len = -1 ;
            ;
        while(   (len= in.read(buf)) != -1){//in ->buf
            out.write(buf,0,len);//buf->out
        }

        } catch (FileNotFoundException e) {
            e.printStackTrace();
        } catch (IOException e) {
            e.printStackTrace();
        }finally {
            try {
                if(out !=null)out.close();
                if(in !=null) in.close();
            } catch (IOException e) {
                e.printStackTrace();
            }
        }
    }
}
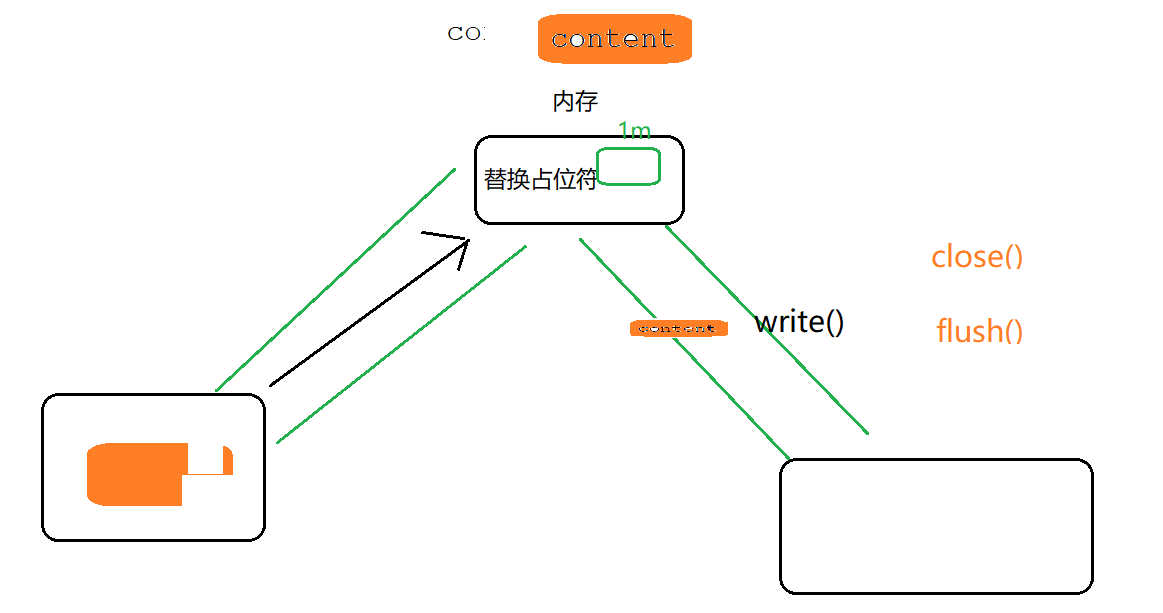
使用字符流进行文件的复制
import java.io.*;

public class FileCopyCharactor {
    public static void main(String[] args) {
        //文件->内存(Reader)
        Reader reader = null ;
        Writer writer = null ;
        try {
             reader = new FileReader("d:/个人介绍.txt");
             writer = new FileWriter("d:/个人完整介绍.txt") ;

            char[] buf = new char[4];
            StringBuffer sb = new StringBuffer() ;

            int len = -1 ;
            while((len =reader.read(  buf)) != -1 ){
                // str += buf ;
                sb.append(buf,0,len) ;//将每次读取到的 4个字符 拼接起来
            }
            System.out.println(sb);
            //在内存中 替换占位符
            String content = sb.toString() ;
            content= content.replace("{name}","哈哈")
                    .replace("{enterprise}","xx")
                    .replace("{weixin}","xx");

            //将替换后的内容 输出到文件   ,内存 ->文件(Writer)
            writer.write(content);
            System.out.println("成功...");

//            writer.flush(); 将管道中的数据 刷出到 文件中

        } catch (FileNotFoundException e) {
            e.printStackTrace();
        } catch (IOException e) {
            e.printStackTrace();
        }finally {
            try {
               if(writer!=null) writer.close();
                if(reader!=null) reader.close();
            } catch (IOException e) {
                e.printStackTrace();
            }

        }
    }
}
自带缓冲区的字符流:缓冲区大小,一行
BufferedReader /BufferedWriter
import java.io.*;

public class FileCopyCharactorBuffered {
    public static void main(String[] args) {
        //文件->内存(Reader)
        Reader reader = null ;
        Writer writer = null ;

        BufferedReader br = null ;
                BufferedWriter bw = null ;

        try {
             reader = new FileReader("d:/个人介绍.txt");
             writer = new FileWriter("d:/个人完整介绍2.txt") ;


             br = new BufferedReader( reader) ;
             bw = new BufferedWriter( writer);

            StringBuffer sb = new StringBuffer() ;

            String line = null ;

            while( (line= br.readLine()) != null   ){
                sb.append(line) ;
            }

            System.out.println(sb);

            //在内存中 替换占位符
            String content = sb.toString() ;
            content= content.replace("{name}","哈哈")
                    .replace("{enterprise}","xx")
                    .replace("{weixin}","xx");

            //将替换后的内容 输出到文件   ,内存 ->文件(Writer)


            bw.write(content);
            System.out.println("成功...");

//            writer.flush(); 将管道中的数据 刷出到 文件中

        } catch (FileNotFoundException e) {
            e.printStackTrace();
        } catch (IOException e) {
            e.printStackTrace();
        }finally {

            /*
            *    1先关出,再关入
            *    2从外往内关  br外 = new BufferedReader( reader内) ;
            * */
            try {
               if(bw != null) bw.close();
              if(br!=null )  br.close();
               if(writer!=null) writer.close();
                if(reader!=null) reader.close();
            } catch (IOException e) {
                e.printStackTrace();
            }
        }


    }
}
带缓冲区的字符流 对象 = new 带缓冲区的字符流(字符流) ;
二进制流
DataInputStream/DataOutputStream
二进制流 对象 = new 二进制流(字节流) ;
import java.io.*;
//二进制流
public class FileCopyData {
    //abc.txt->内存->xyz.txt
    public static void main(String[] args) {
        InputStream in = null ;
        OutputStream out = null ;
        InputStream dataInput = null ;
        OutputStream dataOutput = null ;
        try {
            //abc.txt->内存
             in = new FileInputStream("d://xx.JPG") ;

              dataInput = new DataInputStream(in) ;//字节流->二进制流

             out = new FileOutputStream("e:/xx.jpg") ;
              dataOutput = new DataOutputStream(out );//字节流->二进制流

            //开辟10字节的内存
            byte []buf = new byte[10] ;
            int len = -1 ;

        while(   (len= dataInput.read(buf)) != -1){//in ->buf
            dataOutput.write(buf,0,len);//buf->out
        }
            System.out.println("成功");

        } catch (FileNotFoundException e) {
            e.printStackTrace();
        } catch (IOException e) {
            e.printStackTrace();
        }finally {
            try {
                if(dataOutput !=null) dataOutput.close();
                if(dataInput !=null) dataInput.close();
                if(out !=null)out.close();
                if(in !=null) in.close();
            } catch (IOException e) {
                e.printStackTrace();
            }


        }
    }
}
装饰模式:IO设计的核心思想
在不影响原有对象的前提下,无侵入的给一个对象增一些额外的功能。(套娃!!)
new InputStreamReader( new FileInputStream(new File(“d:/abc.txt”)) ) ;
装饰模式
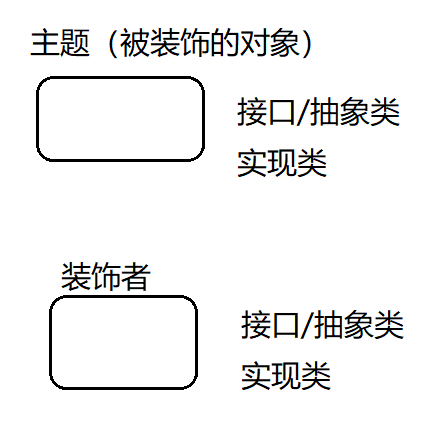
装饰者:需要持有主题(被装饰者)的一个引用。
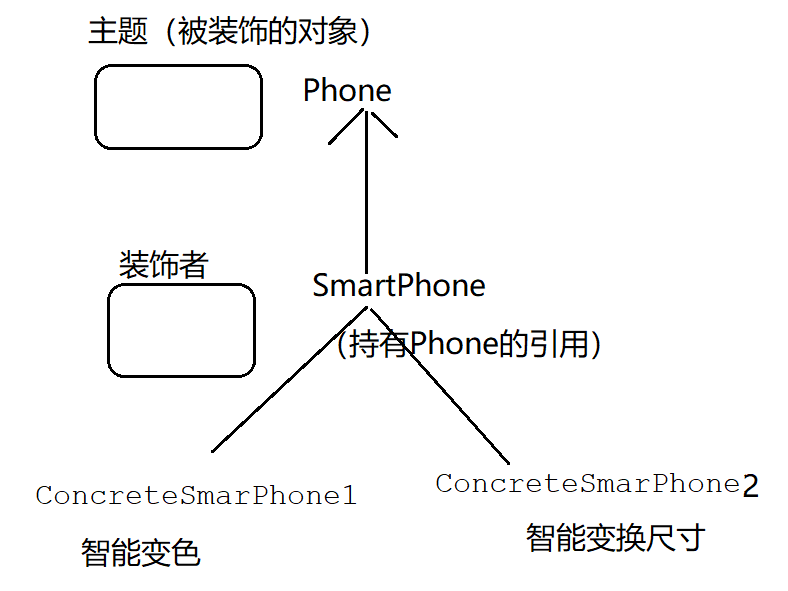
装饰主题接口
package decorator;
public interface Phone {
    void call();//基础功能
}
装饰主题的基础功能
package decorator;
public class ConcretePhone implements  Phone {
    @Override
    public void call() {
        System.out.println("打电话....");
    }
}
装饰者抽象类
package decorator;
public abstract class SmartPhone  implements  Phone{
   private  Phone phone  ;//装饰者 持有 主题的一个引用

   public SmartPhone(){
   }

   public SmartPhone(Phone phone){
      this.phone = phone ;
   }

   //装饰者 包含 原主题已有的功能
   @Override
   public void call() {
      phone.call();
   }
}
具体装饰者1
package decorator;
public class ConcreteSmarPhone1  extends  SmartPhone{
    public ConcreteSmarPhone1(Phone phone){
        super(phone) ;
    }
    public void call(){
        super.call();
        //额外的新功能
        changeColor();
    }
    public void changeColor(){
        System.out.println("智能变色...");
    }
}
具体装饰者2
package decorator;
public class ConcreteSmarPhone2 extends  SmartPhone{
    public ConcreteSmarPhone2(Phone phone){
        super(phone) ;
    }
    public void call(){
        super.call();
        //额外的新功能
        changeSize();
    }
    public void changeSize(){
        System.out.println("智能改变尺寸...");
    }
}
测试类
package decorator;
public class Test {
    public static void main(String[] args) {
        ConcretePhone phone = new ConcretePhone();
        //主题(被装饰者)
        phone.call();
        System.out.println("---");

ConcreteSmarPhone1 phone1 = new ConcreteSmarPhone1( phone ) ;
        phone1.call();

        System.out.println("---");

        ConcreteSmarPhone2 phone2 = new ConcreteSmarPhone2( phone ) ;
        phone2.call();


        System.out.println("-------");

       SmartPhone smart =  new ConcreteSmarPhone2(new ConcreteSmarPhone1( phone )) ;
        smart.call();
    }
}
网络编程
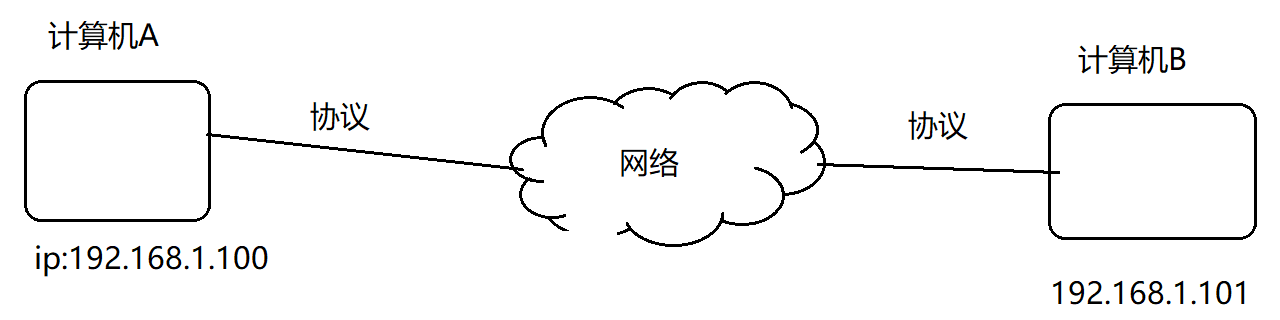
ip地址:网络上的 唯一标识。
ip的组成:32位,由4个8位二进制组成 (每一位最大值是255,每一位十进制标识 0-255)
11000000.10101000.00000001.01100100 二进制不容易被记忆,改成十进制:192.168.1.100
192.168.300.101 错 (每一位最大值是255,每一位十进制标识 0-255)
协议: 为了让网络中不同计算机之间能够相互通信而建立的规则、标准、约定。本课程使用的TCP、UDP
- TCP协议:面向连接的、可靠的(不丢失、不重复、有序)、基于字节流的传输通信协议。传输速度相对慢。
- UDP协议:无连接的协议。在传输数据之前,客户端和服务端之间不建立和维护连接。提供不可靠的数据传输。传输速度相对快。
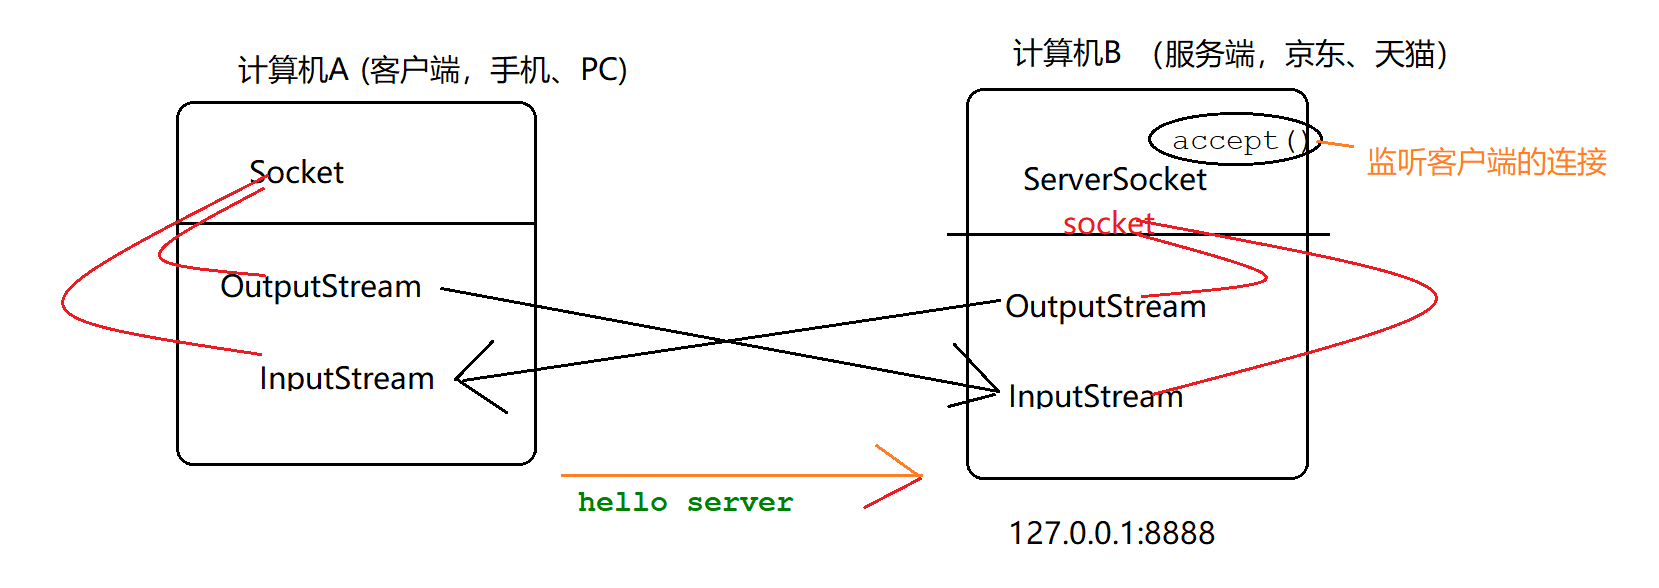
socket(套接字):基于TCP协议的网络通信,可以提供双向安全连接的网络通信。socket需要借助于数据流(字节流)来完成数据的传递工作
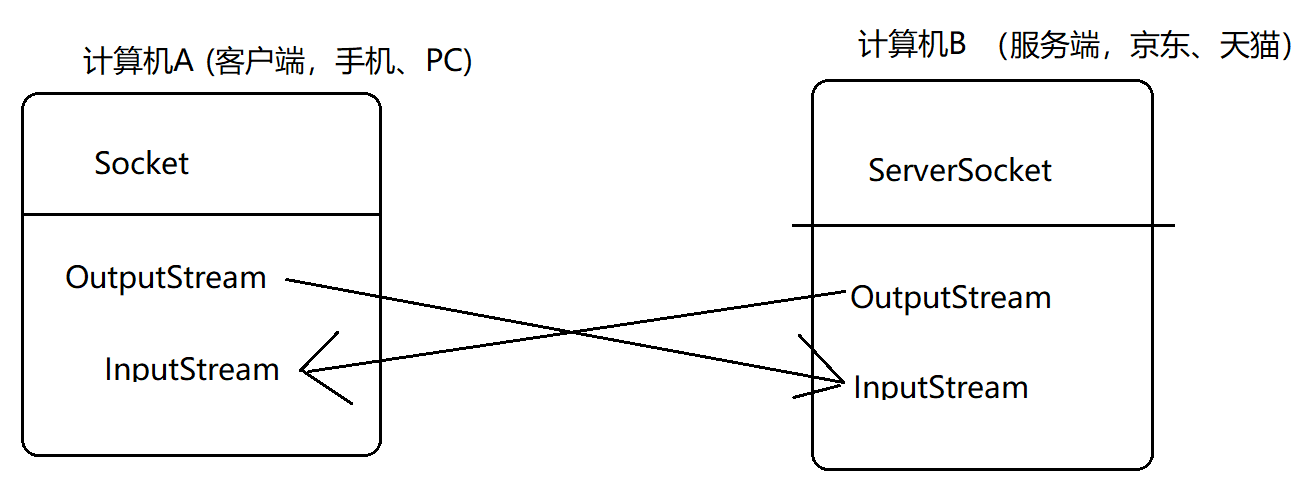
可见:发送数据,OutputStream
接受数据,InputStream
本机默认ip:localhost 127.0.0.1
案例:
模板
1.客户端建立连接 ;服务端准备服务(ip[默认本机]:端口)
2.通过socket生成inputstream/outputstream(准备发送数据)
3.使用inputstream/outputstream进行发送、接受数据
4.关闭inputstream/outputstream、socket
服务端(ServerSocket)
package demo01;

import java.io.*;
import java.net.ServerSocket;
import java.net.Socket;
public class MyServer {

    public static void main(String[] args) {
//        1.准备服务.ip:默认本机127.0.0.1,端口8888
        ServerSocket serverSocket = null ;
        Socket socket = null ;
        InputStream in = null ;
        BufferedReader reader = null ;
        OutputStream out = null ;
        try {
             serverSocket = new ServerSocket(8888) ;
            System.out.println("服务器启动");
            //准备完毕,可以监听客户端请求
             socket = serverSocket.accept();//一直阻塞,直到有客户端连接
            System.out.println("服务端检测到客户端连接成功!");


            //  2.通过socket生成inputstream/outputstream(准备发送数据)
             //3.使用inputstream/outputstream进行发送、接受数据
             in = socket.getInputStream();
            //带缓冲区的字符流(字节流-转换流-字符流)
             reader = new BufferedReader(new InputStreamReader(in));
            String info = null ;
            while(  (info=reader.readLine()) != null       ){
                System.out.println("I am server,接受到客户端信息是:" + info);
            }

            socket.shutdownInput();


            //服务端做出反馈
             out = socket.getOutputStream();
            out.write("welcome  client....".getBytes());

        socket.shutdownOutput();


        } catch (IOException e) {
            e.printStackTrace();
        }finally{
            try {
                // 4.关闭inputstream/outputstream、socket
               if(reader !=null) reader.close();
                if(out !=null) out.close();
                if(in !=null) in.close();
                if(socket !=null) socket.close();
                if(serverSocket !=null) serverSocket.close();
            } catch (IOException e) {
                e.printStackTrace();
            }
        }

    }
}
客户端(Socket)
package demo01;

import java.io.*;
import java.net.Socket;
public class MyClient {

    public static void main(String[] args) {
        Socket socket = null ;
        OutputStream out = null ;
        InputStream in = null ;
        BufferedReader reader = null ;
        try {
             socket = new Socket("127.0.0.1",8888);
            System.out.println("客户端链接成功!");
             out = socket.getOutputStream();
            out.write( "hello server".getBytes()  );
            socket.shutdownOutput();

            //接收服务端的反馈
             in = socket.getInputStream();
             reader = new BufferedReader(new InputStreamReader(in));
            String info = null;
            while(   (info=reader.readLine()) != null ){
                System.out.println("I am client,接收到的服务端消息:"+info);
            }

            socket.shutdownInput();
        } catch (IOException e) {
            e.printStackTrace();
        }finally{
            try {
               if(out!=null) out.close();
                if(in!=null) in.close();
                if(socket!=null) socket.close();
            } catch (IOException e) {
                e.printStackTrace();
            }

        }
    }
}
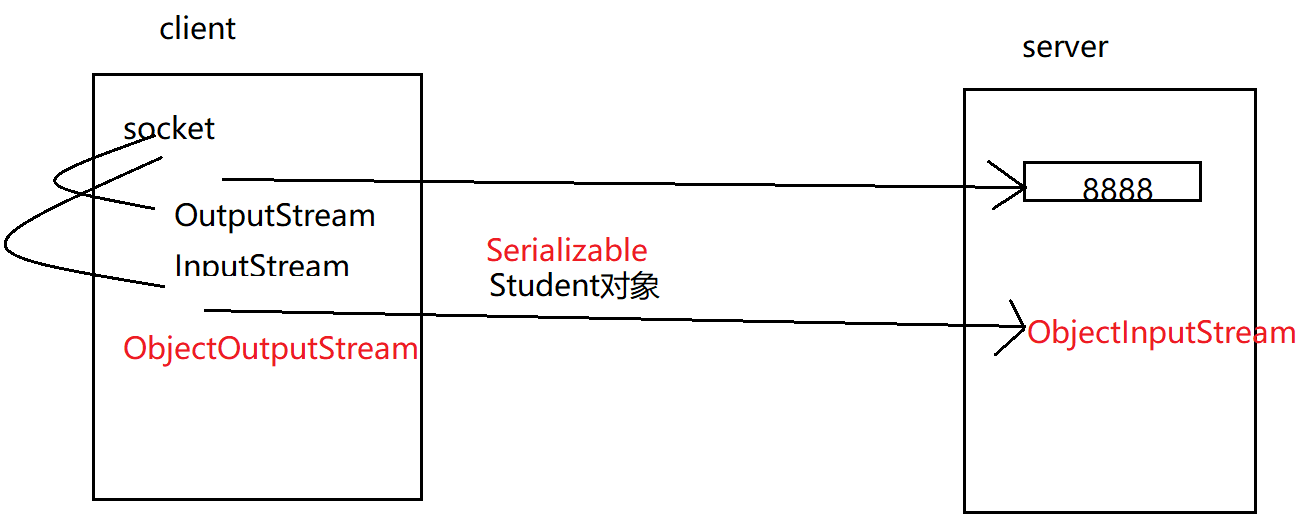
对象流
网络传递一个对象: 1.将要传递的对象序列化 2.使用对象流(ObjectInputStream/ObjectOutputStream)
对象
package demo02;

import java.io.Serializable;
public class Student implements Serializable {//将要传递的对象序列化
    private int sid ;
    private String sname ;
    private int age ;

    public Student(){

    }
    public Student(int sid, String sname, int age) {
        this.sid = sid;
        this.sname = sname;
        this.age = age;
    }

    public int getSid() {
        return sid;
    }

    public void setSid(int sid) {
        this.sid = sid;
    }

    public String getSname() {
        return sname;
    }

    public void setSname(String sname) {
        this.sname = sname;
    }

    public int getAge() {
        return age;
    }

    public void setAge(int age) {
        this.age = age;
    }

    @Override
    public String toString() {
        return "Student{" +
                "sid=" + sid +
                ", sname='" + sname + '\'' +
                ", age=" + age +
                '}';
    }
}
服务端
package demo02;

import java.io.IOException;
import java.io.InputStream;
import java.io.ObjectInputStream;
import java.net.ServerSocket;
import java.net.Socket;
public class MyServer {
    public static void main(String[] args) {
        ServerSocket serverScoket = null ;
        Socket socket = null ;
        InputStream in = null ;
        ObjectInputStream ois = null ;
        try {
             serverScoket = new ServerSocket( 8888) ;
             socket = serverScoket.accept();

            //接受客户端发来的对象
             in = socket.getInputStream();
            //对象流
             ois = new ObjectInputStream(in);
            try {
                Student student = (Student)ois.readObject();//读取对象
                System.out.println(student);
                socket.shutdownInput();
            } catch (ClassNotFoundException e) {
                e.printStackTrace();
            }


        } catch (IOException e) {
            e.printStackTrace();
        }finally{
            try {
               if(ois!=null) ois.close();
                if(in!=null)   in.close();
                if(socket!=null)  socket.close();
                if(serverScoket!=null)  serverScoket.close();
            } catch (IOException e) {
                e.printStackTrace();
            }

        }

    }
}
客户端
package demo02;

import java.io.IOException;
import java.io.ObjectOutputStream;
import java.io.OutputStream;
import java.net.Socket;
public class MyClient {
    public static void main(String[] args) {
        Socket socket = null ;
        OutputStream out = null ;
        ObjectOutputStream oos = null ;
        try {
             socket = new Socket("localhost",8888) ;

            Student student = new Student(1001,"zs",23);

             out = socket.getOutputStream();
            //将OutputStream转为对象流
             oos = new ObjectOutputStream(out) ;
            oos.writeObject( student );//发送对象
            socket.shutdownOutput();


        } catch (IOException e) {
            e.printStackTrace();
        }
        finally{
            try {
                if(oos!=null) oos.close();
                if(out!=null)   out.close();
                if(socket!=null)  socket.close();
            }catch (IOException e) {
                e.printStackTrace();
            }

        }
    }
}
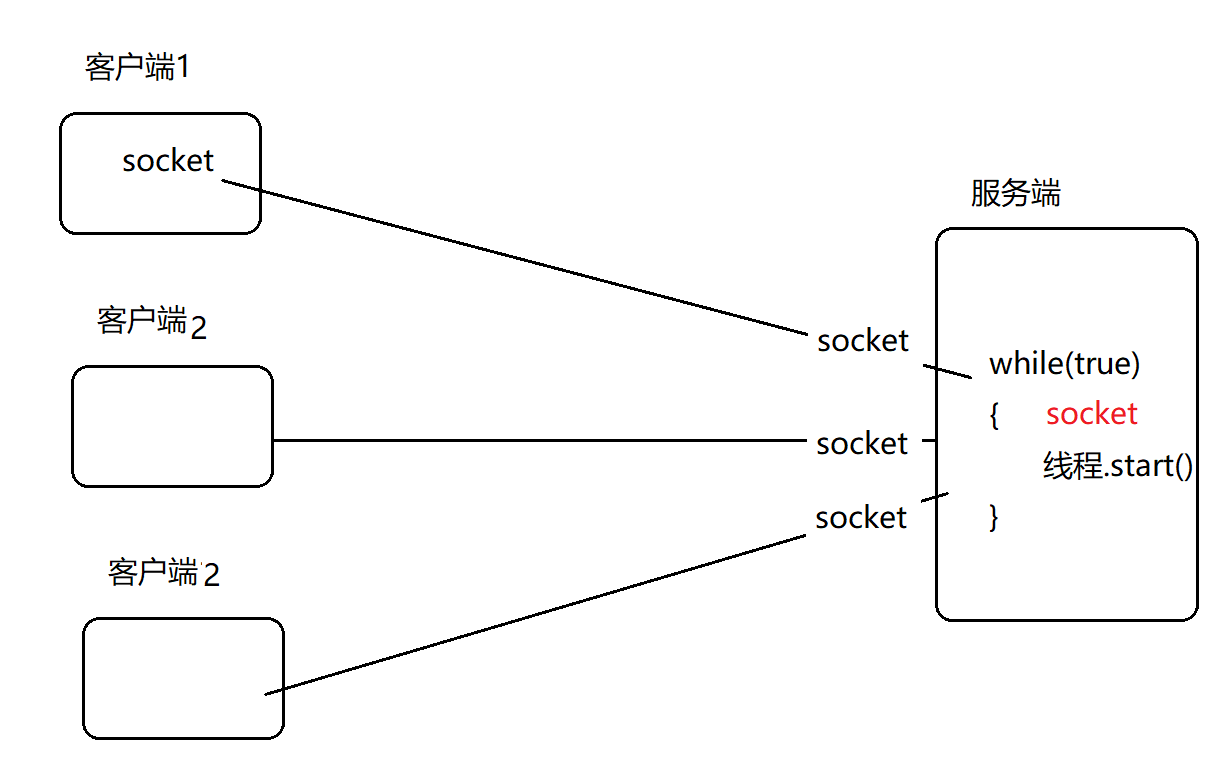
多客户端问题
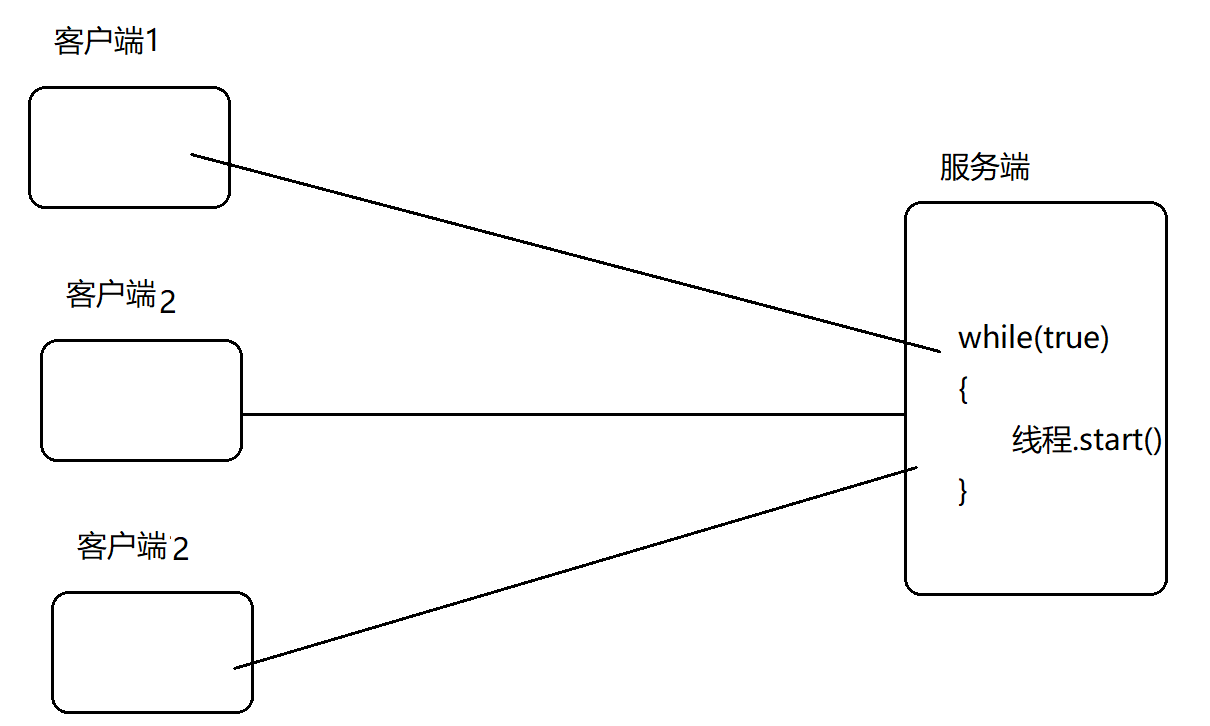
思路:客户端代码不变;服务端:每当有一个客户端,就开启一个新线程去处理(每个线程专门处理一个客户端对象)。
服务端线程
package demo03;

import java.io.*;
import java.net.Socket;
public class ServerThread  extends  Thread{

    Socket socket  ;
    public ServerThread(Socket socket){
      this.socket = socket;
    }

    @Override
    public void run() {
        InputStream in =null ;
        ObjectInputStream ois  = null ;
        OutputStream out = null ;
        try {
            //接受客户端数据(客户端—>服务端)
             in = socket.getInputStream();
             ois  = new ObjectInputStream(in) ;
            Student student =  (Student)ois.readObject() ;
            System.out.println(student);
            socket.shutdownInput();

            //给客户端反馈(服务端->客户端)
             out = socket.getOutputStream();
            out.write("已收到....".getBytes());

        } catch (IOException e) {
            e.printStackTrace();
        } catch (ClassNotFoundException e) {
            e.printStackTrace();
        }
        finally {
            try {
                out.close();
                ois.close();
                in.close();
                socket.close(); ;
            } catch (IOException e) {
                e.printStackTrace();
            }
        }

    }
}
服务端
package demo03;

import java.io.IOException;
import java.net.ServerSocket;
import java.net.Socket;

public class MyServer {
    public static void main(String[] args) {
        try {
            ServerSocket serverSocket = new ServerSocket(8888) ;

            while(true) {
                Socket socket = serverSocket.accept();//阻塞,接受客户端请求
                ServerThread serverThread = new ServerThread(socket) ;
                serverThread.start();
            }

        } catch (IOException e) {
            e.printStackTrace();
        }
    }

}
客户端
package demo03;

import java.io.IOException;
import java.io.InputStream;
import java.io.ObjectOutputStream;
import java.io.OutputStream;
import java.net.Socket;
public class MyClient {
    public static void main(String[] args) {
        Socket socket = null ;
        OutputStream out = null ;
        ObjectOutputStream oos = null ;
        try {
             socket = new Socket("localhost",8888) ;

            Student student = new Student(1001,"zs",23);

             out = socket.getOutputStream();
            //将OutputStream转为对象流
             oos = new ObjectOutputStream(out) ;
            oos.writeObject( student );//发送对象
            socket.shutdownOutput();

            //接受服务端的反馈
            InputStream in = socket.getInputStream();
            byte[] buf = new byte[100] ;
            in.read(buf) ;
            System.out.println("接收到的服务端反馈:" + new String(buf)      );


        } catch (IOException e) {
            e.printStackTrace();
        }
        finally{
            try {
                if(oos!=null) oos.close();
                if(out!=null)   out.close();
                if(socket!=null)  socket.close();
            }catch (IOException e) {
                e.printStackTrace();
            }

        }
    }
}
UDP的实现
DatagramPacket(数据):封装了数据报的数据、数据长度、目标地址和目标端口
DatagramScoket(收发器):接收和发送DatagramPacket中封装好的数据
接收方
package demo04;

import java.io.IOException;
import java.net.DatagramPacket;
import java.net.DatagramSocket;
import java.net.SocketException;

public class Receive {

    public static void main(String[] args) {
        DatagramSocket ds = null ;
        byte[] data = new byte[64] ;
        //准备接收数据的对象
        DatagramPacket dp = new DatagramPacket(data , data.length) ;
        //接收数据
        try {
             ds = new DatagramSocket(9999  );
            ds.receive( dp );

            //显示接收到的数据
            String receiveData  = new String(dp.getData(), 0, data.length);
            System.out.println("接收到的数据:"+receiveData);
            System.out.println("显示发送方的信息:" +  dp.getAddress().getHostAddress() );


        } catch (SocketException e) {
            e.printStackTrace();
        } catch (IOException e) {
            e.printStackTrace();
        }
        finally {
            ds.close();
        }

    }
}
发送方
package demo04;

import java.io.IOException;
import java.net.*;
public class Send {
    public static void main(String[] args) {
        DatagramSocket ds = null ;
        //创建一个InetAddress对象
        InetAddress ip = null ;
        try {
             ip = InetAddress.getByName("127.0.0.1");


        String msg = "helloserver.." ;
        DatagramPacket dp = new DatagramPacket(msg.getBytes(),msg.length(),ip,9999) ;
         ds = new DatagramSocket() ;
        ds.send(  dp );
        } catch (UnknownHostException e) {
            e.printStackTrace();
        } catch (SocketException e) {
            e.printStackTrace();
        } catch (IOException e) {
            e.printStackTrace();
        }finally{
            ds.close();
        }
    }
}
总结:发送数据使用的工具
tcp:字节流
udp:DatagramScoket
网络编程中一些工具类
InetAddress
   public static void main(String[] args) {
        InetAddress host = null;
        try {
            //本机
            host = InetAddress.getLocalHost();
            System.out.println(host);
            //网络中任意一台
            InetAddress host163 = InetAddress.getByName("www.163.com");
            System.out.println(host163);
        } catch (UnknownHostException e) {
            e.printStackTrace();
        }

    }

URL/URLConnection
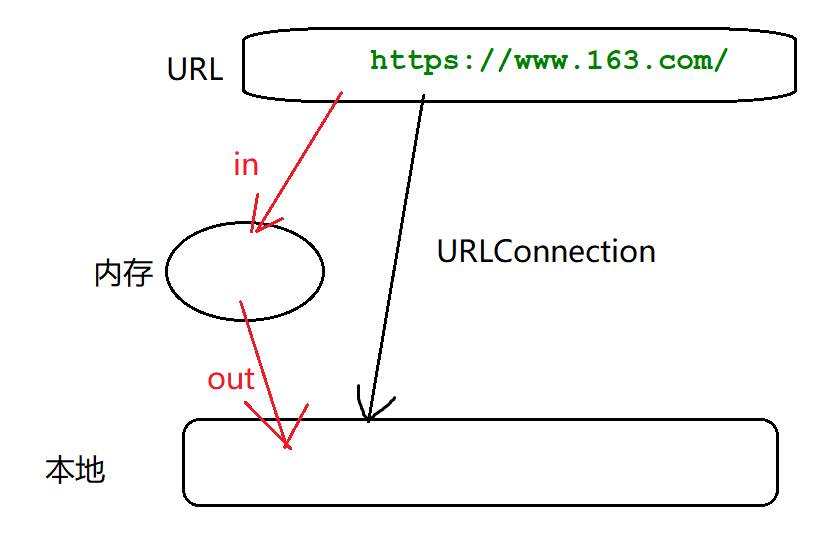
以下示例,注意点:输入流 url-内存; 输出流:内存-本地
package demo05;

import java.io.FileOutputStream;
import java.io.IOException;
import java.io.InputStream;
import java.io.OutputStream;
import java.net.MalformedURLException;
import java.net.URL;
import java.net.URLConnection;
public class URLDemo {
    public static void main(String[] args) {
        InputStream in = null ;
        URLConnection urlConnection = null;
        OutputStream out = null ;
        try {
            URL url = new URL("https://www.163.com/") ;
             urlConnection = url.openConnection();
             in = urlConnection.getInputStream();

             out = new FileOutputStream("d:\\163.txt");
            byte[] buf = new byte[64] ;
            int len = -1 ;
            while(  (len = in.read(buf)) != -1 ){
                out.write(buf,0,len);
            }
        } catch (MalformedURLException e) {
            e.printStackTrace();
        }
        catch (IOException e) {
            e.printStackTrace();
        }finally{
            try {
               if(out!=null) out.close();
                if(in!=null)  in.close();
            } catch (IOException e) {
                e.printStackTrace();
            }


        }

    }
}

