Java反射
RTTI(RunTime Type Information,运行时类型信息)
反射机制是在[运行状态]中:
对于任意一个类,都能够知道这个类的所有属性和方法;
对于任意一个对象,都能够调用它的任意一一个方法和属性;
反射提供的功能:
在运行时判断任意一个对象所属的类;
在运行时构造任意一个类的对象;
在运行时判断任意一个类所具有的成员变量和方法;
在运行时调用任意–个对象的方法;
生成动态代理。
获取反射对象(反射入口)
- Class.forName(全类名)
- xx.class
对象.getClass
//通过反射获取类
//1. Class.forname()
try {
Class<?> forName = Class.forName("com.lx.myclass.Person");
System.out.println(forName);
} catch (ClassNotFoundException e) {
// TODO Auto-generated catch block
e.printStackTrace();
}
//2. 类名.class
Class<?> forName2 =Person.class;
System.out.println(forName2);
//3. 对象.getClass
Person per = new Person();
Class<?> forName3=per.getClass();
System.out.println(forName3);
获取方法
public static void test2() {
    Class<?> forName = null ;
    //class
    try {
        forName = Class.forName("com.lx.myclass.Person");
    } catch (ClassNotFoundException e) {
        // TODO Auto-generated catch block
        e.printStackTrace();
    }
    //获取所有的公共的方法
    /*
        * 本类以及父类、接口中的所有的方法
        *
        * 符合访问修饰符的规律
        * */
    Method[] methods = forName.getMethods();
    for(Method method:methods) {
        System.out.println(method);
    }
}
获取所有的方法
// 获取当前类所有方法
//1.只能是当前类
//2.忽略访问修饰符限制
public static void test7() {
    Class<?> forName = null;
    try {
        forName = Class.forName("com.lx.myclass.Person");
    } catch (ClassNotFoundException e) {
        e.printStackTrace();
    }
        Method[] declaredMethods = forName.getDeclaredMethods();
    for (Method declaredMethod : declaredMethods)
    {
        System.out.println(declaredMethod);
    }
}
获取接口
//获取所有接口
public static void test3() {
    Class<?> forName = null ;
    //class
    try {
        forName = Class.forName("com.lx.myclass.Person");
    } catch (ClassNotFoundException e) {
        // TODO Auto-generated catch block
        e.printStackTrace();
    }
    // 获取当前类的所有接口
    Class<?>[] interfaces = forName.getInterfaces();
    for(Class<?> inter:interfaces) {
        System.out.println(inter);
    }
}
获取父类
//获取所有父类
public static void test4() {
    Class<?> forName = null ;
    //class
    try {
        forName = Class.forName("com.lx.myclass.Person");
    } catch (ClassNotFoundException e) {
        // TODO Auto-generated catch block
        e.printStackTrace();
    }
    // 获取所有父类  单继承
    Class<?> superclass = forName.getSuperclass();
    System.out.println(superclass);
}
获取所有的构造方法
//获取所有构造方法
public static void test5() {
    Class<?> forName = null ;
    //class
    try {
        forName = Class.forName("com.lx.myclass.Person");
    } catch (ClassNotFoundException e) {
        // TODO Auto-generated catch block
        e.printStackTrace();
    }
    // 获取所有父类  单继承
    Constructor<?>[] constructors = forName.getConstructors();
    for(Constructor<?> constructor:constructors)
    	System.out.println(constructor);
}
获取所有的公共属性
// 获取所有公共属性
public static void test6() {
    Class<?> forName = null;
    // class
    try {
        forName = Class.forName("com.lx.myclass.Person");
    } catch (ClassNotFoundException e) {
        // TODO Auto-generated catch block
        e.printStackTrace();
    }
    // 获取所有父类 单继承
    Field[] fields = forName.getFields();
    for (Field field : fields)
    {
        System.out.println(field);
    }
}
获取所有属性
// 获取当前类所有属性
//1.只能是当前类
//2.忽略访问修饰符限制
public static void test8() {
    Class<?> forName = null;
    try {
        forName = Class.forName("com.lx.myclass.Person");
    } catch (ClassNotFoundException e) {
        e.printStackTrace();
    }
    Field[] declaredFields = forName.getDeclaredFields();
    for (Field declaredField : declaredFields)
    {
        System.out.println(declaredField);
    }
}
获取当前反射所代表类(接口)的对象
// 获取当前反射所代表类(接口)的对象
public static void test9() throws InstantiationException, IllegalAccessException {
    Class<?> forName = null;
    try {
        forName = Class.forName("com.lx.myclass.Person");
    } catch (ClassNotFoundException e) {
        e.printStackTrace();
    }
    Object instance = forName.newInstance();
    Person person = (Person)instance;
    System.out.println(person);
}
获取对象的实例,并操作对象
// 获取对象的实例,并操作对象
public static void test1() throws InstantiationException, IllegalAccessException {
    Class<?> forName = null;
    try {
        forName = Class.forName("com.lx.myclass.Person");
    } catch (ClassNotFoundException e) {
        e.printStackTrace();
    }
    Person person = (Person) forName.newInstance();
    person.setId(22);
    person.setName("zs");
    System.out.println(person.getId() + "---" + person.getName());
}
操作属性
// 操作属性
public static void test2() throws InstantiationException, IllegalAccessException, NoSuchFieldException, SecurityException {
    Class<?> forName = null;
    try {
        forName = Class.forName("com.lx.myclass.Person");
    } catch (ClassNotFoundException e) {
        e.printStackTrace();
    }
    Person person = (Person) forName.newInstance();
    Field idField = forName.getDeclaredField("id");
    //访问的是private修饰的id,但是 peivate是私有
    // 因此要修改属性的访问权限,使用反射时,如果是因为访问修饰符限制造成异常,可以通过setAccessible(true)方法解决
	// 同理方法也具有setAccessible(true)的方法
    idField.setAccessible(true);
    idField.set(person, 1);//相当于  person.setId(1);
    System.out.println(person.getId());
}
操作方法
// 操作方法
public static void test3()
        throws InstantiationException, IllegalAccessException, NoSuchFieldException, SecurityException, IllegalArgumentException, InvocationTargetException, NoSuchMethodException {
    Class<?> forName = null;
    try {
        forName = Class.forName("com.lx.myclass.Person");
    } catch (ClassNotFoundException e) {
        e.printStackTrace();
    }
    Person person = (Person) forName.newInstance();
    Method  myPrivateMethod= forName.getDeclaredMethod("privateMethod", null);
    // 同理方法也具有setAccessible(true)的方法
    myPrivateMethod.setAccessible(true);
    myPrivateMethod.invoke(person, null);
}
操作方法 带参
// 操作方法  带参
public static void test4()
        throws InstantiationException, IllegalAccessException, NoSuchFieldException, SecurityException, IllegalArgumentException, InvocationTargetException, NoSuchMethodException {
    Class<?> forName = null;
    try {
        forName = Class.forName("com.lx.myclass.Person");
    } catch (ClassNotFoundException e) {
        e.printStackTrace();
    }
    Person person = (Person) forName.newInstance();
    Method  myPrivateMethod1= forName.getDeclaredMethod("privateMethod1", String.class);
    // 同理方法也具有setAccessible(true)的方法
    myPrivateMethod1.setAccessible(true);
    myPrivateMethod1.invoke(person, "hello");
}
操作构造方法
// 操作构造方法
public static void test5() throws InstantiationException, IllegalAccessException, NoSuchFieldException,
        SecurityException, IllegalArgumentException, InvocationTargetException, NoSuchMethodException {
    Class<?> forName = null;
    try {
        forName = Class.forName("com.lx.myclass.Person");
    } catch (ClassNotFoundException e) {
        e.printStackTrace();
    }
    // 在反射中,根据类型获取方法时;基本类型(int\char) 和包装类(Integer,Character)时不同的类型
    Constructor<?> constructor = forName.getConstructor(int.class);
    System.out.println(constructor);
}
获取私有的构造方法
// 操作构造方法
public static void test6() throws InstantiationException, IllegalAccessException, NoSuchFieldException,
        SecurityException, IllegalArgumentException, InvocationTargetException, NoSuchMethodException {
    Class<?> forName = null;
    try {
        forName = Class.forName("com.lx.myclass.Person");
    } catch (ClassNotFoundException e) {
        e.printStackTrace();
    }
    Constructor<?> constructor = forName.getDeclaredConstructor(String.class);
    System.out.println(constructor);
}
构造方法new对象
// 操作构造方法 new对象
public static void test7() throws InstantiationException, IllegalAccessException, NoSuchFieldException,
        SecurityException, IllegalArgumentException, InvocationTargetException, NoSuchMethodException {
    Class<?> forName = null;
    try {
        forName = Class.forName("com.lx.myclass.Person");
    } catch (ClassNotFoundException e) {
        e.printStackTrace();
    }
    Constructor<?> constructor = forName.getConstructor(int.class);
    System.out.println(constructor);
    Person per = (Person) constructor.newInstance(10);
    System.out.println(per);
}
注意传参
动态加载类名和方法
class.txt
className=com.lx.myclass.Person
methodName = staticMethod
//动态加载类名和方法
public static void test8() throws FileNotFoundException, IOException, NoSuchMethodException, SecurityException, IllegalAccessException, IllegalArgumentException, InvocationTargetException, InstantiationException {
    Properties properties = new Properties();
    properties.load(new FileReader("class.txt"));
    String classname = properties.getProperty("className");
    String methodName = properties.getProperty("methodName");
    Class<?> forName = null;
    try {
        forName = Class.forName(classname);
    } catch (ClassNotFoundException e) {
        e.printStackTrace();
    }
    Method method = forName.getMethod(methodName);
    method.invoke(forName.newInstance());
}
反射可以越过 泛型检查
//反射可以越过 泛型检查
public static void test9() throws NoSuchMethodException, SecurityException, IllegalAccessException, IllegalArgumentException, InvocationTargetException, InstantiationException {
    //此时只能添加Integer类型
    ArrayList<Integer> list = new ArrayList<Integer>();
    list.add(1);
    list.add(2);
    //list.add("zs");
    Class<?> listclass= list.getClass();
    Method method = listclass.getMethod("add", Object.class);
    method.invoke(list, "zs");
    System.out.println(list);

}
不推荐这样做
就像不推荐反射操作private修饰的东西
虽然可以通反射访问 private等修饰符不允许访问的属性/方法,也可以忽略掉泛型的约束;但是实际的开发,不建议这样使用,因此可能造成程序的混乱。
万能set
import java.lang.reflect.Field;
public class MyProperty {
	//per.setXxx(value)
	public static void setProperty(Object obj,String propertyName,Object value) throws NoSuchFieldException, SecurityException, IllegalArgumentException, IllegalAccessException {
		Class<?> class1 = obj.getClass();
		Field field = class1.getDeclaredField(propertyName);
		field.setAccessible(true);
		field.set(obj, value);
	}
}
public static void test10() throws NoSuchFieldException, SecurityException, IllegalArgumentException, IllegalAccessException{
    Person person = new Person();
    MyProperty.setProperty(person, "name", "zs");
    MyProperty.setProperty(person, "age", 23);
    Student student = new Student();
    MyProperty.setProperty(student, "score", 98);
    System.out.println(person);
    System.out.println(student);
}
源码
java加密解密
使用异或进行加密解密
异或: * 同为0,异为1; * 一个数,两次异或之后,是原数本身
一个数据异或一次:加密
一个数据异或两次:解密
是可逆的
package utils;
public class SecurityUtil {
	//通过异或进行加密和解密  传入string("abc")--->String("xyz")
	public static String xor(String in) {//"abc"--->{'a','b','c'}字符串变成字符数组
		//char 和int之间时可以直接转换的
		//String 和int之间时无法进行运算的
		char[] chs = in.toCharArray();
		for(int i = 0; i < chs.length;i++) {
			//^ 异或符号
			chs[i] = (char)(chs[i]^3000);
		}
		return new String(chs);
	}
	public static void main(String[] args) {
		String str = "hello";
		str = xor(str);// 第一次异或  加密
		System.out.println(str);

		str = xor(str);// 第二次异或  解密
		System.out.println(str);
	}
}
MD5
字符串 —> 十六进制串
是不可逆的
引入jar包
commons-codec-1.10.jar
代码
import org.apache.commons.codec.digest.DigestUtils;
public class MD5 {
	public static String md5Encode(byte[] input) {
		return DigestUtils.md5Hex(input);//byte[]--->String
	}
	public static void main(String[] args) {
		// TODO Auto-generated method stub
		String str = "hello";
		str = md5Encode(str.getBytes());
		System.out.println(str);
	}
}
SHA256加密
引入jar包
commons-codec-1.10.jar
代码
import org.apache.commons.codec.digest.DigestUtils;
public class MD5 {
	//SHA256
	public static String SHA256Encode(byte[] input) {
		return DigestUtils.sha256Hex(input);//byte[]--->String
	}
	public static void main(String[] args) {
		String str = "hello";
		str = SHA256Encode(str.getBytes());
		System.out.println(str);
	}
}
MD5和SHA256的异同
同:
都是不可逆
异
MD5:速度较快
SHA256:安全性较高
Base64
import java.lang.reflect.InvocationTargetException;
import java.lang.reflect.Method;
public class Base {
	//base64 加密
	public static String base64Encode(byte[] input) {
		String result = null;
		//反射
		try {
			Class clazz = Class.forName("com.sun.org.apache.xerces.internal.impl.dv.util.Base64");
			Method method = clazz.getMethod("encode", byte[].class);
			result = (String)method.invoke(null, input);
		} catch (ClassNotFoundException e) {
			e.printStackTrace();
		} catch (NoSuchMethodException e) {
			e.printStackTrace();
		} catch (SecurityException e) {
			e.printStackTrace();
		} catch (IllegalAccessException e) {
			e.printStackTrace();
		} catch (IllegalArgumentException e) {
			e.printStackTrace();
		} catch (InvocationTargetException e) {
			e.printStackTrace();
		}
		return result;
	}
	//base64解密
	public static byte[] base64Decode(String input) {
		byte[] result = null ;
		try {
			Class clazz = Class.forName("com.sun.org.apache.xerces.internal.impl.dv.util.Base64");
			Method method = clazz.getMethod("decode", String.class);
			result = (byte[])method.invoke(null, input);
		} catch (ClassNotFoundException e) {
			// TODO Auto-generated catch block
			e.printStackTrace();
		} catch (NoSuchMethodException e) {
			// TODO Auto-generated catch block
			e.printStackTrace();
		} catch (SecurityException e) {
			// TODO Auto-generated catch block
			e.printStackTrace();
		} catch (IllegalAccessException e) {
			// TODO Auto-generated catch block
			e.printStackTrace();
		} catch (IllegalArgumentException e) {
			// TODO Auto-generated catch block
			e.printStackTrace();
		} catch (InvocationTargetException e) {
			// TODO Auto-generated catch block
			e.printStackTrace();
		}
		return result;

	}
	public static void main(String[] args) {
		String str = "hello";
		//加密
		str = base64Encode(str.getBytes());
		System.out.println("加密"+str);
		//解密
		byte[] rs = base64Decode(str);
		System.out.println("解密"+new String(rs));
	}
}
可逆
使用的是jdk自带的一个加密解密
运用到了反射技术
源码
RPC
RPC:Remote Procedure Call (远程过程调用)
- “HelloService”,而服务端需要通过该字符串解析出该字符串代表的接口的一切信息–》通过反射技术
- 客户端–》服务端:socket
- 服务端需要根据客户端的不同请求,返回不同的接口类型,客户端就要接收到不同的接口类型—》通过动态代理
客户端 Client.java
package com.lx.client;
import java.io.InputStream;
import java.io.ObjectInputStream;
import java.io.ObjectOutputStream;
import java.io.OutputStream;
import java.lang.reflect.InvocationHandler;
import java.lang.reflect.Method;
import java.lang.reflect.Proxy;
import java.net.InetSocketAddress;
import java.net.Socket;
public class Client {
	// 获取代表服务端接口的动态代理对象
	// serviceInterface:请求的接口名
	// addr:带请求服务端的ip:端口
	@SuppressWarnings("unchecked")
	public static <T> T getRemoteProxyObj(Class serviceInterface, InetSocketAddress addr) {
		// 动态代理对象
		/*
		 * newProxyInstance(a,b,c) a:类加载器:需要代理哪一个类 b:需要代理的对象具有哪些功能(方法) --- 接口(方法在接口中存放 )
		 */
		return (T) Proxy.newProxyInstance(serviceInterface.getClassLoader(), new Class<?>[] {serviceInterface },
				new InvocationHandler() {
					/**
					 * proxy 代理的对象
					 *
					 * method 对象的哪一个方法
					 *
					 * args 参数列表
					 *
					 */
					@Override
					public Object invoke(Object proxy, Method method, Object[] args) throws Throwable {
						ObjectInputStream input = null;
						ObjectOutputStream output = null;
						Socket socket = new Socket();
						try {
							// 客户端向服务端发送请求:请求某一个具体的接口

							// socketAddress:Ip:端口
							socket.connect(addr);
							output = new ObjectOutputStream(socket.getOutputStream());// 发送 通过序列化流(对象流)
							// 发送:接口名,方法名,方法的参数的类型,方法的参数,
							output.writeUTF(serviceInterface.getName());
							output.writeUTF(method.getName());
							output.writeObject(method.getParameterTypes());
							output.writeObject(args);
							// 等待服务端处理
							// 接收服务端处理后的返回值
							input = new ObjectInputStream(socket.getInputStream());
							Object result = input.readObject();
							return result;
						} catch (Exception e) {
							// TODO: handle exception
							e.printStackTrace();
							return null;
						} finally {
							try {
								if (output != null) {
									output.close();
								}
								if (input != null) {
									input.close();
								}
							} catch (Exception e) {
								// TODO Auto-generated catch block
								e.printStackTrace();
								return null;
							}
						}
					}
				});
	}
}
服务端
MyCenter.java
package com.lx.center;
import java.io.IOException;
import java.lang.reflect.InvocationTargetException;
//服务中心
public interface MyCenter {
	public void start();
	public void stop();
	//注册服务
	public void register(Class name,Class serviceImpl);
}
MyCenterServer.java
package com.lx.center;
import java.io.IOException;
import java.io.InputStream;
import java.io.ObjectInputStream;
import java.io.ObjectOutputStream;
import java.lang.reflect.InvocationTargetException;
import java.lang.reflect.Method;
import java.net.InetSocketAddress;
import java.net.ServerSocket;
import java.net.Socket;
import java.util.HashMap;
import java.util.concurrent.ExecutorService;
import java.util.concurrent.Executors;
import javax.sound.sampled.Port;
public class MyCenterServer implements MyCenter {
	// map:服务端的所有可供客户端访问的接口,都注册到map中
	// key:接口的名字 value:真正的接口的实现
	private static HashMap<String, Class> serviceRegister = new HashMap<String, Class>();
	// 端口
	private static int Port;// =9999
	// 连接池:连接池中存在多个和连接对象,每一个连接对象都可以处理一个客户请求
	// jdk1.5提供
	private static ExecutorService executor = Executors.newFixedThreadPool(Runtime.getRuntime().availableProcessors());
	private static boolean isRunning = false;
	public MyCenterServer(int port) {
		this.Port = port;
	}
	// 开启服务
	@Override
	public void start() {
		ServerSocket serverSocket = null;
		try {
			serverSocket = new ServerSocket();
			serverSocket.bind(new InetSocketAddress(Port));
		} catch (IOException e) {
			// TODO Auto-generated catch block
			e.printStackTrace();
		}
		isRunning = true;
		while (true) {
			// 具体的服务内容;接收客户端请求,处理请求,并返回结果
			// TODO Auto-generated method stub
			// 如果想要让多个客户端请求并发执行 多线程
			System.out.println("start server  ...  ");
			// 客户端每次请求一次连接(发送一次请求),则服务端 从连接池中获取一个线程对象去处理
			Socket socket = null;
			try {
				socket = serverSocket.accept();// 等待客户端连接
			} catch (IOException e) {
				// TODO Auto-generated catch block
				e.printStackTrace();
			}
			executor.execute(new ServiceTask(socket));// .参数是一个多线程对象
		}
	}
	@Override
	public void stop() {
		// TODO Auto-generated method stub
		isRunning = false;
		executor.shutdown();
	}
	@Override
	public void register(Class service, Class serviceImpl) {
		serviceRegister.put(service.getName(), serviceImpl);
	}
	private static class ServiceTask implements Runnable {
		private Socket socket;
		public ServiceTask(Socket socket) {
			this.socket = socket;
		}
		public ServiceTask() {
		}
		@Override
		public void run() {// 线程所做的事情
			ObjectOutputStream output = null;
			ObjectInputStream input = null;
			// 具体的服务内容;接收客户端请求,处理请求,并返回结果
			try {
				// 接收到客户端连接及请求,处理该请求
				input = new ObjectInputStream(socket.getInputStream());
				// 因为ObjectInputStream对发送数据的顺序严格要求,因此需要参照发送的顺序逐个接收
				String serviceName = input.readUTF();
				String methodName = input.readUTF();
				Class[] parameterTypes = (Class[]) input.readObject();// 参数类型
				Object[] arguments = (Object[]) input.readObject();// 方法的参数名
				// 根据客户端的请求,找到map中与之对应的具体的接口
				Class SerciceClass = serviceRegister.get(serviceName);
				Method method = SerciceClass.getMethod(methodName, parameterTypes);
				// 执行该方法
				Object result = method.invoke(SerciceClass.newInstance(), arguments);
				// 向客户端 将执行完毕的返回值 传给客户端
				output = new ObjectOutputStream(socket.getOutputStream());
				output.writeObject(result);
			} catch (Exception e) {
				// TODO: handle exception
				e.printStackTrace();
			} finally {
				try {
					if (output != null) {
						output.close();
					}
					if (input != null) {
						input.close();
					}
				} catch (Exception e) {
					// TODO Auto-generated catch block
					e.printStackTrace();
				}
			}
		}
	}
}
Service
HelloService.java
package com.lx.service;
public interface HelloService {
	public String sayHi(String name);
}
HelloServiceImpl.java
package com.lx.service;
public class HelloServiceImpl implements HelloService{
	@Override
	public String sayHi(String name) {
		// TODO Auto-generated method stub
		System.out.println("hi"+name);
		return "hi"+name;
	}
}
Test
ClientTest.java
package com.lx.test;
import java.net.InetSocketAddress;
import com.lx.client.Client;
import com.lx.service.HelloService;
import com.lx.service.HelloServiceImpl;
public class ClientTest {
	public static void main(String[] args) throws ClassNotFoundException {
		HelloService helloService = Client.getRemoteProxyObj(Class.forName("com.lx.service.HelloService"), new InetSocketAddress("127.0.0.1", 9999));
		System.out.println(helloService.sayHi("zs"));
	}
}
ServerTest
package com.lx.test;
import com.lx.center.MyCenter;
import com.lx.center.MyCenterServer;
import com.lx.service.HelloService;
import com.lx.service.HelloServiceImpl;
public class ServeTest {
	public static void main(String[] args) {
		// 开启一个线程
		new Thread(new Runnable() {
			@Override
			public void run() {
				// 服务中心
				MyCenter serverCenter = new MyCenterServer(9999);
				// 将helloService接口及其实现类注册到服务中心
				serverCenter.register(HelloService.class, HelloServiceImpl.class);
				serverCenter.start();
			}
		}).start();
	}
}

源码地址
发送邮件
简单邮件
导包
javax.mail.jar
import java.util.Date;
import java.util.Properties;
import javax.mail.Session;
import javax.mail.Transport;
import javax.mail.internet.InternetAddress;
import javax.mail.internet.MimeMessage;
public class JavaMailDemo {
	// 发件人的 邮箱 和 密码(替换为自己的邮箱和密码)
    // PS: 某些邮箱服务器为了增加邮箱本身密码的安全性,给 SMTP 客户端设置了独立密码(有的邮箱称为“授权码”),
    //     对于开启了独立密码的邮箱, 这里的邮箱密码必需使用这个独立密码(授权码)。
    public static String sendEmailAccount = "收件人qq邮箱";
    public static String sendEmailPwd = "请更换为自己的独立密码(授权码)";
    public static String receiveMailAccount = "发件人qq邮箱";
    //发件人邮箱服务器地址
    public static String emailProtocolType = "smtp";
    public static String sendEmailSMTPHost = "smtp.qq.com";
    public static String smtpPort = "465";
    public static String sslSocketFactory = "javax.net.ssl.SSLSocketFactory";
    // 发件人邮箱的 SMTP 服务器地址, 必须准确, 不同邮件服务器地址不同, 一般格式为: smtp.xxx.com
    // 网易163邮箱的 SMTP 服务器地址为: smtp.163.com
    // 收件人邮箱(替换为自己知道的有效邮箱)
    public static void main(String[] args) throws Exception {
        // 1. 创建参数配置, 用于连接邮件服务器的参数配置
        Properties props = new Properties();                    // 参数配置
        props.setProperty("mail.transport.protocol", emailProtocolType);   // 使用的协议(JavaMail规范要求)
        props.setProperty("mail.smtp.host", sendEmailSMTPHost);   // 发件人的邮箱的 SMTP 服务器地址
        props.setProperty("mail.smtp.auth", "true");            // 需要请求认证

        // PS: 某些邮箱服务器要求 SMTP 连接需要使用 SSL 安全认证 (为了提高安全性, 邮箱支持SSL连接, 也可以自己开启),
        //     如果无法连接邮件服务器, 仔细查看控制台打印的 log, 如果有有类似 “连接失败, 要求 SSL 安全连接” 等错误,
        //     打开下面 /* ... */ 之间的注释代码, 开启 SSL 安全连接。
        /*
        // SMTP 服务器的端口 (非 SSL 连接的端口一般默认为 25, 可以不添加, 如果开启了 SSL 连接,
        //                  需要改为对应邮箱的 SMTP 服务器的端口, 具体可查看对应邮箱服务的帮助,
        //                  QQ邮箱的SMTP(SLL)端口为465或587, 其他邮箱自行去查看)
         */
        //ssl安全认证
        props.setProperty("mail.smtp.port", smtpPort);
        //设置socketfactory
        props.setProperty("mail.smtp.socketFactory.class", sslSocketFactory);
        //只处理SSL的连接, 对于非SSL的连接不做处理
        props.setProperty("mail.smtp.socketFactory.fallback", "false");
        props.setProperty("mail.smtp.socketFactory.port", smtpPort);
        // 2. 根据配置创建会话对象, 用于和邮件服务器交互
        Session session = Session.getInstance(props);
        session.setDebug(true);  // 设置为debug模式, 可以查看详细的发送 log
        // 3. 创建一封邮件
        MimeMessage message = createMimeMessage(session, sendEmailAccount, receiveMailAccount);
        // 4. 根据 Session 获取邮件传输对象
        Transport transport = session.getTransport();
        // 5. 使用 邮箱账号 和 密码 连接邮件服务器, 这里认证的邮箱必须与 message 中的发件人邮箱一致, 否则报错
        //    PS_01: 成败的判断关键在此一句, 如果连接服务器失败, 都会在控制台输出相应失败原因的 log,
        //           仔细查看失败原因, 有些邮箱服务器会返回错误码或查看错误类型的链接, 根据给出的错误
        //           类型到对应邮件服务器的帮助网站上查看具体失败原因。
        //
        //    PS_02: 连接失败的原因通常为以下几点, 仔细检查代码:
        //           (1) 邮箱没有开启 SMTP 服务;
        //           (2) 邮箱密码错误, 例如某些邮箱开启了独立密码;
        //           (3) 邮箱服务器要求必须要使用 SSL 安全连接;
        //           (4) 请求过于频繁或其他原因, 被邮件服务器拒绝服务;
        //           (5) 如果以上几点都确定无误, 到邮件服务器网站查找帮助。
        //
        //    PS_03: 仔细看log, 认真看log, 看懂log, 错误原因都在log已说明。
        transport.connect(sendEmailAccount, sendEmailPwd);
        // 6. 发送邮件, 发到所有的收件地址, message.getAllRecipients() 获取到的是在创建邮件对象时添加的所有收件人, 抄送人, 密送人
        transport.sendMessage(message, message.getAllRecipients());
        // 7. 关闭连接
        transport.close();
    }
    /**
     * 创建一封只包含文本的简单邮件
     * @param session 和服务器交互的会话
     * @param sendMail 发件人邮箱
     * @param receiveMail 收件人邮箱
     * @return
     * @throws Exception
     */
    public static MimeMessage createMimeMessage(Session session, String sendMail, String receiveMail) throws Exception {
        // 1. 创建一封邮件
        MimeMessage message = new MimeMessage(session);
        // 2. From: 发件人(昵称有广告嫌疑,避免被邮件服务器误认为是滥发广告以至返回失败,请修改昵称)
        message.setFrom(new InternetAddress(sendMail, "setFrom", "UTF-8"));
        // 3. To: 收件人(可以增加多个收件人、抄送、密送)
        //    CC:抄送人,BCC:密送
        message.setRecipient(MimeMessage.RecipientType.TO, new InternetAddress(receiveMail, "XX用户", "UTF-8"));
        message.setRecipient(MimeMessage.RecipientType.CC, new InternetAddress("xxxxxxx@qq.com", "XX用户", "UTF-8"));
        // 4. Subject: 邮件主题(标题有广告嫌疑,避免被邮件服务器误认为是滥发广告以至返回失败,请修改标题)
        message.setSubject("setSubject", "UTF-8");
        // 5. Content: 邮件正文(可以使用html标签)(内容有广告嫌疑,避免被邮件服务器误认为是滥发广告以至返回失败,请修改发送内容)
        message.setContent("正文...", "text/html;charset=utf-8");
        // 6. 设置发件时间
        message.setSentDate(new Date());
        // 7. 保存设置
        message.saveChanges();
        return message;
    }
}
复杂邮件
import java.util.Date;
import java.util.Properties;
import javax.activation.DataHandler;
import javax.activation.FileDataSource;
import javax.mail.Message.RecipientType;
import javax.mail.Session;
import javax.mail.Transport;
import javax.mail.internet.InternetAddress;
import javax.mail.internet.MimeBodyPart;
import javax.mail.internet.MimeMessage;
import javax.mail.internet.MimeMultipart;
import javax.mail.internet.MimeUtility;
public class JavaMailWithAttachments {
    // 发件人的 邮箱 和 密码(替换为自己的邮箱和密码)
    public static String sendEmailAccount = "收件人qq邮箱";
    public static String sendEmailPwd = "请更换为自己的独立密码(授权码)";
    // 发件人邮箱的 SMTP 服务器地址, 必须准确, 不同邮件服务器地址不同, 一般格式为: smtp.xxx.com
    // 网易163邮箱的 SMTP 服务器地址为: smtp.163.com
    public static String myEmailSMTPHost = "smtp.qq.com";
    // 收件人邮箱(替换为自己知道的有效邮箱)
    public static String receiveMailAccount = "发件人qq邮箱";
    public static void main(String[] args) throws Exception {
        // 1. 创建参数配置, 用于连接邮件服务器的参数配置
        Properties props = new Properties();                    // 参数配置
        props.setProperty("mail.transport.protocol", "smtp");   // 使用的协议(JavaMail规范要求)
        props.setProperty("mail.smtp.host", myEmailSMTPHost);   // 发件人的邮箱的 SMTP 服务器地址
        props.setProperty("mail.smtp.auth", "true");            // 需要请求认证
        final String smtpPort = "465";
        props.setProperty("mail.smtp.port", smtpPort);
        props.setProperty("mail.smtp.socketFactory.class", "javax.net.ssl.SSLSocketFactory");
        props.setProperty("mail.smtp.socketFactory.fallback", "false");
        props.setProperty("mail.smtp.socketFactory.port", smtpPort);
        // 开启 SSL 连接, 以及更详细的发送步骤请看上一篇: 基于 JavaMail 的 Java 邮件发送:简单邮件发送
        // 2. 根据配置创建会话对象, 用于和邮件服务器交互
        //Session对象的构造方法为private因此需要借助getInstance方法
        Session session = Session.getInstance(props);
        session.setDebug(true);                                 // 设置为debug模式, 可以查看详细的发送 log
        // 3. 创建一封邮件
        MimeMessage message = createMimeMessage(session, sendEmailAccount, receiveMailAccount);
        // 也可以保持到本地查看
        // message.writeTo(file_out_put_stream);
        // 4. 根据 Session 获取邮件传输对象
        Transport transport = session.getTransport();
        // 5. 使用 邮箱账号 和 密码 连接邮件服务器
        //    这里认证的邮箱必须与 message 中的发件人邮箱一致,否则报错
        transport.connect(sendEmailAccount, sendEmailPwd);
        // 6. 发送邮件, 发到所有的收件地址, message.getAllRecipients() 获取到的是在创建邮件对象时添加的所有收件人, 抄送人, 密送人
        transport.sendMessage(message, message.getAllRecipients());
        // 7. 关闭连接
        transport.close();
    }
    /**
     * 创建一封复杂邮件(文本+图片+附件)
     */
    public static MimeMessage createMimeMessage(Session session, String sendMail, String receiveMail) throws Exception {
		// 1. 创建邮件对象
		MimeMessage message = new MimeMessage(session);
		// 2. From: 发件人
		message.setFrom(new InternetAddress(sendMail, "我昵称", "UTF-8"));
		// 3. To: 收件人(可以增加多个收件人、抄送、密送)
		message.addRecipient(RecipientType.TO, new InternetAddress(receiveMail, "我的收件人昵称", "UTF-8"));
		// 4. Subject: 邮件主题
		message.setSubject("T图片+附件)", "UTF-8");
		// 5. 创建图片“节点”
		MimeBodyPart imagePart = new MimeBodyPart();
		DataHandler imageDataHandler = new DataHandler(new FileDataSource("src//abc.png")); // 读取本地文件
		imagePart.setDataHandler(imageDataHandler);                   // 将图片数据添加到“节点”
		imagePart.setContentID("image_fairy_tail");     // 为“节点”设置一个唯一编号(在文本“节点”将引用该ID)
		// 6. 创建文本“节点”
		MimeBodyPart textPart = new MimeBodyPart();
		//    这里添加图片的方式是将整个图片包含到邮件内容中, 实际上也可以以 http 链接的形式添加网络图片
		textPart.setContent("这是一张图片<br/><img src='cid:image_fairy_tail'/>",
						"text/html;charset=UTF-8");
		// 7. (文本+图片)设置 文本 和 图片 “节点”的关系(将 文本 和 图片 “节点”合成一个混合“节点”)
		MimeMultipart mm_text_image = new MimeMultipart();
		mm_text_image.addBodyPart(textPart);
		mm_text_image.addBodyPart(imagePart);
		mm_text_image.setSubType("related");    // 关联关系
		// 8. 将 文本+图片 的混合“节点”封装成一个普通“节点”
		MimeBodyPart text_image = new MimeBodyPart();
		text_image.setContent(mm_text_image);
		// 9. 创建附件“节点”
		MimeBodyPart attachment = new MimeBodyPart();
		DataHandler attDataHandler = new DataHandler
					(new FileDataSource("src//上课前检查插头.txt"));  // 读取本地文件
		attachment.setDataHandler(attDataHandler);                                             // 将附件数据添加到“节点”
		attachment.setFileName(MimeUtility.encodeText(attDataHandler.getName()));              // 设置附件的文件名(需要编码)
		// 10. 设置(文本+图片)和 附件 的关系(合成一个大的混合“节点” / Multipart )
		MimeMultipart mm = new MimeMultipart();
		mm.addBodyPart(text_image);
		mm.addBodyPart(attachment);     // 如果有多个附件,可以创建多个多次添加
		mm.setSubType("mixed");         // 混合关系
		// 11. 设置整个邮件的关系(将最终的混合“节点”作为邮件的内容添加到邮件对象)
		message.setContent(mm);
		// 12. 设置发件时间
		message.setSentDate(new Date());
		// 13. 保存上面的所有设置
		message.saveChanges();
		return message;
    }
}
中文分词
另一个分词开源项目
使用
中科院分词包ictclas4j:
- 将Data目录拷贝到项目根目录
- 将ictclas4 j提供的bin目录,覆盖eclipse中的bin目录
- 将ictclas4 j提供的src源码复制到项目中
- 导入需要的commons-lang.jar、log4j.jar
public static void main(String[] args) {
    Segment st = new Segment(1);
    String line = "一块勤奋地漂亮的一块钱,/打造经济的航空母舰。ABCD.#$% Hello World!\n又一段文本123辆 !3.0";
    SegResult sr = st.split(line);
    System.out.println(sr.getFinalResult());
}
二维码
QRCode
日本的
jar包
Qrcode.jar
工具类
import java.awt.Color;
import java.awt.Graphics2D;
import java.awt.Image;
import java.awt.image.BufferedImage;
import java.io.File;
import javax.imageio.ImageIO;
import com.swetake.util.Qrcode;
import jp.sourceforge.qrcode.QRCodeDecoder;
public class QRCodeUtil {
	//加密:  文字信息 ->二维码.png
	/*
	 * imgPath:src/二维码.png
	 * content:  文字信息
	 * imgType:png
	 */
	public void encoderQRCode(String content,String imgPath,String imgType,int size)  throws Exception{
		//BufferedImage :内存中的一张图片
		BufferedImage bufImg =   qRcodeCommon(content,imgType,size);
		File file = new File(imgPath);// "src/二维码.png" --> 二维码.png
		//生成图片
		ImageIO.write(bufImg, imgType, file) ;
	}

	//产生一个二维码的BufferedImage
	/*
	 *content:二维码中隐藏的信息
	 *imgType:图片格式
	 *size :二维码边长
	 */
	public  BufferedImage qRcodeCommon(String content ,String imgType,int size)  throws Exception{
		BufferedImage bufImg = null ;
		//Qrcode对象:字符串->boolean[][]
		Qrcode qrCodeHandler = new Qrcode();
		//设置二维码的排错率:7% L<M<Q<H30%  :排错率越高,可存储的信息越少;但是对二维码清晰对要求越小
		qrCodeHandler.setQrcodeErrorCorrect('M');
		//可存放的信息类型:N:数字、  A:数字+A-Z  B:所有
		qrCodeHandler.setQrcodeEncodeMode('B');
		//尺寸:取值范围:1-40
		qrCodeHandler.setQrcodeVersion(size);
		byte[] contentBytes = content.getBytes("UTF-8") ;//"Hello world" -> byte[]"Hello world"
		//  -->boolean[][]
		boolean[][] codeOut = qrCodeHandler.calQrcode(contentBytes) ;
		int imgSize =  67 + 12*(size -1) ;
		//BufferedImage:内存中的图片
		bufImg = new BufferedImage(imgSize,imgSize,BufferedImage.TYPE_INT_RGB );//red green blue
		//创建一个画板
		Graphics2D gs = bufImg.createGraphics() ;
		gs.setBackground(Color.WHITE);//将画板的背景色设置为白色
		gs.clearRect( 0,0, imgSize,imgSize); //初始化
		gs.setColor(Color.BLACK);//设置 画板上 图像的颜色(二维码的颜色)
		int pixoff = 2 ;
		for(int j=0;j<codeOut.length;j++) {
			for(int i=0;i<codeOut.length;i++) {
				if(codeOut[j][i]) {
					gs.fillRect(j*3+pixoff , i*3+pixoff, 3, 3);
				}
			}
		}
		//增加LOGO
		//将硬盘中的src/logo.png  加载为一个Image对象
		Image logo =  ImageIO.read(new File("src/logo.png")  ) ;
		int maxHeight = bufImg.getHeight() ;
		int maxWdith = bufImg.getWidth() ;
		//在已生成的二维码上 画logo
		gs.drawImage(logo,imgSize/5*2,imgSize/5*2, maxWdith/5,maxHeight/5 ,null) ;
		gs.dispose(); //释放空间
		bufImg.flush(); //清理
		return bufImg ;
	}
	//解密:  二维码(图片路径) -> 文字信息
	public String decoderQRCode(String imgPath) throws Exception{
		//BufferedImage内存中的图片  :硬盘中的imgPath图片 ->内存BufferedImage
		BufferedImage bufImg =  ImageIO.read( new File(imgPath) ) ;
		//解密
		QRCodeDecoder decoder = new QRCodeDecoder() ;
		TwoDimensionCodeImage tdcImage = new TwoDimensionCodeImage(bufImg);
		byte[] bs = decoder.decode(tdcImage) ;	//bufImg
		//byte[] -->String
		String content    = new String(bs,"UTF-8");
		return content;
	}
}
import java.awt.image.BufferedImage;
import jp.sourceforge.qrcode.data.QRCodeImage;
public class TwoDimensionCodeImage implements QRCodeImage {
    BufferedImage bufImg;  //将图片加载到内存中
    public TwoDimensionCodeImage(BufferedImage bufImg) {
        this.bufImg = bufImg;
    }
    @Override
    public int getHeight() {
        return bufImg.getHeight();
    }
    @Override
    public int getPixel(int x, int y) {
        return bufImg.getRGB(x, y);
    }
    @Override
    public int getWidth() {
        return bufImg.getWidth();
    }
}
测试
public class Test {
	public static void main(String[] args)  throws Exception{
		//生成二维码
		/*
		 * 生成图片的路径        src/二维码.png
		 * 文字信息、网址信息 :  "helloworld"
		 */
		String imgPath = "src/二维码123.png";
		String content =  "http://www.baidu.com";  //扫描二维码后,网页跳转
		//生成二维码
		/*
		 * 加密:  文字信息 ->二维码
		 * 解密:  二维码 -> 文字信息
		 */
		QRCodeUtil qrUtil = new QRCodeUtil();
		//加密:  文字信息 ->二维码
		qrUtil.encoderQRCode(content, imgPath, "png", 17);
//		   TwoDimensionCode handler = new TwoDimensionCode();
//		   handler.encoderQRCode(content, imgPath, "png", 7);
//		//解密:  二维码 -> 文字信息
		String imgContent = qrUtil.decoderQRCode(imgPath) ;
		System.out.println(imgContent);
	}
}
ZXing
google的
jar
javase-3.1.0.jar
core-3.1.0.jar
工具类
import java.awt.BasicStroke;
import java.awt.Color;
import java.awt.Graphics2D;
import java.awt.geom.RoundRectangle2D;
import java.awt.image.BufferedImage;
import java.io.File;
import java.io.IOException;
import javax.imageio.ImageIO;
public class LogoUtil {
	//传入logo、二维码 ->带logo的二维码
	public  static BufferedImage  logoMatrix( BufferedImage matrixImage,String logo ) throws IOException {
		//在二维码上画logo:产生一个  二维码画板
		Graphics2D g2 = matrixImage.createGraphics() ;
		//画logo: String->BufferedImage(内存)
		BufferedImage logoImg = ImageIO.read(new File(logo)) ;
		int height = matrixImage.getHeight() ;
		int width = matrixImage.getWidth();
		//纯logo图片
		g2.drawImage(logoImg  , width*2/5,height* 2/5,    width*1/5,height* 1/5  ,   null) ;
		//产生一个 画 白色圆角正方形的 画笔
		BasicStroke stroke = new BasicStroke(5,BasicStroke.CAP_ROUND ,BasicStroke.JOIN_ROUND) ;
		//将画板-画笔 关联
		g2.setStroke(stroke);
		//创建一个正方形
		RoundRectangle2D.Float round = new RoundRectangle2D.Float(width*2/5,height* 2/5,    width*1/5,height* 1/5 , BasicStroke.CAP_ROUND ,BasicStroke.JOIN_ROUND);
		g2.setColor(Color.WHITE);
		g2.draw(round);
		//灰色边框
		BasicStroke stroke2 = new BasicStroke(1,BasicStroke.CAP_ROUND ,BasicStroke.JOIN_ROUND) ;
		g2.setStroke(stroke2);
		//创建一个正方形
		RoundRectangle2D.Float round2 = new RoundRectangle2D.Float(width*2/5+2,height* 2/5+2,    width*1/5-4,height* 1/5 -4, BasicStroke.CAP_ROUND ,BasicStroke.JOIN_ROUND);
//		Color color = new Color(128,128,128) ;
		g2.setColor(Color.GRAY);
		g2.draw(round2);
		g2.dispose();
		matrixImage.flush();
		return matrixImage;
	}
}
import java.awt.image.BufferedImage;
import java.io.File;
import java.io.IOException;
import java.util.HashMap;
import java.util.Hashtable;
import java.util.Map;
import javax.imageio.ImageIO;
import com.google.zxing.BarcodeFormat;
import com.google.zxing.Binarizer;
import com.google.zxing.BinaryBitmap;
import com.google.zxing.EncodeHintType;
import com.google.zxing.LuminanceSource;
import com.google.zxing.MultiFormatReader;
import com.google.zxing.MultiFormatWriter;
import com.google.zxing.Result;
import com.google.zxing.WriterException;
import com.google.zxing.client.j2se.BufferedImageLuminanceSource;
import com.google.zxing.common.BitMatrix;
import com.google.zxing.common.HybridBinarizer;
import com.google.zxing.qrcode.decoder.ErrorCorrectionLevel;
import jp.sourceforge.qrcode.util.Color;
public class ZXingUtil {
	//加密:文字->二维码(图片)
	public static void  encodeImg(String imgPath,String format,String content,int width, int height,String logo) throws WriterException, IOException {//format:gif
		Hashtable<EncodeHintType,Object > hints = new Hashtable<EncodeHintType,Object>() ;
		//排错率  L<M<Q<H
		hints.put( EncodeHintType.ERROR_CORRECTION, ErrorCorrectionLevel.H) ;
		//编码
		hints.put( EncodeHintType.CHARACTER_SET, "utf-8") ;
		//外边距:margin
		hints.put( EncodeHintType.MARGIN, 1) ;
		/*
		 * content : 需要加密的 文字
		 * BarcodeFormat.QR_CODE:要解析的类型(二维码)
		 * hints:加密涉及的一些参数:编码、排错率
		 */
		BitMatrix bitMatrix = new MultiFormatWriter().encode(content,BarcodeFormat.QR_CODE , width, height,hints) ;
		//内存中的一张图片:此时需要的图片 是二维码-> 需要一个boolean[][] ->BitMatrix
		//BufferedImage img = MatrixToImageWriter.toBufferedImage(bitMatrix) ;
		BufferedImage img = new BufferedImage(width, height,  BufferedImage.TYPE_INT_RGB);
		for(int x=0;x<width;x++) {
			for(int y=0;y<height;y++) {
				img.setRGB(x, y,     (bitMatrix.get(x,y)? Color.BLACK:Color.WHITE)  );
			}
		}
		//画logo
		img = LogoUtil.logoMatrix(img, logo) ;
		//String ->File
		File file = new File(imgPath);
		//生成图片
		ImageIO.write(img, format,file) ;//format:图片格式
	}
//	ZXing
	//解密:二维码->文字
	public static void decodeImg(File file) throws Exception {
		if(!file.exists()) return ;
		//file->内存中的一张图片
		 BufferedImage imge = ImageIO.read(file)  ;
		 MultiFormatReader formatReader = new MultiFormatReader() ;
		 LuminanceSource source = new BufferedImageLuminanceSource(imge);
		 Binarizer binarizer = new HybridBinarizer(source);
		 BinaryBitmap binaryBitmap = new BinaryBitmap(binarizer);
		 //图片 ->result
		 Map map = new HashMap();
		 map.put(EncodeHintType.CHARACTER_SET, "utf-8") ;
		 Result result = formatReader.decode(binaryBitmap  ,map ) ;
		 System.out.println("解析结果:"+ result.toString());
	}
	public static void main(String[] args) {
		int i=6,j=8,k=10,m=7; if(i < j | m > ++k) k++;
		System.out.println(k);
	}
}
使用
import java.io.File;
import java.io.IOException;
import com.google.zxing.WriterException;
public class Test {
	public static void main(String[] args) throws Exception {
		String imgPath = "src/xx.png" ;
		String content = "hello你好" ;
		String logo = "src/logo.png" ;
		//加密:文字->二维码
		ZXingUtil.encodeImg(imgPath,"gif",content,430,430,logo);
		//解密:二维码->文字
		ZXingUtil.decodeImg(new File(imgPath));
	}
}
Socket
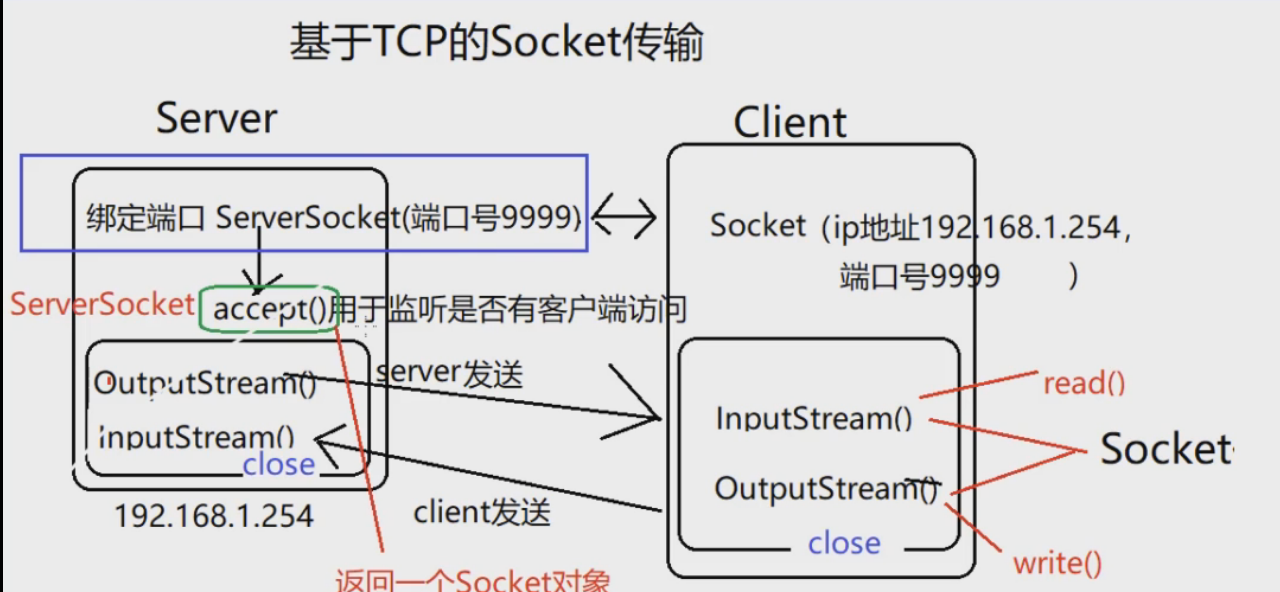
基于TCP的Socket传输
输入输出流发送的都是内存中的东西
服务端
import java.io.File;
import java.io.FileInputStream;
import java.io.IOException;
import java.io.InputStream;
import java.io.OutputStream;
import java.net.ServerSocket;
import java.net.Socket;
public class MyServer {
	public static void main(String[] args) throws IOException {
		// 绑定了服务端的端口:ip:为本机的IP
		// 暴漏了一个服务,该 服务的地址:localhost:9999
		ServerSocket serverSocket = new ServerSocket(9999);
		while (true) {
			Socket accept = serverSocket.accept();
			System.out.println("客户端连接成功");
			// 服务端向客户端发送消息Output
			OutputStream out = accept.getOutputStream();
			String info = "hello";
			/*
			 * out.write(info.getBytes());
			 */
			// 发送文件
			// 准备要发送的文件
			File file = new File("D:\\_model2.prt");
			// 将文件放入内存中
			InputStream fileIn = new FileInputStream(file);
			byte[] FileBytes = new byte[1000];
			int len = -1;
			// 发送(因为文件较大,不能一次发送完毕,因此需要通过循环来分次发送)
			while ((len = fileIn.read(FileBytes)) != -1) {
				out.write(FileBytes);
			}
			System.out.println("文件发送成功");
			// 服务端接收客户端的信息
			/*
			 * InputStream in = accept.getInputStream(); byte[] bs = new byte[100];
			 * in.read(bs); System.out.println("服务端接收到的消息为:"+new String(bs));
			 */
			// in.close();
			out.close();
			accept.close();
			serverSocket.close();
			fileIn.close();
		}
	}
}
客户端
import java.io.File;
import java.io.FileOutputStream;
import java.io.IOException;
import java.io.InputStream;
import java.io.OutputStream;
import java.net.Socket;
import java.net.UnknownHostException;
import com.sun.org.apache.bcel.internal.generic.NEW;
public class MyClient {
	public static void main(String[] args) throws UnknownHostException, IOException {
		//客户端连接server发布的服务
		Socket socket = new Socket("127.0.0.1",9999);
		//客户端接收消息
		InputStream in = socket.getInputStream();
		//接收普通文字
		//byte[] bs = new byte[100];
		//in.read(bs);
		//System.out.println("客户端接收到的消息为:"+new String(bs));
		//接收文件
		OutputStream fileOut = new FileOutputStream("D:\\aa.prt");
		byte[] bs = new byte[1000];
		int len  =-1;
		while((len=in.read(bs))!=-1) {
			fileOut.write(bs,0,len);
		}
		System.out.println("文件接收成功");
		//客户端向服务端返回信息
		/*
		 * OutputStream out = socket.getOutputStream(); String info = "hello Server";
		 * out.write(info.getBytes());
		 */
		in.close();
		//out.close();
		socket.close();
		fileOut.close();
	}
}
优化服务端,多线程
import java.io.File;
import java.io.FileInputStream;
import java.io.InputStream;
import java.io.OutputStream;
import java.net.Socket;
//处理下载的线程
public class MyDownload implements Runnable{
	private Socket socket;
	public MyDownload() {
	}
	public MyDownload(Socket socket) {
		this.socket = socket;
	}
	@Override
	public void run() {
		System.out.println("客户端连接成功");
		try {
		// 服务端向客户端发送消息Output
		OutputStream out = socket.getOutputStream();
		// 发送文件
		// 准备要发送的文件
		File file = new File("D:\\_model2.prt");
		// 将文件放入内存中
		InputStream fileIn = new FileInputStream(file);
		byte[] FileBytes = new byte[1000];
		int len = -1;
		// 发送(因为文件较大,不能一次发送完毕,因此需要通过循环来分次发送)
		while ((len = fileIn.read(FileBytes)) != -1) {
			out.write(FileBytes);
		}
		System.out.println("文件发送成功");
		out.close();
		socket.close();
		fileIn.close();
		} catch (Exception e) {
			// TODO: handle exception
			System.out.println(e.getMessage());
		}
	}
}
import java.io.IOException;
import java.net.ServerSocket;
import java.net.Socket;
public class MyService01 {
	public static void main(String[] args) throws IOException {
		ServerSocket serverSocket = new ServerSocket(9999);
		while(true) {
			Socket socket = serverSocket.accept();
			//下载的线程
			//MyDownload mydownload =new MyDownload(socket);
			//Runnable-->Thread
			new Thread(new MyDownload(socket)).start();
		}
	}
}
文件的拆分和合并
将一个文件7.5M据分成若干个子文件8个文件(7个1M+1个0. 5)
将拆分后的8个文件合并成源文件7.5M
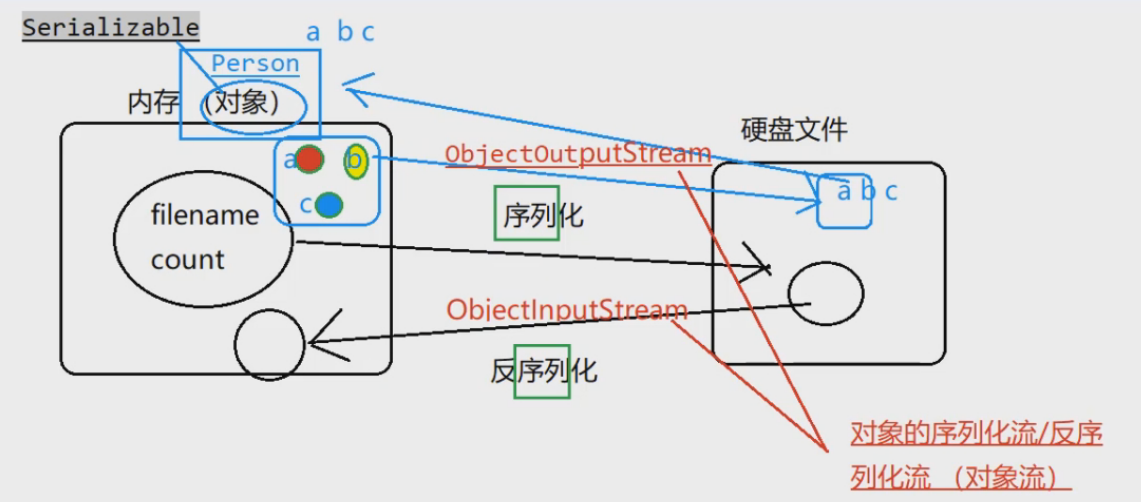
对象–>硬盘:序列化
硬盘–》对象:反序列化
拆分的时候:如何将文件名,分割的数量保留,为后续的合并做准备
再生成一个配置文件conf.properties保存上述信息
拆分文件
简单拆分
import java.io.File;
import java.io.FileInputStream;
import java.io.FileNotFoundException;
import java.io.FileOutputStream;
import java.io.IOException;
import java.io.InputStream;
import java.io.OutputStream;
import java.util.Properties;
public class SplitFile {
	public static void main(String[] args) throws IOException {
		// TODO Auto-generated method stub
		// 源文件(待拆分的文件)
		File resFile = new File("d:\\data.zip");
		// 拆分后的目录
		File splitDir = new File("d:\\splitDir");
		splitFile(resFile,splitDir);
	}
	// 拆分文件
	public static void splitFile(File resFile, File splitDir) throws IOException {
		if (!splitDir.exists()) {
			splitDir.mkdir();
		}
		// 思路:拆分:1个输入流,n个输出流(a,b,c)
		// 合并:n个输入流,1和输出流(注意顺序a,b,c)
		// 拆分:1个输入流
		InputStream in = new FileInputStream(resFile);
		OutputStream out = null;
		byte[] buf = new byte[1024 * 1024];
		int len = -1;
		int count = 1;
		while ((len = in.read(buf)) != -1) {
			out = new FileOutputStream(new File(splitDir, count++ + ".part"));
			out.write(buf, 0, len);
			// out.flush();//专门的清理缓冲区
			out.close();// 关闭流、关闭之前会清理缓冲区
		}
		// 拆分的时候:如何将文件名,分割的数量保留,为后续的合并做准备
		// 再生成一个配置文件conf.properties保存上述信息
		/*
		 * //方式一 out = new FileOutputStream(new File(splitDir,"conf.properties"));
		 * //查询当前操作系统的换行符 String property = System.getProperty("line.separator");
		 * out.write(("filename="+resFile.getName()).getBytes());
		 * out.write(property.getBytes());
		 *
		 * out.write(("partcount="+(count-1)).getBytes()); out.close();
		 */
		// 方式二Properties,将内存中的多个属性以key=value的形式写到硬盘中
		out = new FileOutputStream(new File(splitDir, "conf.properties"));
		Properties prop = new Properties();
		prop.setProperty("filename", resFile.getName());
		prop.setProperty("partcount", (count - 1) + "");
		// 写入磁盘(保存:持久化)
		prop.store(out, "file configuration...");
		out.close();
		in.close();
	}
}
限制使用次数的拆分文件
合并文件
简单合并
import java.io.File;
import java.io.FileInputStream;
import java.io.FileNotFoundException;
import java.io.FileOutputStream;
import java.io.IOException;
import java.io.OutputStream;
import java.io.SequenceInputStream;
import java.util.ArrayList;
import java.util.Collections;
import java.util.Enumeration;
import java.util.List;
import java.util.Properties;
public class MergeFile {
	public static void main(String[] args) throws IOException {
		//文件合并方法一
//		//读取多个拆分后的文件(inouts:所有输入流的集合)
//		List<FileInputStream> inputs = new ArrayList<>();
//		for(int i =1;i<=8;i++) {
//			inputs.add(new FileInputStream("D:\\splitDir\\"+i+".part"));
//
//		}
//		//指定合并后的文件输出流
//		OutputStream out = new FileOutputStream("d:\\asd.zip");
//		//将多个输入流一次读入内存,最后再一次性输出到asd.zip中
//		byte[] buf = new byte[1024*1024];
//		for(FileInputStream in:inputs) {
//			int len = in.read(buf);
//			out.write(buf,0,len);
//		}
//		out.close();
//		for(FileInputStream in:inputs) {
//			in.close();
//		}
//
		//文件合并方法二
		File splitDir = new File("D:\\splitDir");
		mergeFile(splitDir);

	}
	public static void mergeFile(File splitDir) throws IOException {
		List<FileInputStream> inputs = new ArrayList<>();
		for(int i =1;i<=8;i++) {
			inputs.add(new FileInputStream("D:\\splitDir\\"+i+".part"));
		}
		Enumeration<FileInputStream> en = Collections.enumeration(inputs);
		//多个流--》1个流
		SequenceInputStream sin = new SequenceInputStream(en);
		//指定合并后的文件输出流
		OutputStream out = new FileOutputStream("d:\\asd.zip");
		//将多个输入流一次读入内存,最后再一次性输出到asd.zip中
		byte[] buf = new byte[1024*1024];
		int len = -1;
		while((len=sin.read(buf))!=-1) {
			out.write(buf,0,len);
		}
		out.close();
		sin.close();
	}
	public static Properties getProperties() throws FileNotFoundException, IOException {
		//找到配置文件的位置
		String configFileName = "D:\\splitDir\\conf.properties";
		Properties properties= new Properties();
		properties.load(new FileInputStream(configFileName));
		return properties;
	}
}
多线程合并文件
import java.io.BufferedReader;
import java.io.File;
import java.io.FileNotFoundException;
import java.io.FileReader;
import java.io.IOException;
public class ConfigReader {
	public static void main(String[] args) throws IOException {
		File configFile = new File("d:\\splitDir\\9.config");
		readConfig(configFile);
	}
	public static void readConfig(File configFile) throws IOException {
		BufferedReader bufferedReader = new BufferedReader(new FileReader(configFile));
		String line = null;
		while((line=bufferedReader.readLine())!=null) {
			String[] arr  = line.split("=");
			if(line.startsWith("filename")) {
			}else if(line.startsWith("partcount")) {
			}else {
				System.out.println("暂未处理");
			}
		}
		bufferedReader.close();
	}
}
import java.io.File;
import java.io.FileInputStream;
import java.io.FileNotFoundException;
import java.io.FileOutputStream;
import java.io.IOException;
import java.io.OutputStream;
import java.io.SequenceInputStream;
import java.util.ArrayList;
import java.util.Collections;
import java.util.Enumeration;
import java.util.List;
import java.util.Properties;
public class MergeFile {
	public static void main(String[] args) throws IOException {
		//文件合并方法一
//		//读取多个拆分后的文件(inouts:所有输入流的集合)
//		List<FileInputStream> inputs = new ArrayList<>();
//		for(int i =1;i<=8;i++) {
//			inputs.add(new FileInputStream("D:\\splitDir\\"+i+".part"));
//		}
//		//指定合并后的文件输出流
//		OutputStream out = new FileOutputStream("d:\\asd.zip");
//		//将多个输入流一次读入内存,最后再一次性输出到asd.zip中
//		byte[] buf = new byte[1024*1024];
//		for(FileInputStream in:inputs) {
//			int len = in.read(buf);
//			out.write(buf,0,len);
//		}
//		out.close();
//		for(FileInputStream in:inputs) {
//			in.close();
//		}
		//文件合并方法二
		File splitDir = new File("D:\\splitDir");
		mergeFile1(splitDir);
	}
	public static Properties getProperties() throws FileNotFoundException, IOException {
		//找到配置文件的位置
		String configFileName = "D:\\splitDir\\conf.properties";
		Properties properties= new Properties();
		properties.load(new FileInputStream(configFileName));
		return properties;
	}
	public static void mergeFile1(File splitDir) throws FileNotFoundException, IOException {
		//合并之前先读取配置文件的信息
		Properties prop = getProperties();
		String fileName = prop.getProperty("filename");
		int partCount = Integer.parseInt(prop.getProperty("partcount"));
		List<FileInputStream> inputs = new ArrayList<>();
		for(int i =1;i<=partCount;i++) {
			inputs.add(new FileInputStream("D:\\splitDir\\"+i+".part"));
		}
		Enumeration<FileInputStream> en = Collections.enumeration(inputs);
		//多个流--》1个流
		SequenceInputStream sin = new SequenceInputStream(en);
		//指定合并后的文件输出流
		OutputStream out = new FileOutputStream("d:\\aa\\"+fileName);
		//将多个输入流一次读入内存,最后再一次性输出到asd.zip中
		byte[] buf = new byte[1024*1024];
		int len = -1;
		while((len=sin.read(buf))!=-1) {
			out.write(buf,0,len);
		}
		out.close();
		sin.close();
	}
}
序列化反序列化
import java.io.Serializable;
public class Person implements Serializable{
	/**
	 * 指定该类的SUID
	 */
	private static final long serialVersionUID = 12L;
	private String name;
	private int age;
	public Person(String name, int age) {
		this.name = name;
		this.age = age;
	}
	public Person() {
	}
	public String getName() {
		return name;
	}
	public void setName(String name) {
		this.name = name;
	}
	public int getAge() {
		return age;
	}
	public void setAge(int age) {
		this.age = age;
	}
}
import java.io.FileInputStream;
import java.io.FileNotFoundException;
import java.io.FileOutputStream;
import java.io.IOException;
import java.io.ObjectInputStream;
import java.io.ObjectOutputStream;
public class Test {
	public static void main(String[] args) throws FileNotFoundException, IOException, ClassNotFoundException {
		//序列化
		objectOut();
		//反序列化
		objectIn();
	}
	public static void objectOut() throws FileNotFoundException, IOException {
		Person per = new Person("zs",24);
		ObjectOutputStream oos = new ObjectOutputStream(new FileOutputStream("d:\\per.obj"));
		oos.writeObject(per);
		oos.close();
	}
	public static void objectIn() throws FileNotFoundException, IOException, ClassNotFoundException {
		ObjectInputStream ois = new ObjectInputStream(new FileInputStream("d:\\per.obj"));
		Object readObject = ois.readObject();
		Person per = (Person)readObject;
		System.out.println(per.getName()+"===="+per.getAge());
	}
}
说明
序列化和反序列化都依赖对象所在的类:类不能改变
再序列化和反序列化时JVM给Person对象计算一个SUID,计算时类是计算的一个因子,当类改变时SUID也随之改变,反序列化时,二者的SUID不一致,因此报错,可以指定该类的SUID
private static final long serialVersionUID = 12L;
序列化运行时使用一个称为serialVersionUID 的版本号与每个可序列化类相关联,该序列号在反序列化过程中用于验证列化对象的发送者和接收者是否为该对象加载了与序列化兼容的类。如果接收者加载的该对象的类的seri alVersi onUID与对应的发送者的类的版本号不同,则反序列化将会导致InvalidClassException.可序列化类可以通过声明为”serialVersionUID” 的字段(该字段必须是静态(static)、 最终(final) 的long 型字段)显式声明其自己的seria1VersionUID:
ANT-ACESS-MODIFIER static final long serialVersionUID = 42L:
如果可序列化类未显式声明serialVersionUID, 则序列化运行时将基于该类的各个方面年算该类的默认serlalVersi1onU1D值,如ava(TD对象序列化规范”中所述。不过。强列建论所有可序列化类都显式声明serialVersinIITD 值,原因是计算默认的seria1Versi onUID对类的详细信息具有较高的敏感性,根据编译器实现的不同可能千差万别,这样在反序列化过程中可能会导致意外的InvalidClassException. 因此,为保证serlalVerstonUID值跨不同Java编译器实现的致性,序列化类必须声明一个 明确的serlalVerstonUID值。还强烈建议使用private修饰符显示声明seria1VersionUID (如果可能),原因是这种声明仅应用于直接声明类– serialVersi onUID字段作为继承成员没有用处。数组类不能声明一个明确的serialVersionUID, 因此它们总是具有默认的计算值,但是数组类没有匹配serialVersionUID 值的要求。
因此建议写死
序列化和反序列化的顺序要严格一致
- 序列化时a,b,c
- 反序列化时a,b,c
多个对象时,可以将对象挨个序列化,也可以将所有的对象放到一个List集合中
序列化基本类型变量就使用write方法,对象类型就使用writeObject方法
原因是
//ObjectOutputStream继承了OutputStream
public class ObjectOutputStream
    extends OutputStream implements ObjectOutput, ObjectStreamConstants
{
XML解析
dogs.xml
<?xml version="1.0" encoding="UTF-8"?>
<dogs>
	<dog id ="1">
		<name>YAYA</name>
		<score>100</score>
		<level>10</level>
	</dog>
	<dog id ="2">
		<name>HAHA</name>
		<score>10</score>
		<level>1</level>
	</dog>
	<dog id ="3">
		<name>LALA</name>
		<score>200</score>
		<level>20</level>
	</dog>
</dogs>
public class Dog {
	private int id;
	private String name;
	private double score;
	private int level;
	public Dog(int id, String name, double score, int level) {
		this.id = id;
		this.name = name;
		this.score = score;
		this.level = level;
	}
	public Dog() {
	}
	public int getId() {
		return id;
	}
	public void setId(int id) {
		this.id = id;
	}
	public String getName() {
		return name;
	}
	public void setName(String name) {
		this.name = name;
	}
	public double getScore() {
		return score;
	}
	public void setScore(double score) {
		this.score = score;
	}
	public int getLevel() {
		return level;
	}
	public void setLevel(int level) {
		this.level = level;
	}
	@Override
	public String toString() {
		return "Dog [id=" + id + ", name=" + name + ", score=" + score + ", level=" + level + "]";
	}
}
import java.io.FileInputStream;
import java.io.FileNotFoundException;
import java.io.IOException;
import java.util.ArrayList;
import java.util.List;
import javax.xml.parsers.DocumentBuilder;
import javax.xml.parsers.DocumentBuilderFactory;
import javax.xml.parsers.ParserConfigurationException;
import org.w3c.dom.Document;
import org.w3c.dom.Element;
import org.w3c.dom.Node;
import org.w3c.dom.NodeList;
import org.xml.sax.SAXException;
public class XMLParsrUtil {
	// 输入一个xml文件的路径(//dogs.xml),输出一个List<Dog>
	public static List<Dog> parseXmlToList(String fileName)
			throws ParserConfigurationException, FileNotFoundException, SAXException, IOException {
		List<Dog> dogs = new ArrayList<>();
		// DOM方式解析:入口
		DocumentBuilderFactory factory = DocumentBuilderFactory.newInstance();// 产生一个DOM工厂实例
		// 产品
		DocumentBuilder builder = factory.newDocumentBuilder();
		// 准备输出流,为parse()做准备
		// 解析为一个可以使用java来处理的document对象
		Document document = builder.parse(new FileInputStream(fileName));
		Element element = document.getDocumentElement();// 获取所有文档的节点
		// nodeList存储了3个<dog>
		NodeList nodeList = element.getElementsByTagName("dog");// 获取dog节点
		// 遍历nodeList,3个<dog>
		for (int i = 0; i < nodeList.getLength(); i++) {
			Dog dog = new Dog();
			// Node node = nodeList.item(i);//list.get(i)
			// 获取dog的id属性
			// node.getAttributes()[0]//node中只有getAttributes获取所有的属性而我们只有一个属性id
			// 可以使用他的子接口
			// 获取节点属性
			Element dogElement = (Element) nodeList.item(i);// list.get(i)
			int id = Integer.parseInt(dogElement.getAttribute("id"));
			dog.setId(id);
			// 获取dog的子节点<name><score>
			NodeList childNodes = dogElement.getChildNodes();
			// 遍历每一个子节点
			for (int j = 0; j < childNodes.getLength(); j++) {
				// 每一个子节点<name><level><score>包括文字、空格
				Node dogChild = childNodes.item(j);
				// 排除空格,只拿<xxx>形式的子节点,即Node.ELEMENT_NODE形式的
				if (dogChild.getNodeType() == Node.ELEMENT_NODE) {
					// 判断节点名
					if (dogChild.getNodeName().equals("name")) {// <name>
						String name = dogChild.getFirstChild().getNodeValue();
						dog.setName(name);
					} else if (dogChild.getNodeName().equals("score")) {
						double score = Double.parseDouble(dogChild.getFirstChild().getNodeValue());
						dog.setScore(score);
					} else if (dogChild.getNodeName().equals("level")) {
						int level = Integer.parseInt(dogChild.getFirstChild().getNodeValue());
						dog.setLevel(level);
					}
				}
			}
			dogs.add(dog);
		}
		return dogs;
	}
}
import java.io.FileNotFoundException;
import java.io.IOException;
import java.util.List;
import javax.xml.parsers.ParserConfigurationException;
import org.xml.sax.SAXException;
//XML解析
public class Sample {
	public static void main(String[] args) throws FileNotFoundException, ParserConfigurationException, SAXException, IOException {
		List<Dog> dogs = XMLParsrUtil.parseXmlToList("src/com/mumulx/dogs.xml");
		System.out.println(dogs);
	}
}
Json
引入json
方法一:打成jar包
新建java项目–>新建包org.json将下载的zip包中的文件复制到org.json中
右键项目导出,java:jar文件,将源码一起打包
方式二:直接使用
map变Json
//1.Map集合、JavaBean、字符串--》JSon对象
	//a.Map集合JSon对象
	public static void mapAndJaon() {
		Map<String,String> map = new HashMap<>();
		map.put("s01", "zs1");
		map.put("s02", "zs2");
		map.put("s03", "zs3");
		map.put("s04", "zs4");
		//map-->json
		JSONObject json = new JSONObject(map);
		System.out.println(json);
	}
JavaBean变JSon
public class Person {
	private int age;
	private String name;
	private Address address;
	public Person() {
	}
	public Person(int age, String name, Address address) {
		this.age = age;
		this.name = name;
		this.address = address;
	}
	public int getAge() {
		return age;
	}
	public void setAge(int age) {
		this.age = age;
	}
	public String getName() {
		return name;
	}
	public void setName(String name) {
		this.name = name;
	}
	public Address getAddress() {
		return address;
	}
	public void setAddress(Address address) {
		this.address = address;
	}
}
public class Address {
	private String homeAddress;
	private String schoolAddress;
	public Address() {
	}
	public Address(String homeAddress, String schoolAddress) {
		this.homeAddress = homeAddress;
		this.schoolAddress = schoolAddress;
	}
	public String getHomeAddress() {
		return homeAddress;
	}
	public void setHomeAddress(String homeAddress) {
		this.homeAddress = homeAddress;
	}
	public String getSchoolAddress() {
		return schoolAddress;
	}
	public void setSchoolAddress(String schoolAddress) {
		this.schoolAddress = schoolAddress;
	}
}
	//JavaBean(普通java对象)-->JSon
	public static void javaBeanAndJSon() {
		Address address = new  Address("js","xz");
		Person per = new Person(18,"zs",address);
		//JavaBean-->JSon
		JSONObject json = new JSONObject(per);
		System.out.println(json);
	}
String变JSon
	//String-->JSon
	public static void stringAndJSon() {
		//字符串的形式必须是json的形式
		String str = "{\"name\":\"zs\",\"age\":23}";
		JSONObject json = new JSONObject(str);
		System.out.println(json);
	}
JSon文件变JSon
per.json
{
"name":"zs",
"age":23,
"address":{"hAddress":"js","sAddress":"xz"}
}
方式一
//文件-->JSon
	//方式一
	//per.json-->JSON
	//思路:将文件变成字符串,再将字符串变成JSon
	public void fileAndJSon01() throws IOException {//static方法只能调用static函数
		//将文件变成String
		//相对路径文件流
		InputStream in = super.getClass().getClassLoader().getResourceAsStream("com/mumulx/per.json");
		byte[] bs = new byte[1024];
		int len = -1;
		StringBuffer sb = new StringBuffer();
		while((len=in.read(bs))!=-1) {
			//byte[]-->String
			String str = new String(bs,0,len);
			sb.append(str);
		}
		String rs = sb.toString();
		JSONObject json = new JSONObject(rs);
		System.out.println(json);
	}
方式二
需要引入commons-io.jar
//方式二
	public void fileAndJSon02() throws IOException {//static方法只能调用static函数
		//文件-->字符串  需要引入commons-io.jar
		String rs = FileUtils.readFileToString(new File("src/com/mumulx/per.json"));
		JSONObject json = new JSONObject(rs);
		System.out.println(json);
	}
生成JSon文件
	//生成JSon文件
	public static void createJSonFile() throws JSONException, IOException {
		//准备JSon数据
		Map<String,Person> map = new HashMap<>();
		Person per1 = new Person(11,"zs1",new Address("js1","yc1"));
		Person per2 = new Person(12,"zs2",new Address("js2","yc2"));
		Person per3 = new Person(13,"zs3",new Address("js3","yc3"));
		map.put("per1", per1);
		map.put("per2", per2);
		map.put("per3", per3);
		//map-->JSon
		JSONObject json = new JSONObject(map);
		//生成json文件
		Writer writer = new FileWriter("d:\\aa.obj");
		json.write(writer);
		writer.close();
	}
JSonArray
//JSonArray
	//[{"name":"zs","age":23},{"classname":"aa","classno":1},{"schoolname":"bb","schooladdr":"sdfsdf"}]
	public static void jsonArray() {
		String jsonArrayStr = "[{\"name\":\"zs\",\"age\":23},{\"classname\":\"aa\",\"classno\":1},{\"schoolname\":\"bb\",\"schooladdr\":\"sdfsdf\"}]";
		//String格式的json数组-->json数组
		JSONArray jArray = new JSONArray(jsonArrayStr);
		System.out.println(jArray);
	}
Map转换为JSon数组
添加jar包
commons-beantils-1.8.0.jar
commons-collections-3.2.1jar
commons-lang-2.5.jar
commons-logging-1.1.1jar
ezmorph-1.0.6.jar
json-lib-2.4-jdk15.jar
//对于json的类型转换通常需要引入另外一个json库
	public static void mapAndJSONArray() {
		Map<String,String> map = new HashMap<>();
		map.put("s01", "zs1");
		map.put("s02", "zs2");
		map.put("s03", "zs3");
		map.put("s04", "zs4");
		//冲突: JSONArray既存在于json.jar又 存在于json-lib库
		net.sf.json.JSONArray jArray = new net.sf.json.JSONArray();
		//map->json
		jArray=jArray.fromObject(map);
		System.out.println(jArray);
	}
新增的jar包功能更加强大,常用
	//String-->JSon
	public static void stringAndJSon01() {
		//字符串的形式必须是json的形式
		String str = "{\"name\":\"zs\",\"age\":23}";
		//JSONObject json = new JSONObject(str);
		net.sf.json.JSONObject json = new net.sf.json.JSONObject();

		json=json.fromObject(str);
		System.out.println(json);

	}
	//JavaBean(普通java对象)-->JSon
	public static void javaBeanAndJSon01() {
		Address address = new  Address("js","xz");
		Person per = new Person(18,"zs",address);
		//JavaBean-->JSon
		net.sf.json.JSONObject json = new net.sf.json.JSONObject();
		json = json.fromObject(per);
		System.out.println(json);
	}
JSONArray–>map
//JSonArray-->map
	public static void jsonArrayToMap() {
		//JSONArray--》每获得一个json-->key:value-->map
		//准备数据
		String jsonArrayStr = "[{\"name\":\"zs\",\"age\":23},{\"classname\":\"aa\",\"classno\":1},{\"schoolname\":\"bb\",\"schooladdr\":\"sdfsdf\"}]";
		//string-->jsonArray
		net.sf.json.JSONArray jArray = new net.sf.json.JSONArray();
		jArray=jArray.fromObject(jsonArrayStr);
		//JSONArray--》获取每一个JSOn
		Map<String,Object> map = new HashMap<>();
		for(int i = 0;i<jArray.size();i++) {
			Object object = jArray.get(i);
			net.sf.json.JSONObject json = (net.sf.json.JSONObject)object;
			//获取每一个json的key/value-->map
			Set<String> keys = json.keySet();//每个json的所有key
			for(String key:keys) {
				Object value=json.getString(key);
				map.put(key, value);
			}
		}
		System.out.println(map);
	}

