spring
spring简介
2002 Rod Johnon 发布<Expoer One-on-one j2eedevelopment and Design>
2003产生Spring,Spring两大核心IOC(DI)、Aop
Spring data, spring boot, spring cloud, spring framework ,spring social
IOC :控制反转 (DI:依赖注入)
Inversion of control
搭建Spring环境
jar包
使用spring-framework-4.3.9.RELEASE-dist.zip
开发spring至少需要使用的jar(5个+1个):
spring-aop.jar              开发AOP特性时需要的JAR
spring-beans.jar            处理Bean的jar          <bean>
spring-context.jar          处理spring_上下文的jar<context>
spring-core.jar             spring核心jar
spring-expression.jar       spring表达式

三方提供的日志jar
commons-logging.jar         日志
xxx.jar二进制文件 xxx-javadoc.jar说明文档 xxx-sources.jar源码java文件
编写配置文件
为了编写时有一些提示、自动生成些配置信息:
方式一:增加sts插件
可以给eclipse增加支持spring的插件: spring tool suite
下载springsource-tool-suite-3.9.4. RELEASE-e4.7.3a-updatesite.zip,然后在Eclipse中安装: Help- Instal
方式二:
直接下载sts工具(相当于一个Eclipse) : 下载地址
新建: bean configuration ..
文件名:applicationContext.xml
开发Spring程序(IOC)
package org.ycit.entity;
public class Student {
	private int stuNo;
	private String stuName;
	private int stuAge;
	public Student() {
	}

	public Student(int stuNo, String stuName, int stuAge) {
		this.stuNo = stuNo;
		this.stuName = stuName;
		this.stuAge = stuAge;
	}
	public int getStuNo() {
		return stuNo;
	}
	public void setStuNo(int stuNo) {
		this.stuNo = stuNo;
	}
	public String getStuName() {
		return stuName;
	}
	public void setStuName(String stuName) {
		this.stuName = stuName;
	}
	public int getStuAge() {
		return stuAge;
	}
	public void setStuAge(int stuAge) {
		this.stuAge = stuAge;
	}
	@Override
	public String toString() {
		// TODO Auto-generated method stub
		return this.stuNo+"-"+this.getStuName()+"-"+this.getStuAge();
	}
}
	<!-- 该文件创建的所有的对象,被spring放入了一个称之为spring  ioc容器的地方 -->
	<!-- id唯一标识符     class:指定类型  property:代表该类 的属性 -->
	<bean id="student" class="org.ycit.entity.Student">
        <!--name 属性名,value:属性值-->
		<property name="stuNo" value="11"></property>
		<property name="stuName" value="zs"></property>
		<property name="stuAge" value="11"></property>
	</bean>
ApplicationContext context = new ClassPathXmlApplicationContext("applicationContext.xml");
Student student = (Student)context.getBean("student");
可以发现,springioc容器 帮我们new了对象,并且给对象赋了值
SpringIOC发展史:
new
Student student = new Student();
student.setXxx();
此种方法创建对象new非常零散,造成后期维护较为麻烦
简单工厂
将new全部放到一个工厂(类)中,根据参数的类型决定返回值
通过简单工厂可以将new集中起来操作,方便后期的维护
ioc (超级工厂)
SpringIOC容器帮我们解决了工厂的问题,可以存放任何对象
IOC(控制反转)也可以称之为DI (依赖注入) :
反转的是获取对象的方式由通过自己new产生对象的方式变成直接从springioc容器中获取(applicationContext)getBean()的方式
控制反转:将创建对象、属性值的方式进行了翻转,从new、setXxx()翻转为了从springIOC容器getBean ()
为了更加清晰地理解ioc,ioc在spring一次大会上更名为DI(依赖注入)
依赖注入:将属性值注入给了属性,将属性注入给了bean, 将bean注入给了ioc容器;
总结:IOC/DI ,无论要什么对象,都可以直接去springioc容器中获取,而不需要自己操作(new\setXxx())
因此之后的ioc分为2步:
- 先给springioc中存放对象并赋值
- 拿
DI:依赖注入
依赖:B类中有A类的对象,B类中–A类的对象依赖A类
类的右上角有s标志,标志着这个类被纳入到了ioc容器中了
IOC容器赋值:
如果是简单类型(8个基本+String),value
如果是对象类型,ref="需要引用的id值",因此实现了 对象与对象之间的依赖关系,通过conext.getBean(需要获取的bean的id值)获取对象
依赖注入3种方式:
set注入:通过setXxx()赋值
赋值,默认使用的是 set方法();
依赖注入底层是通过反射实现的。
<bean id="student" class="org.ycit.entity.Student">
    <property name="stuNo" value="11"></property>
    <property name="stuName" value="zs"></property>
    <property name="stuAge" value="11"></property>
</bean>
构造器注入:通过构造方法赋值
<bean id="teacher" class="org.ycit.entity.Teacher">
    <!--
    通过构造方法赋值 顺序严格一致
    不一致可以使用index属性指定参数的顺序   (从0开始)
    可以使用属性name指定参数的名字-->
    <constructor-arg value="ls"></constructor-arg>
    <constructor-arg value="22"></constructor-arg>
</bean>
<!--index从0开始--> <constructor-arg value="ls" index="1"></constructor-arg> <constructor-arg value="22" index="0"></constructor-arg><!--通过name指定参数名--> <constructor-arg value="ls" name="name"></constructor-arg> <constructor-arg value="22" name="age"></constructor-arg><!--type--> <constructor-arg value="ls" type="String"></constructor-arg> <constructor-arg value="22" type="int"></constructor-arg>注解注入
- @Autowired
@Resource
这几种方式也可以同时使用
需要注意:如果
<constructor-arg>的顺序 与构造方法参数的顺序不一致,则需要通过type或者index或name指定。p命名空间注入(取代的是setter注入)
引入p命名空间
xmlns:p="http://www.springframework.org/schema/p"
使用
```xml
简单类型:
p:属性名="属性值"
引用类型(除了String外):
p:属性名-ref="引用的id"
注意:多个 p赋值的时候 要有空格,顺序无所谓。
注意:
无论是String还是Int/short/long,在赋值时都是
value="值"
因此建议 此种情况 需要配合 name\type进行区分
注入各种集合数据类型:
List Set map properties
private List<String> list;
private String[] array;
private Set<String> set;
private Map<String,String> map;
private Properties props;
<bean id="collectionDemo" class="org.ycit.entity.AllCollectionType">
	<property name="list">
		<list>
			<value>足球</value>
			<value>篮球</value>
			<value>乒乓球</value>
		</list>
	</property>
	<property name="array">
        <array>
            <value>asd</value>
            <value>sdf</value>
            <value>asdf</value>
        </array>
	</property>
	<property name="set">
        <set>
            <value>asd2</value>
            <value>sdf3</value>
            <value>asdf4</value>
        </set>
	</property>
	<property name="map">
        <map>
            <entry>
                <key>
                    <value>aa</value>
                </key>
                <value>aa</value>
            </entry>
            <entry>
                <key>
                    <value>bb</value>
                </key>
                <value>bb</value>
            </entry>
            <entry>
                <key>
                    <value>cc</value>
                </key>
                <value>cc</value>
            </entry>
        </map>
    </property>
    <property name="props">
        <props>
            <prop key="a4">a4</prop>
            <prop key="b4">b4</prop>
            <prop key="c4">c4</prop>
            <prop key="d4">d4</prop>
        </props>
	</property>
	</bean>
set、list、数组 ;各自都有自己的标签<set> <list> <array>,但是也可以混着用,不建议混着使用
注意:
 <bean id="student" class="org.ycit.entity.Student">
        <property name="stuNo" value="11"></property>
</bean>
与
 <bean id="student" class="org.ycit.entity.Student">
        <property name="stuNo">
            <value>11</value>
        </property>
        <property name="stuName">
            <value>1<![CDATA[><#$%>]]></value>
        </property>
        <property name="stuName">
            <value type="java.lang.String">zsss</value>
        </property>
</bean>
两种方式的异同
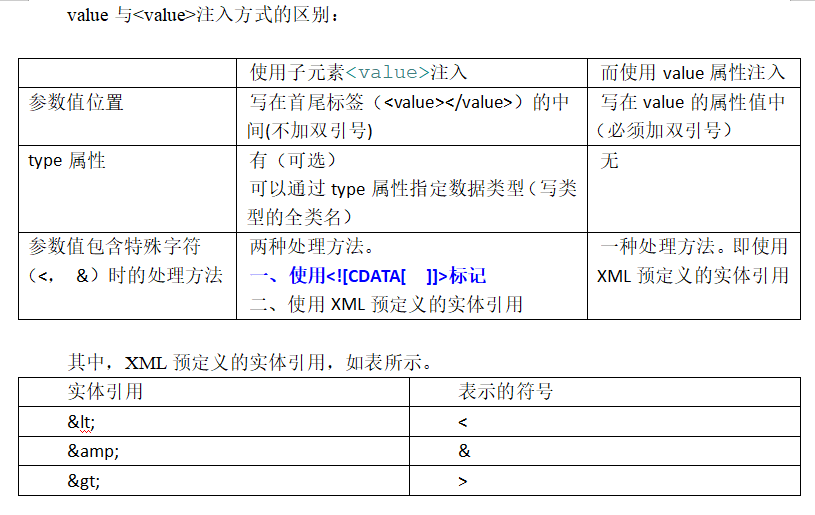
给对象类型
赋值null:
<property name="name" >
    <null/>
</property>
赋空值 ""
<property name="name" >
    <value></value>
</property>
在ioc中定义bean的前提:该bean的类 必须提供了 无参构造
自动装配(只适用于 ref类型 ):
约定优于配置
自动装配:
<bean ... class="org.lanqiao.entity.Course" autowire="byName|byType|constructor|no" >
autowire="byName"Course类中有一个ref属性teracher(属性名),并且该ioc容器中恰好有一个bean的id也是teacher。bean的id值=类的属性名,则会自动装配
byName本质是byId
byName: 自动寻找:其他bean的id值=该Course类的属性名byType: 其他bean的类型(class) 是否与 该Course类的ref属性类型一致 (注意,此种方式 必须满足:当前Ioc容器中 只能有一个Bean满足条件 )constructor: 其他bean的类型(class) 是否与 该Course类的构造方法参数 的类型一致;此种方式的本质就是byTypeno不使用
可以在头文件中 一次性将该ioc容器的所有bean 统一设置成自动装配:
<beans xmlns="http://www.springframework.org/schema/beans"
...
default-autowire="byName">
自动装配虽然可以减少代码量,但是会降低程序的可读性,使用时需要谨慎。子标签可以覆盖全局性,子标签可以进行覆盖设置
使用注解定义bean:
通过注解的形式 将bean以及相应的属性值 放入ioc容器
配置扫描器
<context:component-scan base-package="org.lanqiao.dao,xxx">
</context:component-scan>
多个包之间通过,分隔
Spring在启动的时候,会根据base-package在 该包中扫描所有类,查找这些类是否有注解@Component或其他注解(“studentDao”),如果有,则将该类 加入spring Ioc容器。
添加注解
//id为Component中设置的studentDao
@Component("studentDao")
public class StudentDaoImpl {
	public void addStudent(Student student) {
		System.out.println("增加学生");
	}
}
@Component细化:
dao层注解:         @Repository
service层注解:     @Service
控制器层注解:       @Controller
使用注解实现事务
使用注解实现事务(声明式事务)
目标:通过事务 使以下方法 要么全成功、要么全失败
public void addStudent()
{
    //增加班级
    //增加学生
    //crdu
}
jar包
spring-tx-4.3.9.RELEASE.jar
ojdbc.jar
commons-dbcp.jar  连接池使用到数据源
commons-pool.jar  连接池
spring-jdbc-4.3.9.RELEASE.jar
aopalliance.jar
配置
jdbc\mybatis\spring
增加事务tx的命名空间
xmlns:tx="http://www.springframework.org/schema/tx"
增加对事务的支持
<!-- 增加对事务的支持 -->
<tx:annotation-driven transaction-manager="txManager"  />
配置事务管理器
<!-- 配置事务管理器txManager -->
<bean id = "txManager" class="org.springframework.jdbc.datasource.DataSourceTransactionManager">
	<property name="dataSource" ref="dataSource"></property>
</bean>
配置数据库相关的事务
<!-- 配置数据库相关的事务 -->
<bean id="dataSource" class="org.apache.commons.dbcp.BasicDataSource">
	<property name="driverClassName" value="oracle.jdbc.OracleDriver"></property>
	<property name="url" value="jdbc:oracle:thin:@localhost:1521:MyOracleDB"></property>
	<property name="username" value="scott"></property>
	<property name="password" value="135451"></property>
	<property name="maxActive" value="10"></property>
	<property name="maxIdle" value="6"></property>
</bean>
使用
将需要 成为事务的方法 前增加注解:
@Transactional(readOnly = false,propagation = Propagation.REQUIRED)
public void addStudent(Student student) {
    //if(该学生是否存在)
    //其他的判定条件
	studentDao.addStudent(student);
}
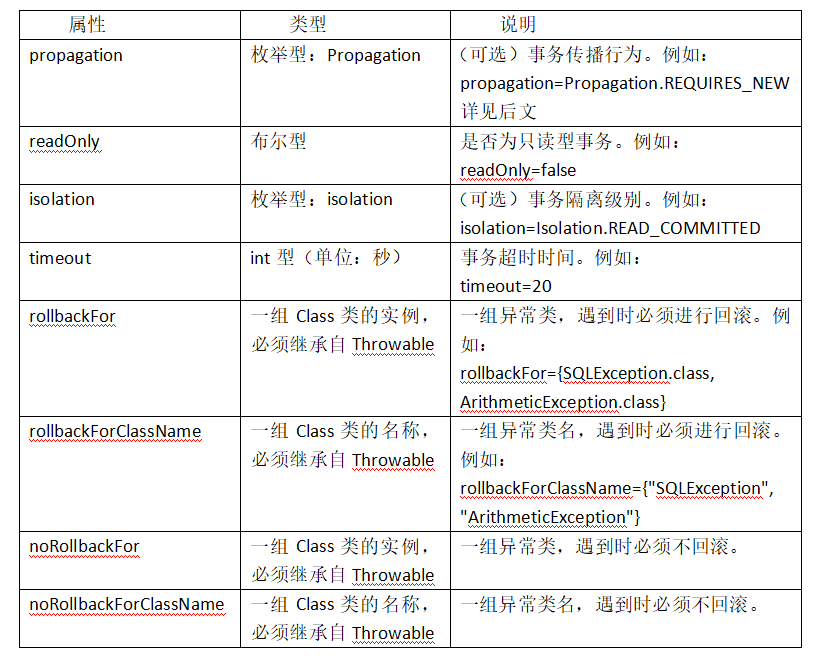
Propagation (事务的传播属性)
Propagationkey属性确定代理应该给哪个方法增加事务行为。这样的属性最重要的部份是传播行为。有以下选项可供使用:PROPAGATION_REQUIRED–支持当前事务,如果当前没有事务,就新建一个事务。这是最常见的选择。
PROPAGATION_SUPPORTS–支持当前事务,如果当前没有事务,就以非事务方式执行。
PROPAGATION_MANDATORY–支持当前事务,如果当前没有事务,就抛出异常。
PROPAGATION_REQUIRES_NEW–新建事务,如果当前存在事务,把当前事务挂起。
PROPAGATION_NOT_SUPPORTED–以非事务方式执行操作,如果当前存在事务,就把当前事务挂起。
PROPAGATION_NEVER–以非事务方式执行,如果当前存在事务,则抛出异常。
PROPAGATION_REQUIRED
加入当前正要执行的事务不在另外一个事务里,那么就起一个新的事务
比如说,
ServiceB.methodB的事务级别定义为PROPAGATION_REQUIRED, 那么由于执行ServiceA.methodA的时候,ServiceA.methodA已经起了事务,这时调用ServiceB.methodB,ServiceB.methodB看到自己已经运行在ServiceA.methodA的事务内部,就不再起新的事务。而假如ServiceA.methodA运行的时候发现自己没有在事务中,他就会为自己分配一个事务。这样,在ServiceA.methodA或者在ServiceB.methodB内的任何地方出现异常,事务都会被回滚。即使ServiceB.methodB的事务已经被提交,但是ServiceA.methodA在接下来fail要回滚,ServiceB.methodB也要回滚
PROPAGATION_SUPPORTS
如果当前在事务中,即以事务的形式运行,如果当前不再一个事务中,那么就以非事务的形式运行
PROPAGATION_MANDATORY
必须在一个事务中运行。也就是说,他只能被一个父事务调用。否则,他就要抛出异常
PROPAGATION_REQUIRES_NEW
这个就比较绕口了。 比如我们设计ServiceA.methodA的事务级别为PROPAGATION_REQUIRED,ServiceB.methodB的事务级别为PROPAGATION_REQUIRES_NEW, 那么当执行到ServiceB.methodB的时候,ServiceA.methodA所在的事务就会挂起,ServiceB.methodB会起一个新的事务,等待ServiceB.methodB的事务完成以后,他才继续执行。他与PROPAGATION_REQUIRED 的事务区别在于事务的回滚程度了。因为ServiceB.methodB是新起一个事务,那么就是存在两个不同的事务。如果ServiceB.methodB已经提交,那么ServiceA.methodA失败回滚,ServiceB.methodB是不会回滚的。如果ServiceB.methodB失败回滚, 如果他抛出的异常被ServiceA.methodA捕获,ServiceA.methodA事务仍然可能提交。
PROPAGATION_NOT_SUPPORTED
当前不支持事务。比如ServiceA.methodA的事务级别是PROPAGATION_REQUIRED ,ServiceB.methodB的事务级别是PROPAGATION_NOT_SUPPORTED , 那么当执行到ServiceB.methodB时,ServiceA.methodA的事务挂起,而他以非事务的状态运行完,再继续ServiceA.methodA的事务。 6.PROPAGATION_NEVER
不能在事务中运行。假设ServiceA.methodA的事务级别是PROPAGATION_REQUIRED, 而ServiceB.methodB的事务级别是PROPAGATION_NEVER ,那么ServiceB.methodB就要抛出异常了。
PROPAGATION_NESTED
理解Nested的关键是savepoint。他与PROPAGATION_REQUIRES_NEW的区别是,PROPAGATION_REQUIRES_NEW另起一个事务,将会与他的父事务相互独立,而Nested的事务和他的父事务是相依的,他的提交是要等和他的父事务一块提交的。也就是说,如果父事务最后回滚,他也要回滚的。而Nested事务的好处是他有一个savepoint。
ServiceA {
    /**
    * 事务属性配置为 PROPAGATION_REQUIRED
    */
    void methodA() {
        try {
            //savepoint
            ServiceB.methodB(); //PROPAGATION_NESTED 级别
        } catch (SomeException) {
            // 执行其他业务, 如 ServiceC.methodC();
        }
    }
}
也就是说ServiceB.methodB失败回滚,那么ServiceA.methodA也会回滚到savepoint点上,ServiceA.methodA可以选择另外一个分支,比如 ServiceC.methodC,继续执行,来尝试完成自己的事务。 但是这个事务并没有在EJB标准中定义。
Spring事务的隔离级别
ISOLATION_DEFAULT:
这是一个PlatfromTransactionManager默认的隔离级别,使用数据库默认的事务隔离级别。另外四个与JDBC的隔离级别相对应
ISOLATION_READ_UNCOMMITTED:
这是事务最低的隔离级别,它充许令外一个事务可以看到这个事务未提交的数据。这种隔离级别会产生脏读,不可重复读和幻像读。
ISOLATION_READ_COMMITTED:
保证一个事务修改的数据提交后才能被另外一个事务读取。另外一个事务不能读取该事务未提交的数据
ISOLATION_REPEATABLE_READ:
这种事务隔离级别可以防止脏读,不可重复读。但是可能出现幻像读。它除了保证一个事务不能读取另一个事务未提交的数据外,还保证了避免下面的情况产生(不可重复读)。
ISOLATION_SERIALIZABLE
这是花费最高代价但是最可靠的事务隔离级别。事务被处理为顺序执行。除了防止脏读,不可重复读外,还避免了幻像读。
什么是脏数据,脏读,不可重复读,幻觉读?
脏读: 指当一个事务正在访问数据,并且对数据进行了修改,而这种修改还没有提交到数据库中,这时,另外一个事务也访问这个数据,然后使用了这个数据。因为这个数据是还没有提交的数据, 那么另外一个事务读到的这个数据是脏数据,依据脏数据所做的操作可能是不正确的。
不可重复读: 指在一个事务内,多次读同一数据。在这个事务还没有结束时,另外一个事务也访问该同一数据。那么,在第一个事务中的两次读数据之间,由于第二个事务的修改,那么第一个事务两次读到的数据可能是不一样的。这样就发生了在一个事务内两次读到的数据是不一样的,因此称为是不可重复读。
幻觉读: 指当事务不是独立执行时发生的一种现象,例如第一个事务对一个表中的数据进行了修改,这种修改涉及到表中的全部数据行。同时,第二个事务也修改这个表中的数据,这种修改是向表中插入一行新数据。那么,以后就会发生操作第一个事务的用户发现表中还有没有修改的数据行,就好象发生了幻觉一样。
AOP:面向方面编程
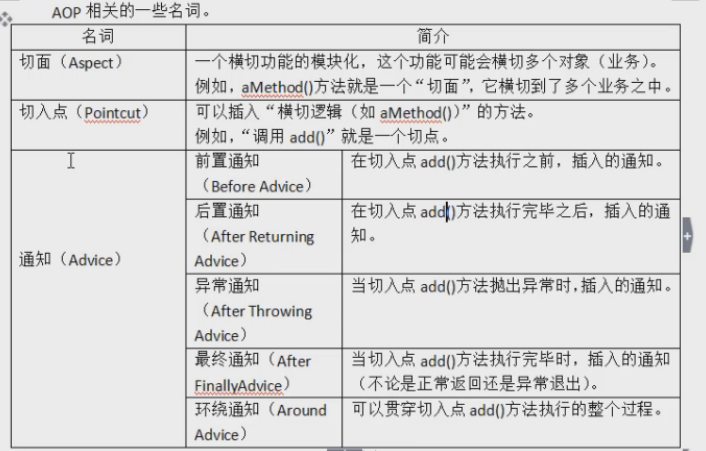
一个普通的类—->有特定功能的类
a.继承类
b.实现接口
c.注解
d.配置
类 -> “通知” :实现接口
xml方式的通知类型
| 通知类型 | 需要实现的接口 | 接口中的方法 | 执行时机 |
|---|---|---|---|
| 前置通知 | org-springframework.aop.MethodBeforeAdvice | before() | 目标方法执行前。 |
| 后置通知 | org-springframework.aop.AfterReturningAdvice | afterRetuming() | 目标方法执行后。 |
| 异常通知 | org.-springframework.aop.ThrowsAdvice | 无 | 目标方法发生异常时 |
| 环绕通知 | org.aopalliance.intercept.MethodInterceptor | invoke() | 拦截对目标方法调用,即调用目标方法的整 |
前置通知
jar
aopaliance.jar
aspectjweaver.jar
配置
增加命名空间
xmlns:aop="http://www.springframework.org/schema/aop"
将两个类放入ioc容器
<bean id="studentServiceImpl" class="org.ycit.service.impl.StudentServiceImpl">
    <property name="studentDao" ref="StudentDaoImpl"></property>
</bean>
<!--通知所在类-->
<bean id="logBefore" class = "org.ycit.aop.LogBefore">
</bean>
将二者进行关联
<!-- 关联两个类 -->
<aop:config>
    <!--配置切入点(在哪里执行通知)  -->
    <!-- 如果想要在多个方法执行之前  执行同一个函数则execution(aa())orexecution(bb()) -->
    <aop:pointcut expression="execution(public void org.ycit.service.impl.StudentServiceImpl.addStudent(org.ycit.entity.Student))" id="poioncut"/>

    <!--advisor:相当于连接切入点和切面的线  -->
    <aop:advisor advice-ref="logBefore" pointcut-ref="poioncut"/>
</aop:config>
注意此时的全类名
如果想在多个方法执行前执行该方法则
execution() or execution()
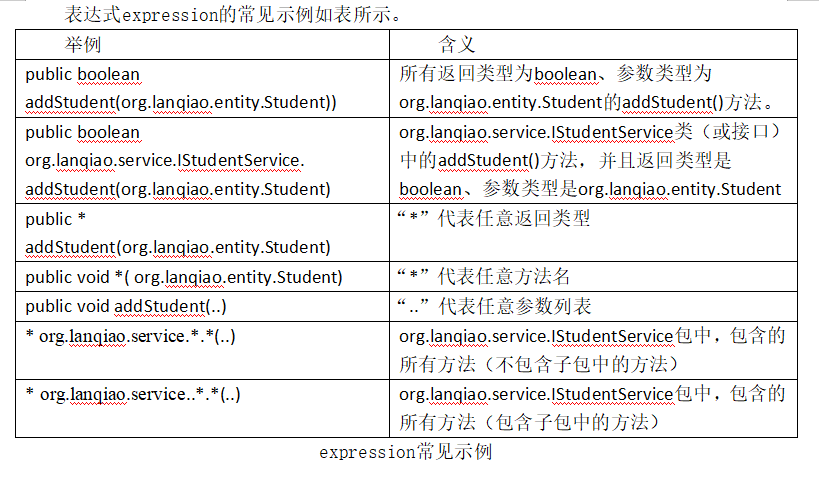
测试
public static void testAop() {
    ApplicationContext context = new ClassPathXmlApplicationContext("applicationContext.xml");
    IsStudentService student = (IsStudentService)context.getBean("studentServiceImpl");
    Student student = new Student();
    studen.addStudent(student1);
}
如果出现异常:类似
java.lang.NoClassDefFoundError: org/apache/commons/pool/impl/GenericObjectPool
则说明缺少jar
编写
aop:每当之前add()之前 自动执行一个方法log();
addStudent(); 业务方法(IStudentService.java中的 addStudent())
public interface IsStudentService {
    void addStudent(Student studnet);
}
log()
public class LogBefore implements MethodBeforeAdvice{
	//前置通知的具体内容
	@Override
	public void before(Method method, Object[] args, Object target) throws Throwable {
		System.out.println("before....");
		//target 对象 method 方法 args输入参数
	}
}
before(); 自动执行的通知,即aop前置通知
public class Xxx
{
	@Test
	a(){}
}
后置通知:
通知类 ,普通实现接口
public class LogAfter implements AfterReturningAdvice{
	@Override
	public void afterReturning(Object returnValue, Method method, Object[] args, Object target) throws Throwable {
		System.out.println("**********后置通知:目标对象:"+target+",调用的方法名:"+method.getName()+",方法的参数个数:"+args.length+",方法的返回值:"+returnValue);
	}
}
目标对象:+target+

调用的方法名:method.getName()

方法的参数个数:args.length
方法的返回值:returnValue
业务类、业务方法
public interface IsStudentService {
    void addStudent(Student studnet);
}
配置:
将业务类、通知 纳入springIOC容器
定义切入点(一端)、定义通知类(另一端),通过pointcut-ref将两端连接起来
<!-- 将通知纳入springIOC容器 -->
<bean id="logAfter" class="org.lanqiao.aop.LogAfter"></bean>

<aop:config>
    <!-- 切入点(连接线的一端:业务类的具体方法) -->
    <aop:pointcut expression="execution(public * org.lanqiao.service.impl.StudentServiceImpl.addStudent(..))"   id="poioncut2"/>
    <!-- (连接线的另一端:通知 类) -->
    <aop:advisor advice-ref="logAfter"  pointcut-ref="poioncut2" />
</aop:config>
异常通知:
通知类
public class LogException implements ThrowsAdvice {
	//异常通知的具体方法
	public void afterThrowing(Method method, Object[] args ,Object target, NullPointerException ex)//只捕获NullPointerException类型的异常
	{
		System.out.println("00000000000异常通知:目标对象:"+target+",方法名:"+method.getName()+",方法的参数个数:"+args.length+",异常类型:"+ex.getMessage());
	}
}
目标对象:target
方法名:method.getName()
方法的参数个数:args.length
异常类型:ex.getMessage()
根据异常通知接口的定义可以发现,异常通知的实现类 必须编写以下方法:
public void afterThrowing([Method, args, target], ThrowableSubclass):
a.public void afterThrowing(Method, args, target, ThrowableSubclass)
b.public void afterThrowing(ThrowableSubclass)
配置
<bean id="logException" class="org.lanqiao.aop.LogException"></bean>

<aop:config>
    <!-- 切入点(连接线的一端:业务类的具体方法) -->
    <aop:pointcut expression="execution(public * org.lanqiao.service.impl.StudentServiceImpl.addStudent(..))"   id="poioncut3"/>
    <!-- (连接线的另一端:通知 类) -->
    <aop:advisor advice-ref="logException"  pointcut-ref="poioncut3" />
</aop:config>
环绕通知:
在目标方法的前后、异常发生时、最终等各个地方都可以 进行的通知,最强大的一个通知;
可以获取目标方法的 全部控制权(目标方法是否执行、执行之前、执行之后、参数、返回值等)
在使用环绕通知时,目标方法的一切信息 都可以通过invocation参数获取到
环绕通知 底层是通过拦截器实现的。
通知类
public class LogAround  implements MethodInterceptor{
	@Override
	public Object invoke(MethodInvocation invocation) throws Throwable {
		Object result  = null ;
		//方法体1...
		try {
			//方法体2...
			System.out.println("用环绕通知实现的[前置通知]...");

			// invocation.proceed() 之前的代码:前置通知
			 result  = invocation.proceed() ;//控制着目标方法的执行  ,addStudent()
			//result 就是目标方法addStudent()方法的返回值
//			 invocation.proceed() 之后的代码:后置通知
			System.out.println("用环绕通知实现的[后置通知]...:");
			System.out.println("-----------------目标对象target"+invocation.getThis()+",调用的方法名:"+invocation.getMethod().getName()+",方法的参数个数:"+invocation.getArguments().length+",返回值:"+result);
		}catch(Exception e) {
			//方法体3...
			//异常通知
			System.out.println("用环绕通知实现的[异常通知]...");
		}
		return result;//目标方法的返回值
	}
}
配置
<!-- 将环绕通知加入ioc容器
<bean id="logAround" class="org.lanqiao.aop.LogAround">
</bean>

<!-- 切入点(连接线的一端:业务类的具体方法)-->
<aop:config>

    <aop:pointcut expression="execution(public * org.lanqiao.service.impl.StudentServiceImpl.addStudent(..))"
		 id="poioncut4"/>
<!-- (连接线的另一端:通知 类)
    <aop:advisor advice-ref="logAround"  pointcut-ref="poioncut4" />
</aop:config> -->
实现注解实现 通知 ,aop
jar
与 实现接口 的方式相同
配置
将业务类、通知 纳入springIOC容器
开启注解对AOP的支持
<!--开启注解对AOP的支持-->
<aop:aspectj-autoproxy></aop:aspectj-autoproxy>
<!-- 配置扫描器 -->
<context:component-scan base-package="org.lanqiao.dao">
编写
通知:
//@Component("logAnnotation")   //将LogAspectAnnotation纳入springIOC容器中
@Aspect //此类是一个通知
public class LogAspectAnnotation  {

	//前置通知
	@Before("execution(public * addStudent(..))") //属性:定义切点
	public void myBefore(JoinPoint jp) {
		System.out.println("《注解形式-前置通知》:目标对象:"+jp.getTarget()+",方法名:"+jp.getSignature().getName() +",参数列表:"+ jp.getArgs().length  );
	}
	//后置通知
	@AfterReturning( pointcut= "execution(public * addStudent(..))" ,returning="returningValue" )
	public void myAfter(JoinPoint jp,Object returningValue) {//returningValue是返回值,但需要告诉spring
		System.out.println("《注解形式-后置通知》:目标对象:"+jp.getTarget()+",方法名:"+jp.getSignature().getName() +",参数列表:"+  jp.getArgs().length+",返回值:"+returningValue );
	}
	/*环绕通知 ,参数ProceedingJoinPoint
	@Around("execution(public * addStudent(..))")
	public void myAround(ProceedingJoinPoint jp  ) {
		//方法之前:前置通知
		System.out.println("《【环绕】方法之前:前置通知");
		try {
			//方法执行时
			jp.proceed() ;//执行方法

			//方法之前之后:后置通知
			System.out.println("《【环绕】方法之前之后:后置通知");
		}catch(Throwable e) {
			//发生异常时:异常通知
			System.out.println("《【环绕】发生异常时:异常通知");
		}finally {
			//最终通知
			System.out.println("《【环绕】最终通知");
		}
	}*/
	//异常通知:如果只捕获特定类型的已存银行,则可以通过第二个参数实现:e
	@AfterThrowing(pointcut= "execution(public * addStudent(..))",throwing="e")
	public void myException(JoinPoint pj, NullPointerException e) {//此异常通知 只会捕获NullPointerException类型的异常
		System.out.println("&&&&&&《注解形式-异常通知》----e:"+e.getMessage());
	}
	//最终通知
	@After("execution(public * addStudent(..))")
	public void myAfter() {
		System.out.println("《[myAfter]注解形式-最终通知-----通知》----");
	}
}
注意:通过注解形式 将对象增加到 ioc容器时,需要设置 扫描器
<context:component-scan base-package="org.lanqiao.aop"></context:component-scan>
扫描器 会将 指定的包 中的 @Componet @Service @Respository @Controller修饰的类产生的对象 增加到IOC容器中
@Aspect不需要 加入扫描器,只需要开启即可:
<aop:aspectj-autoproxy></aop:aspectj-autoproxy>
通过注解形式 实现的aop,如果想获取 目标对象的一些参数,则需要使用一个对象:JointPoint
注解形式的返回值:
声明返回值 的参数名:
@AfterReturning( pointcut= "execution(public * addStudent(..))" ,returning="returningValue" )
注解形式实现aop时,通知的方法的参数不能多、少
public void myAfter(JoinPoint jp,Object returningValue) {//returningValue是返回值,但需要告诉spring
	System.out.println("返回值:"+returningValue );
实现接口形式、注解形式 只捕获声明的特定类型的异常,而其他类型异常不捕获。
通过 配置将 类->通知
基于Schema配置
类似 与 实现接口的方式
接口方式通知:
public class LogAfter implements AfterReturningAdvice
Schema方式通知:
- 编写一个普通类 public class LogAfter {}
将该类 通过配置,转为一个“通知”
编写普通类
public class LogSchema {
	//后置通知方法  :JoinPoint适用于注解
	public void afterReturning(JoinPoint jp,Object returnValue) throws Throwable {
		System.out.println("》》》》》》》》》》》后置通知:目标对象:"+jp.getThis()+",调用的方法名:"+jp.getSignature().getName()+",方法的参数个数:"+jp.getArgs().length+",方法的返回值:"+returnValue);
	}
	public void before() {
		System.out.println("》》》》》》》》》》》前置通知...");
	}
	public void whenException(JoinPoint jp,NullPointerException e) {
		System.out.println(">>>>>>>>>>>>>>>>异常:" +e.getMessage());
	}
	//注意:环绕通知 会返回目标方法的返回值,因此返回值为Object
	public Object around(ProceedingJoinPoint jp)    {
		System.out.println("''''''''''''''''''环绕通知:前置通知");
		Object result = null ;
		try {
			 result = jp.proceed() ;//执行方法
			 System.out.println("'''''''''"+jp.getSignature().getName()+","+result);
			System.out.println("''''''''''''''''''环绕通知:后置通知");
		}catch(Throwable e) {
			System.out.println("''''''''''''''''''环绕通知:异常通知");
		}
		return result ;
	}
}
配置
<!-- 将准备转为 通知的类 纳入ioc容器 -->
<bean id="logSchema" class="org.lanqiao.aop.LogSchema"></bean>
<aop:config>
    <!-- 切入点(连接线的一端:业务类的具体方法) -->
    <aop:pointcut expression="execution(public * org.lanqiao.service.impl.StudentServiceImpl.addStudent(..))"   id="pcShema"/>
    <!-- (连接线的另一端:通知 类 -->
    <!-- schema方式 -->
    <aop:aspect ref="logSchema">
    <!-- 连接线:连接 业务 addStudent和通知before -->
    <aop:before method="before" pointcut-ref="pcShema"/>

    <!-- 连接线:连接 业务 addStudent  和  通知afterReturning -->
    <aop:after-returning method="afterReturning" returning="returnValue" pointcut-ref="pcShema"/>
    <!--异常-->
    <aop:after-throwing method="whenException" pointcut-ref="pcShema" throwing="e"/>

    <!-- 环绕 -->
    <aop:around method="around" pointcut-ref="pcShema" />
    </aop:aspect>
</aop:config>
如果要获取目标对象信息:
注解、schema:JoinPoint
接口:Method method, Object[] args, Object target
schema形式 和注解形式相似,
不同之处:
注解形式 使用了注册@After,
schmema形式进行了多余的配置
Spring开发Web项目 及 拆分Spring配置文件
SpringIoc容器初始化: 1. 将容器中的所有bean实例化为对象 2. 将各个bean依赖的属性值注入进去
在普通Java程序中
ApplicationContext context = new ClassPathXmlApplicationContext("applicationContext.xml");
时初始化
Java程序的入口是统一的main(),因此只需要在main中实例化一次applicationContext.xml就可以实现Ioc容器初始化操作
Spring开发Web项目
Web项目如何初始化SpringIOC容器 :
思路:当服务启动时(tomcat),通过监听器将SpringIOC容器初始化一次(该监听器 spring-web.jar已经提供)
因此用spring开发web项目 至少需要7个jar: spring-java的6个jar + spring-web.jar,
注意:web项目的jar包 是存入到WEB-INF/lib中
web项目启动时 ,会自动加载web.xml,因此需要在web.xml中加载 监听器(ioc容器初始化)。
Web项目启动时,启动实例化Ioc容器:
 <!-- 指定 Ioc容器(applicationContext.xml)的位置-->
  <context-param>
  		<!--  监听器的父类ContextLoader中有一个属性contextConfigLocation,该属性值 保存着 容器配置文件applicationContext.xml的位置 -->
  		<param-name>contextConfigLocation</param-name>
  		<param-value>classpath:applicationContext.xml</param-value>
  </context-param>
  <listener>
  	<!-- 配置spring-web.jar提供的监听器,此监听器 可以在服务器启动时 初始化Ioc容器。
  		初始化Ioc容器(applicationContext.xml) ,
  			1.告诉监听器 此容器的位置:context-param
  			2.默认约定的位置	:WEB-INF/applicationContext.xml
  	 -->
  	<listener-class>org.springframework.web.context.ContextLoaderListener</listener-class>
    </listener>
初始化Ioc容器(applicationContext.xml)两种方式
- 告诉监听器 此容器的位置:context-param
- 默认约定的位置:WEB-INF/applicationContext.xml
拆分Spring配置文件
java项目:
applicationContext1.xml
applicationContext2.xml
applicationContext3.xml

ApplicationContext conext = new ClassPathXmlApplicationContext("applicationContext3.xml") ;
Web项目:
根据什么拆分?
三层结构
UI(html/css/jsp  、Servlet)  applicationController.xml

Service :applicationService.xml

Dao:applicationDao.xml

公共 数据库:applicationDB.xml
功能结构
学生相关配置
applicationContextStudent.xml <bean id="" class="X...Student">班级相关配置
applicationContextClass.xml
合并:如何将多个配置文件 加载
方式1
<context-param>
    <!--  监听器的父类ContextLoader中有一个属性contextConfigLocation,该属性值 保存着 容器配置文件applicationContext.xml的位置 -->
    <param-name>contextConfigLocation</param-name>
    <param-value>
        classpath:applicationContext.xml,
        classpath:applicationContext-Dao.xml,
        classpath:applicationContext-Service.xml,
        classpath:applicationContext-Controller.xml
    </param-value>
</context-param>
方式二(推荐)
<context-param>
    <!--  监听器的父类ContextLoader中有一个属性contextConfigLocation,该属性值 保存着 容器配置文件applicationContext.xml的位置 -->
    <param-name>contextConfigLocation</param-name>
    <param-value>
        classpath:applicationContext.xml,
        classpath:applicationContext-*.xml
    </param-value>
</context-param>
方式三
只在web.xml中加载主配置文件,
<param-value>
    classpath:applicationContext.xml
</param-value>
然后在主配置问加中,加载其他配置文件
<import resource="applicationContext-*.xml"/>bean的实例化、DI是在保存在Spring IOC容器中的
但是每一次request是请求Servlet容器,因此需要在二者间创建一个桥梁
注解形式依赖注入
//<bean id="studentService" class="org.ycit.service.impl.StudentServiceImpl">
//@Service("studentService")

public class StudentServiceImpl implements IsStudnetService{}
属性赋值
@Autowired//自动装配,byType
private StudentMapper studentMapper;
配置扫描包
<context:component-scan base-package="org.ycit.service.impl"></context:component-scan>
注解形式
@Autowired          自动装配,byType

@Autowired
@Qualifier("xxx")   自动装配,byName(byID),二者同时使用
SpringIOC容器
Spring IoC容器?
2种形式:
xml配置文件:
applicationContext.xml
存bean:
<bean id class>取bean:
ApplicationContext context= new ClassPathXmlApplicationContext("applicationContext.xml");

context.getBean();
注解:
存bean、
带有@Configuration注解的类(配置类)
//配置类
@Configuration
public class MyConfig {
    @Bean(value="stu")  //id="stu" class="...Student"
    public Student myStudent( Address address){
        Student student = new Student(10,"zs10",23);
        return student;
    }
}
取bean
ApplicationContext context  = new AnnotationConfigApplicationContext(MyConfig.class) ;
context.getBean();
注意:两种形式获取的Ioc容器是 独立的
IOC作用
存bean
取bean
XXX:注解形式 给IoC容器中存放Bean:
必须有@Configuration注解(配置类)
形式:
三层组件加入IOC容器: 给个各类加注解 、 扫描器识别注解所在包
给三层组件 分别加注解(@Controller、@Service、@Repository -> @Component)
将注解所在包 纳入ioc扫描器(ComponentScan)
纳入ioc扫描器:
xml配置文件 :
<context:component-scan base-package="com.lx.controller"></context:component-scan>
逻辑: 在三层类上加注解 ,让ioc识别,扫描器
会将配置类也纳入IOC容器中,id值为类名的首字母小写注解扫描器
@Configuration
@ComponentScan(value="com.lx")
public class MyConfig {
}
component-scan:只对三层组件负责
给扫描器指定规则:
三层组件
@ComponentScan只负责三层组件
过滤类型:FilterType(ANNOTATION,ASSIGNABLE_TYPE,CUSTOM)
ANNOTATION
ANNOTATION:三层注解类型@Controller、@Service、@Repository -> @Component
excludeFilters:排除
includeFilters:有默认行为,可以通过useDefaultFilters = false禁止,默认就是包含所有,又重复包含了一次,因此包含无效
//排除Service和Dao的扫描
@ComponentScan(value="com.lx",excludeFilters = {  @ComponentScan.Filter(type= FilterType.ANNOTATION,classes ={Service.class,Repository.class})})

@ComponentScan(value="com.lx",includeFilters = {@ComponentScan.Filter(type= FilterType.ANNOTATION,classes ={Controller.class})},useDefaultFilters = false)
ASSIGNABLE_TYPE:具体的类
@ComponentScan(value="com.yanqun",excludeFilters = { @ComponentScan.Filter(type= FilterType.ASSIGNABLE_TYPE,classes ={StudentDao.class} )} )
区分:
ANNOTATION:Controller.clss 指的是 所有标有@Controller的类
ASSIGNABLE_TYPE:值得是具体的一个类 StudentController.class
CUSTOM自定义:自己定义包含规则
@ComponentScan.Filter(type= FilterType.CUSTOM ,value={MyFilter.class}
MyFilter implements TypeFilter 重写其中的match,如果return true则加入IoC容器
//自定义筛选
public class MyFilter  implements TypeFilter {
    @Override
    public boolean match(MetadataReader metadataReader, MetadataReaderFactory metadataReaderFactory) throws IOException {
        AnnotationMetadata annotationMetadata = metadataReader.getAnnotationMetadata();
        //获取类名
        String className = annotationMetadata.getClassName();、
        //只纳入含School的类
        if(className.contains("School"))
            return true ;
        return false;
    }
}
非三层组件
(Student.class 、IntToStringConver.class):
放入IOC
@Bean+方法的返回值
id默认就是方法名(可以通过@Bean(“stu”) 修改id值)
import 、FactoryBean
bean的作用域
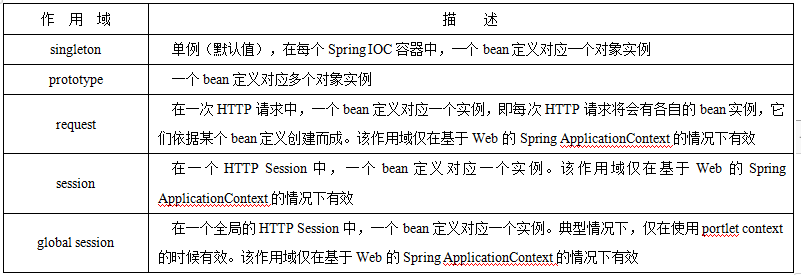
    @Bean(value="stu")
    @Scope("singleton")
    public Student myStudent(){
    }
<bean id="student" class="com.lx.entity.Student" scope="singleton" >
    <!--value:简单类型-->
    <property name="stuNo" value="1"></property>
    <property name="stuName" value="张三"></property>
    <property name="stuAge" value="23"></property>
    <!--ref:其他类型-->
    <!--<property name="address" ref="myaddress"></property>-->
</bean>
scope: singleton(默认)| prototype
执行时机(产生bean的时机):
singleton(单例):容器在初始化时,就会创建对象(唯一的一个);以后再getBean时,不再产生新的bean。singleton也支持延迟加载(懒加载):在第一次使用时产生。 @Lazy
    @Bean(value="stu")
    @Scope("singleton")
    @Lazy
    public Student myStudent(){
    }
prototype(原型,多例):容器在初始化时,不创建对象;只是在每次使用时(每次从容器获取对象时 ,context.getBean(Xxxx)),再创建对象;并且每次getBean()都会创建一个新的对象。
单例和多例
Student stu1 = (Student)context.getBean(Student.class) ;
Student stu2 = (Student)context.getBean(Student.class) ;
当从容器中拿去对象时,拿取得是否是同一个对象; 是:单例;不是:多例
条件注解 Spring Boot
可以让某一个Bean 在某些条件下 加入Ioc容器,其他情况下不加IoC容器。
准备 bean
编写类
增加条件Bean:给每个Bean设置条件 ,必须实现Condition接口
public class OilCarCondition  implements Condition {
    //如果当前环境是 oil,则加入 OilCar
    @Override
    public boolean matches(ConditionContext conditionContext, AnnotatedTypeMetadata annotatedTypeMetadata) {
        //获取环境
        Environment environment = conditionContext.getEnvironment();
        String carType = environment.getProperty("car.type");//car.type="oil"
        if(carType.contains("oil")){
            return true ;
        }
        return false;
    }
}
public class EnergyCarCondition implements Condition {
    //如果当前环境是 oil,则加入 OilCar
    @Override
    public boolean matches(ConditionContext conditionContext, AnnotatedTypeMetadata annotatedTypeMetadata) {
        //获取环境
        Environment environment = conditionContext.getEnvironment();
        String carType = environment.getProperty("car.type");//car.type="oil"
        if(carType.contains("energy")){
            return true ;
        }
        return false;
    }
}
根据条件,加入IoC容器
    @Bean
    @Conditional(OilCarCondition.class)
    public Car oilCar()
    {
        return new OilCar() ;
    }
    @Bean
    @Conditional(EnergyCarCondition.class)
    public Car energyCar()
    {
        return new EnergyCar() ;
    }
添加虚拟参数idea
run–>Edit Configurations…–>VM option
-Dcar.type=oil
回顾给IoC加入Bean的方法
注解 :全部在@Congiration配置中设置:
三层组件: 扫描器 + 三层注解
非三层组件:三种方式
- @Bean+返回值,在配置类中
- @import
- FactoryBean(工厂Bean)
@import使用:
直接编写到@Import中,并且id值是全类名
//配置类
@Configuration
@Import({Apple.class,Banana.class})
@ComponentScan(value="com.lx")
public class MyConfig {
自定义ImportSelector接口的实现类,通过selectimports方法实现(方法的返回值 就是要纳入IoC容器的Bean) 。
并且 告知程序 自己编写的实现类。
@Import({Orange.class,MyImportSelector.class})public class MyImportSelector implements ImportSelector { @Override public String[] selectImports(AnnotationMetadata importingClassMetadata) { return new String[]{"com.lx.entity.Apple","com.lx.entity.Banana"}; //返回值就是 要加入IOC容器的Bean的全类名 } }@Configuration @Import({Apple.class,MyImportSelector.class}) @ComponentScan(value="com.lx") public class MyConfig {编写ImportBeanDefinitionRegistrar接口的实现类,重写方法
public class MyImportBeanDefinitionRegistrar implements ImportBeanDefinitionRegistrar {
    @Override
    public void registerBeanDefinitions(AnnotationMetadata importingClassMetadata, BeanDefinitionRegistry registry) {
//        "com.lx.entity.Orange"
//Class方式
//        BeanDefinition beanDefinition =  new RootBeanDefinition(Orange.class) ;
      //String方式
        BeanDefinition beanDefinition =  new RootBeanDefinition("com.lx.entity.Orange") ;
        registry.registerBeanDefinition("myorange", beanDefinition ); // id ,class
    }
}
@Configuration @Import({MyImportBeanDefinitionRegistrar.class}) @ComponentScan(value="com.lx") public class MyConfig {Import中可以同时放置这三种方法的Class
@Import({Orange.class,MyImportSelector.class,MyImportBeanDefinitionRegistrar.class})
FactoryBean(工厂Bean)
准备bean。实现类和重写方法
public class MyFactoryBean implements FactoryBean {
    //放入对象
    @Override
    public Object getObject() throws Exception {
        return new Apple();
    }
    //类型
    @Override
    public Class<?> getObjectType() {
        return Apple.class;  //Apple
    }
    //是否是单例
    @Override
    public boolean isSingleton() {
        return true;
    }
}
注册bean。注册到@Bean中
@Bean
public FactoryBean<Apple> myFactoryBean(){
    return new MyFactoryBean();//到底是什么?MyFactoryBean 、Apple ?
}
通过@Bean放入容器中得对象应该是myFactoryBean,而myFactoryBean中又是放入了Apple;MyFactoryBean到底是什么?MyFactoryBean 、Apple ?
注意:需要通过&区分 获取的对象是哪一个 :
不加&,获取的是最内部真实的Apple;
如果加了&,获取的 是FacotryBean
//Apple
Object obj = context.getBean("myFactoryBean");
System.out.println(obj);
//FacotryBean
Object obj2 = context.getBean("&myFactoryBean");
System.out.println(obj2);
具体得原因再源码中又说明
Bean的生命周期:
方式一
适用于Bean+返回值得方式
创建(new …)、初始化(赋初值init)、 ….、销毁(destroy)(类似servlet)
xml:
<bean id="student" class="com.yanqun.entity.Student" scope="singleton" init-method="myInit" destroy-method="myDestroy" >
注解:
@Bean(value="stu",initMethod = "myInit",destroyMethod = "myDestroy")  //id="stu" class="...Student"
@Autowired
public Student myStudent(){
}
IoC容器在初始化时,会自动创建对象(构造方法) ->init ->…..->当容器关闭时 调用destroy…
销毁方法
((AnnotationConfigApplicationContext) context).close();
方式二:
JAVA规范 :JSR250;适用于三层组件的形式 三层组件: 扫描器 + 三层注解(4个)
三层注解 (功能性注解、MyIntToStringConverter.java):@Controller、@Service、@Repository、@Component
–>三层注解(功能性注解【三层、功能性类】)
将响应组件 加入 @Component注解、 给初始化方法加
@PostConstruct、给销毁方法加@PreDestroy
@PostConstruct:相当于方法一的init
@PreDestroy:相当于方法一的destroy
如果要获取@Component注解中的bean,那么该Bean的名字就是@Component(value=“xxx”)的value值
@Component(value="myConverter")//@Server  @COntroller @Repository
public class MyIntToStringConverter {

    @PostConstruct
    public void init(){
        System.out.println("转换..Init...");
    }

    public void myConverter(){
        System.out.println("转换.......");
    }
    @PreDestroy
    public void destroy(){
        System.out.println("转换..destroy...");
    }
}
MyIntToStringConverter converter=     (MyIntToStringConverter)context.getBean("myConverter") ;
converter.myConverter();
方法三:两个接口
接口:适用于三层组件(扫描器+三层组件)
InitializingBean初始化
DisposableBean 销毁
初始化:只需要 实现InitializingBean中的afterPropertiesSet()方法
销毁:实现DisposableBean 中的destroy()方法
问题:要在SPring IOC容器中操作:操作方式 对象:Bean+返回 ,三层组件
如果是注解形式
随便写一个方法 ,然后加上相应注解即可
如果是接口形式
必须 实现接口中规定的方法
@Component
public class MyFunction implements InitializingBean , DisposableBean {
public void myMethod(){
}
@Override
public void afterPropertiesSet() throws Exception {
    System.out.println("MyFunction初始化...afterPropertiesSet");
}

@Override
public void destroy() throws Exception {
    System.out.println("MyFunction销毁。。。destroy");
}
}
方法四:(给容器中的所有Bean加初始化、销毁)一个接口
接口:适用于三层组件
接口BeanPostProcessor:拦截了所有中容器的Bean
@Controller //(4个)
public class MyXxx implements BeanPostProcessor {
    //拦截器
    @Override//bean:Student(zs)
    public Object postProcessBeforeInitialization(Object bean, String beanName) throws BeansException {
//        System.out.println("初始化:"+beanName+":"+bean);
//        bean.setName("ls")
        if(bean instanceof Student){
            System.out.println("MyXxx...初始化..");
            Student stu = (Student)bean ;
            stu.setStuName("zs123456");
            stu.setStuNo(123);
            return stu ;
        }
        return bean;
    }
    @Override
    public Object postProcessAfterInitialization(Object bean, String beanName) throws BeansException {
        if(bean instanceof Student) {
//            System.out.println("销毁:" + beanName + ":" + bean);
            System.out.println("MyXxx...销毁..");
        }
            return bean;
    }
}
自动装配 : 三层组件(4个注册+扫描器)
@Autowired
Controller->Service->Dao
三层组件
通过@Autowired从Ioc容器中 根据类型自动注入(没有调用setXxx()方法)
如果@Autowired在属性前标注,则不调用setXxx;如果标注在setXxx前面 ,则调用setXxx
不能放在方法的参数前
@Autowired
private StudentDao studentDao ;
或
@Autowired
public void setStudentDao(StudentDao studentDao) {
    this.studentDao = studentDao;
}
Bean+返回值:
@Autowired 在方法的参数前(也可以省略)、方法前 (构造方法:特殊,如果只有一个有参构造方法,则构造方法前的@Autowired也可以省略)
参数前
@Bean(value="stu")
public Student myStudent(@Autowired Address address){
    Student student = new Student(10,"zs10",23);
    return student;
}
方法前
@Autowired
@Bean(value="stu")
public Student myStudent(Address address){
    Student student = new Student(10,"zs10",23);
    return student;
}
构造方法前
@Autowired
public StudentService(StudentDao studentDao){
    this.studentDao= studentDao ;
}
之前:@Autowired 根据类型匹配:
三层注入方式/@Bean+返回值
如果有多个类型相同的,匹配哪个?
报错。
可以指定默认值@primary,就不会报错
@Primary
@Repository("stuDao1")
public class StudentDaoImpl1 implements StudentDao {
}
@Repository("stuDao2") public class StudentDaoImpl2 implements StudentDao { }@Autowired private StudentDao studentDao ;值为stuDao1
能否根据名字匹配?
可以,结合 @Qualifier(“stuDao2”)使用。
@Qualifier("stuDao2")
@Autowired
private StudentDao studentDao ;
如果有0个类型相同,默认报错;可以修改成不注入(值为null),
@Autowired(required=false)
private StudentDao studentDao ;
自动注入方式一:@Autowired (Spring) ,默认根据类型
自动注入方式二 @Resource(JSR250,来自jdk),默认根据名字 (如果 有名字,根据名字匹配;如果没有名字,先根据名字查找,如果没找到,再根据类型查找);也可以通过name或type属性 指定根据名字 或类型找。也可以使用@Primary指定默认
@Resource
@Resource(name="studentDao1")
@Resource(type=StudentDao.class)
自动注入方式三:@Inject(JSR330),额外引入javax.inject.jar,默认根据类型匹配
利用Spring底层组件进行开发 (三层组件+扫描器方式)
能够供我们使用的组件,都是Aware的子接口,即XxxxAware
以ApplicationContextAware为例:实现步骤
实现ApplicationContextAware
重写其中的方法,都包含了一个对象。只需要将该对象 赋值到属性中即可
@Component("myComponent")  //id  name
public class MyComponent implements ApplicationContextAware{
        private ApplicationContext applicationContext;
    @Override
    public void setApplicationContext(ApplicationContext applicationContext) throws BeansException {
        System.out.println("------"+applicationContext);
        this.applicationContext= applicationContext ;
    }
}
有什么用:例如ApplicationContextAware,可以通过该接口 获取到Ioc容器对象。
执行时间:如果在main()中new Ioc容器: 先执行ApplicationContextAware实现类中的方法,通过该方法传入IoC容器 供我们自己使用; 然后再将该容器通过new返回给用户
BeanNameAware:
@Component("myComponent")  //id  name
public class MyComponent implements BeanNameAware {
        private String beanName ;
    @Override
    public void setBeanName(String name) {
        System.out.println("获取当前bean的name"+name);
        this.beanName = name ;
    }
}
环境切换:@Profile
Spring:切换环境
    @Profile("myApple")
    @Bean("apple")
    public Fruit apple(){
       return new Apple() ;
    }
    @Profile("myBanana")
    @Bean("banana")
    public Fruit banana(){
        return new Banana() ;
    }
激活方式一:
-Dspring.profiles.active=@Profile环境名
-Dspring.profiles.active=myApple
有什么用:可以用于切换数据库环境:
激活方式二:硬编码
坑:错误写法
ApplicationContext context = new AnnotationConfigApplicationContext(MyConfig.class) ;

ConfigurableEnvironment environment = (ConfigurableEnvironment)context.getEnvironment();
environment.setActiveProfiles("myBanana");
其中AnnotationConfigApplicationContext中有一个refresh()操作:会将我们设置的一些参数还原
没激活 |->进行激活 ->刷新 ->没激活
流程调整:
没激活->进行激活 | ->刷新
什么时候设置 保存点|: 配置类的编写处 IoC容器在使用时必须refresh() ;如果是有参构造,内部已经刷新;如果无参构造,需要手工刷新。
正确方式
//注解方式
AnnotationConfigApplicationContext context = new AnnotationConfigApplicationContext() ;
ConfigurableEnvironment environment = (ConfigurableEnvironment)context.getEnvironment();
environment.setActiveProfiles("myApple");
//保存点
context.register(MyConfig.class);
context.refresh();
Spring重要组件
接口BeanPostProcessor:拦截了所有中容器的Bean,并且可以进行bean的初始化 、销毁
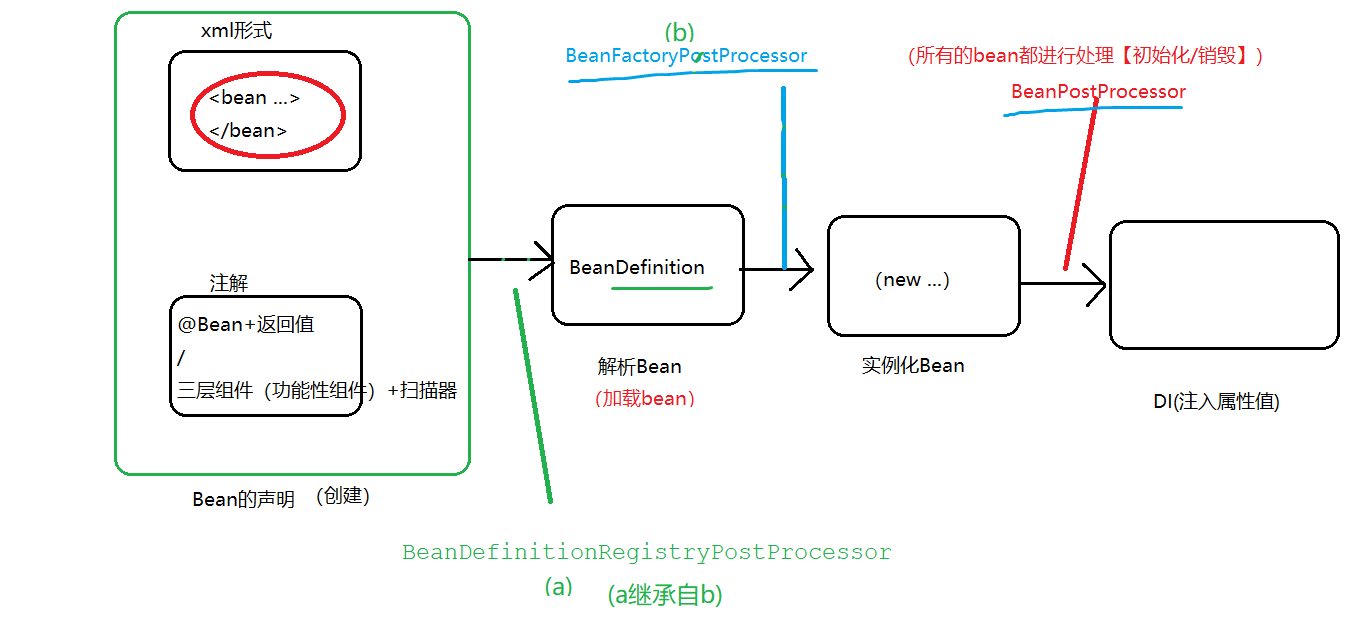
创建->初始化->使用…-》销毁
BeanPostProcessor

BeanFactoryPostProcessor:拦截了容器

BeanDefinitionRegistryPostProcessor:即将被加载之前(解析之前,称为BeanDefination对象之前)
BeanPostProcessor
@Controller //(4个)
public class MyXxx implements BeanPostProcessor {

    //拦截器
    @Override//bean:Student(zs)
    public Object postProcessBeforeInitialization(Object bean, String beanName) throws BeansException {
//        System.out.println("初始化:"+beanName+":"+bean);
//        bean.setName("ls")
        if(bean instanceof Student){
            System.out.println("MyXxx...初始化..");
            Student stu = (Student)bean ;
            stu.setStuName("zs123456");
            stu.setStuNo(123);
            return stu ;
        }
        return bean;
    }
    @Override
    public Object postProcessAfterInitialization(Object bean, String beanName) throws BeansException {
        if(bean instanceof Student) {
//            System.out.println("销毁:" + beanName + ":" + bean);
            System.out.println("MyXxx...销毁..");
        }
            return bean;
    }
}
BeanFactoryPostProcessor
@Component
public class MyYYY  implements BeanFactoryPostProcessor {
    @Override
    public void postProcessBeanFactory(ConfigurableListableBeanFactory beanFactory) throws BeansException {
//        beanFactory.getBeanDefinition("id");//根据bean的名字(id)获取bean
        int count = beanFactory.getBeanDefinitionCount();
        System.out.println("【b】&&&&&&&&&&&&&&容器中bean的个数:"+count);
        String[] names = beanFactory.getBeanDefinitionNames();//name->id <bean id ="">
        System.out.println("【b】&&&&&&&&&&&&&&容器中所有bean的名字:" +Arrays.asList( names  )   );
    }
}
BeanDefinitionRegistryPostProcessor
@Component
public class MyZZZ implements BeanDefinitionRegistryPostProcessor {
    //继承自BeanFactoryPostProcessor的方法    (bean的工厂)
    @Override
    public void postProcessBeanFactory(ConfigurableListableBeanFactory beanFactory) throws BeansException {
        System.out.println("【a后】postProcessBeanFactory:容器中注册的bean的数量:"+beanFactory.getBeanDefinitionCount());
        Object myBean = beanFactory.getBean("myBean");
        System.out.println( myBean.getClass().getName() );
    }
//    ApplicationListener,
    //BeanDefinitionRegistryPostProcessor接口自己的方法  (维护着容器中所有bean的注册信息)
    @Override
    public void postProcessBeanDefinitionRegistry(BeanDefinitionRegistry registry) throws BeansException {
        System.out.println("【a先】postProcessBeanDefinitionRegistry:容器中注册的bean的数量:"+registry.getBeanDefinitionCount());
        //额外增加一个:postProcessBeanDefinitionRegistry (可以为容器 额外增加一些bean的注册)
        //Orange
        BeanDefinitionBuilder beanDefinitionBuilder = BeanDefinitionBuilder.rootBeanDefinition(Orange.class);//产生BeanDefinition
//        beanDefinitionBuilder.getBeanDefinition();;//AbstractBeanDefinition
        registry.registerBeanDefinition("myBean", beanDefinitionBuilder.getBeanDefinition());
    }
}
BeanDefinitionRegistryPostProcessor(a) -》加载bean->BeanFactoryPostProcessor(b)->实例化bean->BeanPostProcessor
同一个方法 在不同地方(类、接口)的出现时机问题:
a继承b,因此a中必然包含b中的方法(记c ):虽然a和b中都有c,但是 因此c出现的时机不同, 则c的执行顺序也不同: 如果是在a中出现,则先执行;如果是在b中执行 则后执行
在同一个地方(类、接口),的不同方法的出现时机问题
监听器:
可以监听事件 ,监听的对象必须是 ApplicationEvent自身或其子类/子接口
方式一:
必须实现ApplicationListener接口,
//监听器
@Component
public class MyListener implements ApplicationListener {
    //监听对象
    @Override
    public void onApplicationEvent(ApplicationEvent event) {
        System.out.println("======="+event+"======");
    }
}
方式二:注解
(语法上 可以监听任意事件,但建议 ApplicationEvent自身或其子类/子接口) Spring:要让SPring识别自己,必须加入IOc容器(Bean+返回值| 注解+扫描器)
@Component
public class MyListener2 {
    //本方法是一个 监听方法
    @EventListener(classes = {ApplicationEvent.class})
    public void myListenerMethod(ApplicationEvent event){
        System.out.println("--0000000--------"+event);
    }
}
自定被监听事件
- 自定义类 实现ApplicationEvent接口(自定义事件)
发布事件
context.publishEvent(自定义事件);//创建一个事件并发布 context.publishEvent(new ApplicationEven("my event...")) ;或
public class MyEvent3 extends ApplicationEvent {
public MyEvent3(Object source) {
    super(source);
}
}
MyEvent3 evn = new MyEvent3("my Event3..."); context.publishEvent(evn) ;


